David's Astronomy Pages
|
Notes (S170) |
Notes (Main) |
Home Page |
Notes (S197) |
|
|
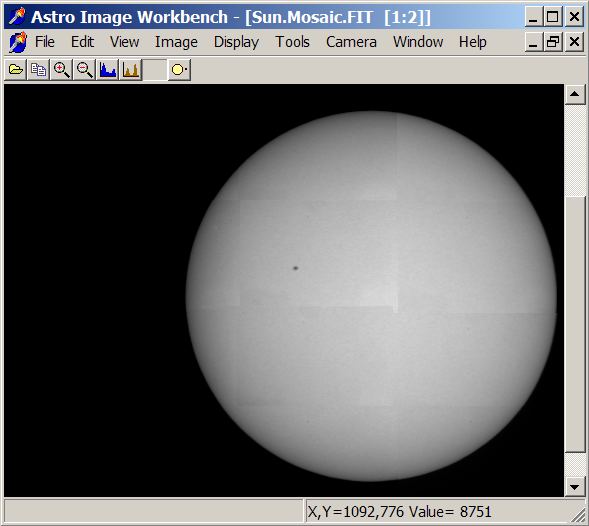
Introduction I have only recently acquired a Solar Filter and this session (S179, 2007-03-02) was my first observation of the Sun with my LX200 scope. The main objective of the session was to gain experience with the Solar Filter and the exposure settings required for imaging the Sun using my CCD camera. It was hoped that image of the Sun disk could be recorded, together with detailed images of any sunspots. The relatively long focal length of my
scope (LX200) and the relatively small FOV of the ST7e camera, meant
that an complete image of the sun's disk could only be recorded by means
of a mosaic of frames. Equipment & Software Equipment : Software - Imaging : TheSky (Software Bisque), CCDSoft (Software Bisque), AIS (Own software) Software - Mosaic Construction 1 : CCDSoft (Software Bisque), PaintShopPro (JASC software) Software - Mosaic Construction 2: Excel (Microsoft), AstroImageTool (Own Software), CCDSoft (Software Bisque), PaintShopPro (JASC software) Imaging The first problem encountered was getting the LX200 aligned with the Sun. The methods used for nighttime alignment, Telrad viewing of alignment star, could not be applied to daytime work. Instead alignment was performed by combination of roughly pointing the scope in the direction of the Sun followed by a series of trial and error images / telescope adjustments until the Sun was eventually located. Even with the off-axis Solar Filter in place (76mm\3.00" clear aperture), an additional filter was required to reduce the brightness of the sun and allow non-saturated exposures at the minimal exposure time (0.11s) of the ST7 camera. A B-Band filter was used for this purpose. The telescope was already approximately focused from previous nighttime imaging, but the focusing was tweaked by visually examining the sharpness of the sun's edge and a sunspot in a series test images. Once aligned the Mosaic tool in TheSky was used to define mosaic frame locations, and my Mosaic Acquisition facility in my own AIS Software Tool was used to shoot the frames.
After acquiring a mosaic set in 2x2 binned images, images of the single visible sunspot (944) were acquired using 1x1 binned images. Finally a set of flat frames were taken, by pointing the scope away from the sun and by covering the front of the scope with a white teeshirt. Images were reduced using Dark Frames and the Flat Frames. Artifacts associated with dust motes still remained in the reduced images, showing that the acquired flat frames were less than perfect. |
|
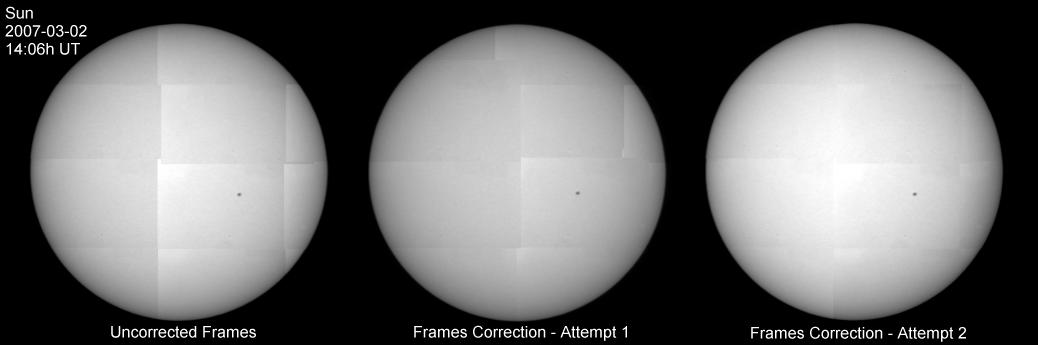
Mosaic Construction - 1 The first attempt and mosaic construction comprised two stages :- a) conversion of FIT images into Bitmap images using my AstroImageTool software. A single black-white range was used. This was chosen as the range that best suited the majority of the images. b) mosaic compilation in PaintshopPro.
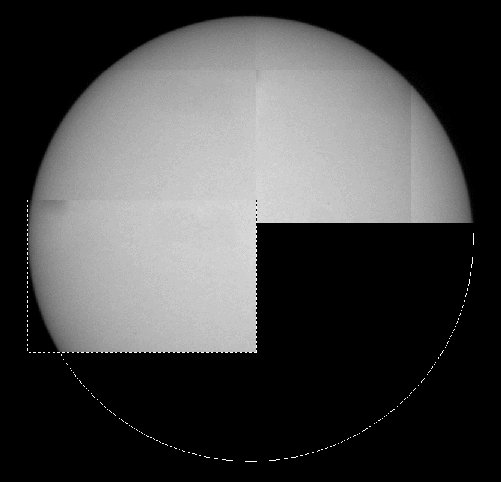
Where certain frames appeared too bright,
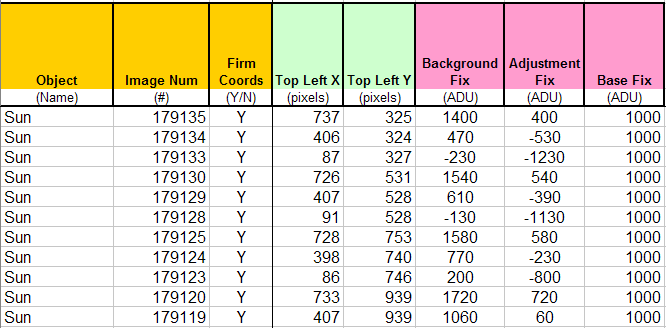
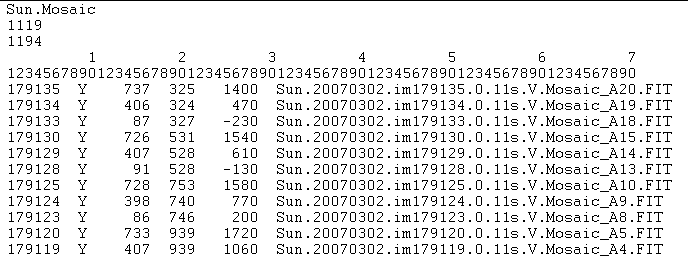
these were individually darkened and replaced on the mosaic. Mosaic Construction - 2 A second attempt to improved the quality of the Mosaic was made a few days later, based around the method previously developed for building a mosaic of M31 where the brightness of each frame had to be individually set using a 'trial & error" approach, within a workflow where the mosaic construction was automated by software application(s). a) Individual frames where again individually placed onto a base picture, using the sun edges and the outline diameter, for the sole purpose of recording the x,y coordinates of each frame. b) Coordinates of each each frame were typed into an Excel Mosaic Worksheet, from where a Mosaic definition file was output
b) A Mosaic definition file (.prn file) is output from the Excel Mosaic Worksheet using a VBA script.
d) A 'Compile Mosaic' facility in my AstroImageTool Software then compiles individual FITS images into a larger Mosaic FITS image.
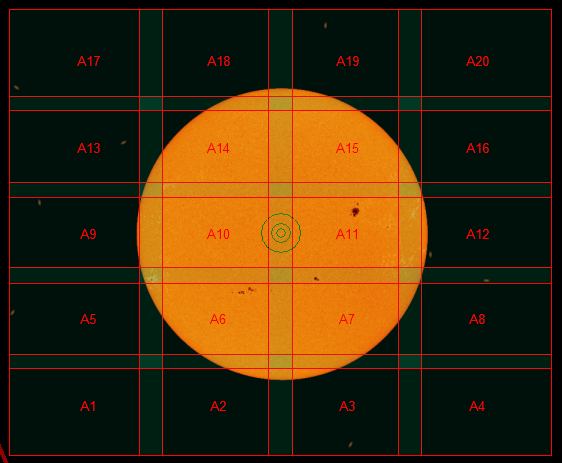
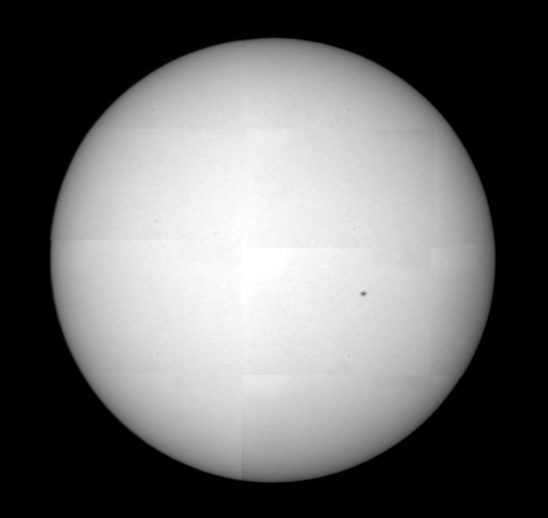
e) The Mosaic image is examined and a brightness adjustment is estimated for any frames that are judged too bright or too dark. Adjustment values are entered into the Mosaic's Excel Workbook and steps c-d are then repeated until the Mosaic product is considered okay. The following montage shows the Mosaic of the Sun without brightness fixes, with fixes applied during the Initial Construction attempt and the final Mosaic image. Joins between frames are still visible, but they are less marked than before. |
|
| Sun Mosaic - Final Product |
|
|
CCD Image Mosaic 0.11s exposure (average combine), 2x2 binning, Solar Filter + V filter 2007-02-14 14:06h UT (#179116-45) |
Back to Top
| This Web Page: | Notes - Session 179 (2007-03-02) |
| Last Updated : | 2015-05-16 |
| Site Owner : | David Richards |
| Home Page : | David's Astronomy Web Site |