David's Astronomy Pages
Notes - Session 600 (2017-01-18)
Notes
(S599.2)
Notes
Main
Home
Page
Notes
(S601)
David's Astronomy Pages
|
Notes (S599.2) |
Notes Main |
Home Page |
Notes (S601) |
The notes in the sections below describe the arrival, testing and first light
use on my new Guiding/Imaging Scope - a TS Photoline 80mm f/6 APO refractor. The
scope is part of a new
equipment plan for new/improved astro-imaging in 2017.
There are
also notes on new Orion XY Guidestar Finder
which arrived at same time as the new scope.
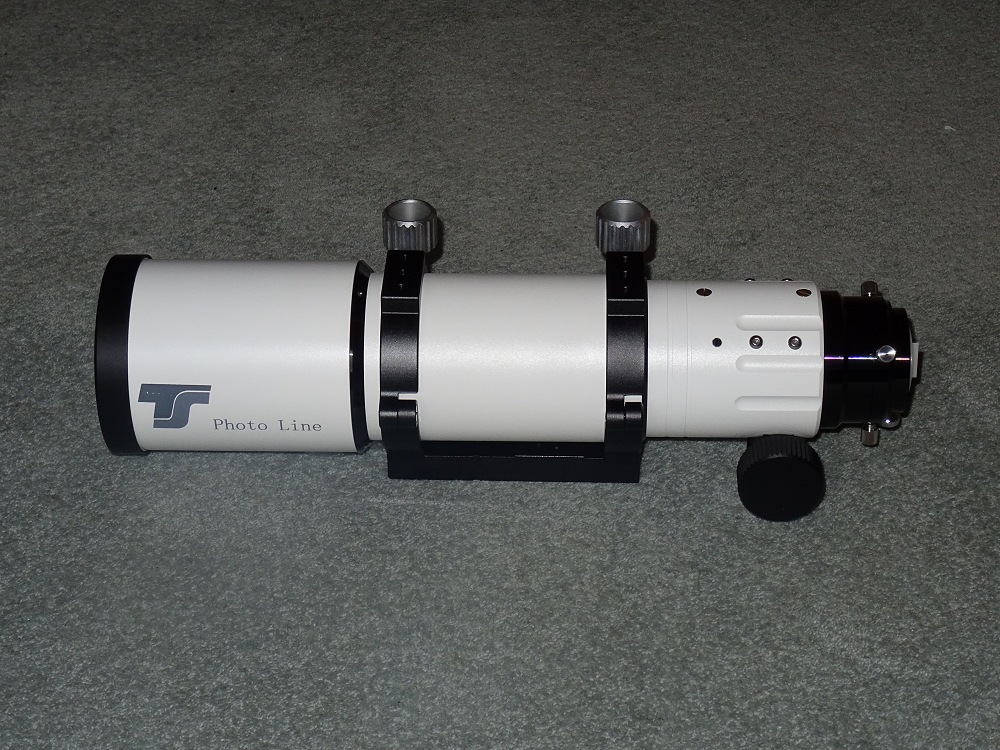
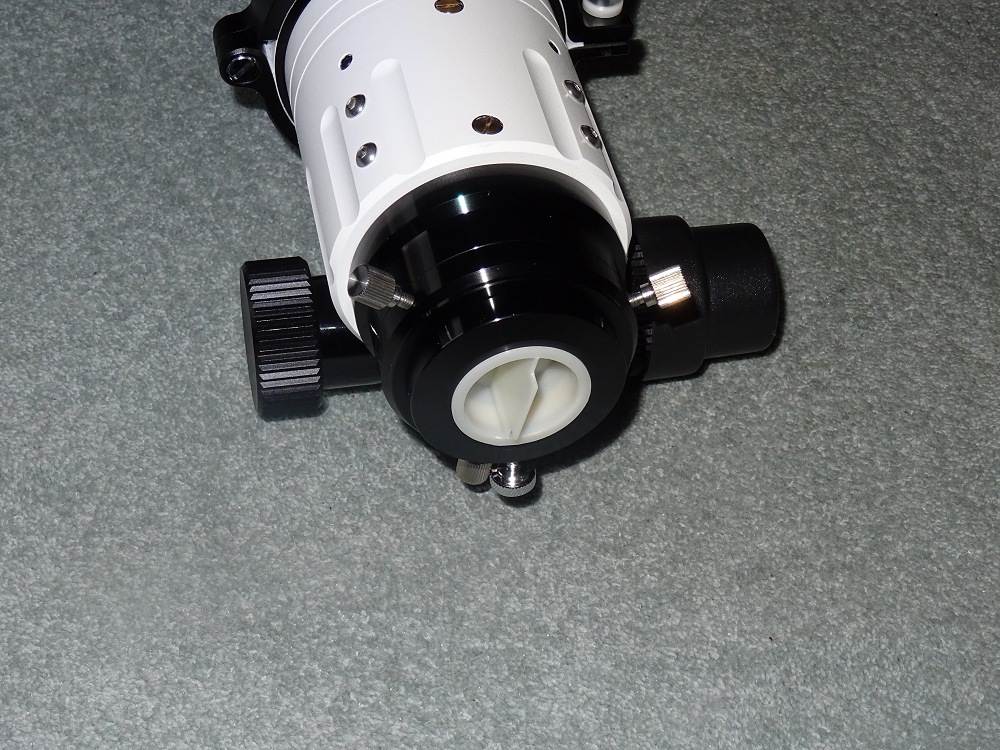
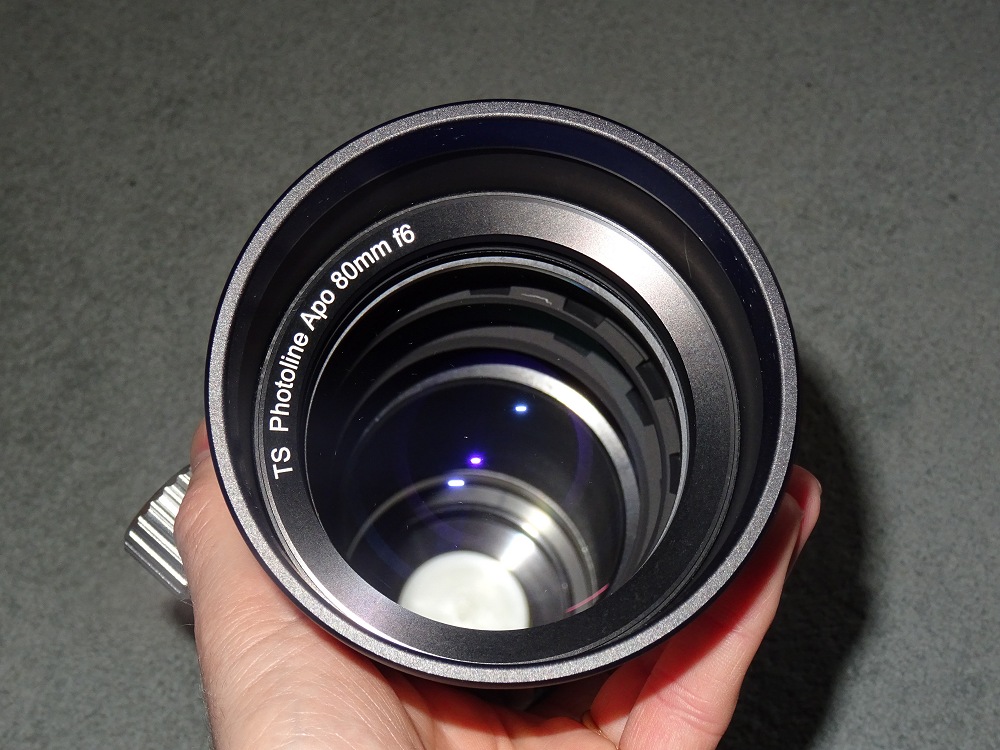
New Guiding/Imaging Scope (TS Photoline 80mm f/6 APO refractor) arrived today (2017-01-17). Pictures below:
| Views of the new TS Photoline 80mm APO scope |
||
| TS Photoline 80mm f/6 APO scope | Back End of TS 80mm APO Scope 2.1/2" Rack & Pinion Focuser, 2" and 1.1/4" adpaters |
|
 |
 |
|
| View looking into Front Lens of new TS 80mm APO scope |
||
 |
||
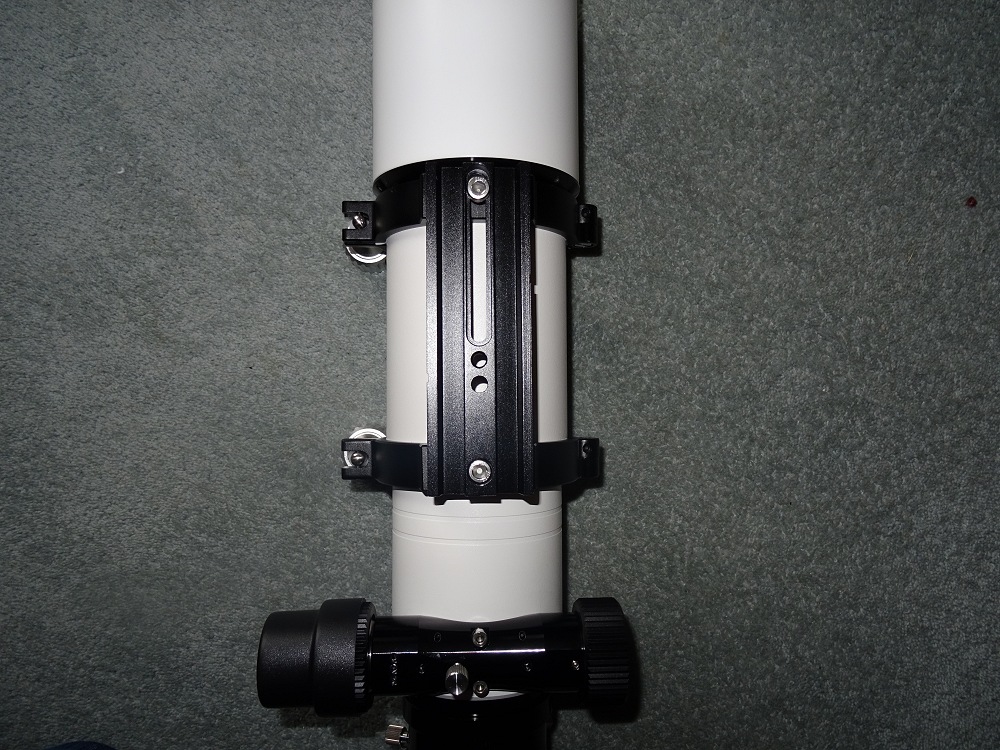
| CNC Rings, 3 holes on top / base of each tube ring 15mm (metric) spacings |
Vixen-style dovetail bar (single screw connection to each CNC ring) |
|
 |
 |
|
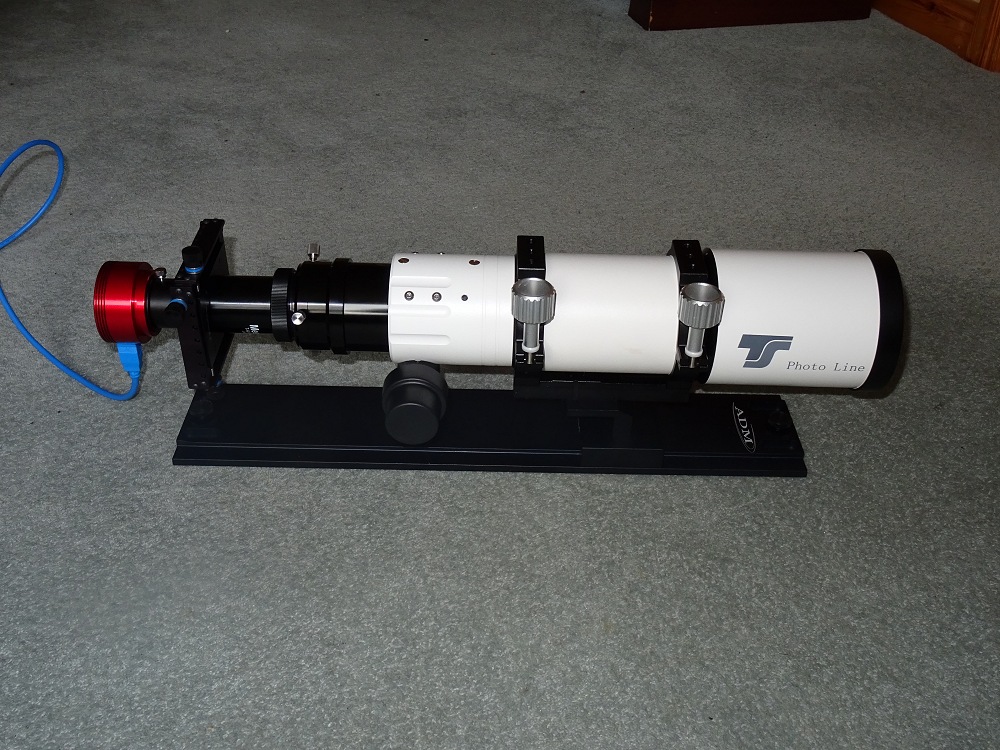
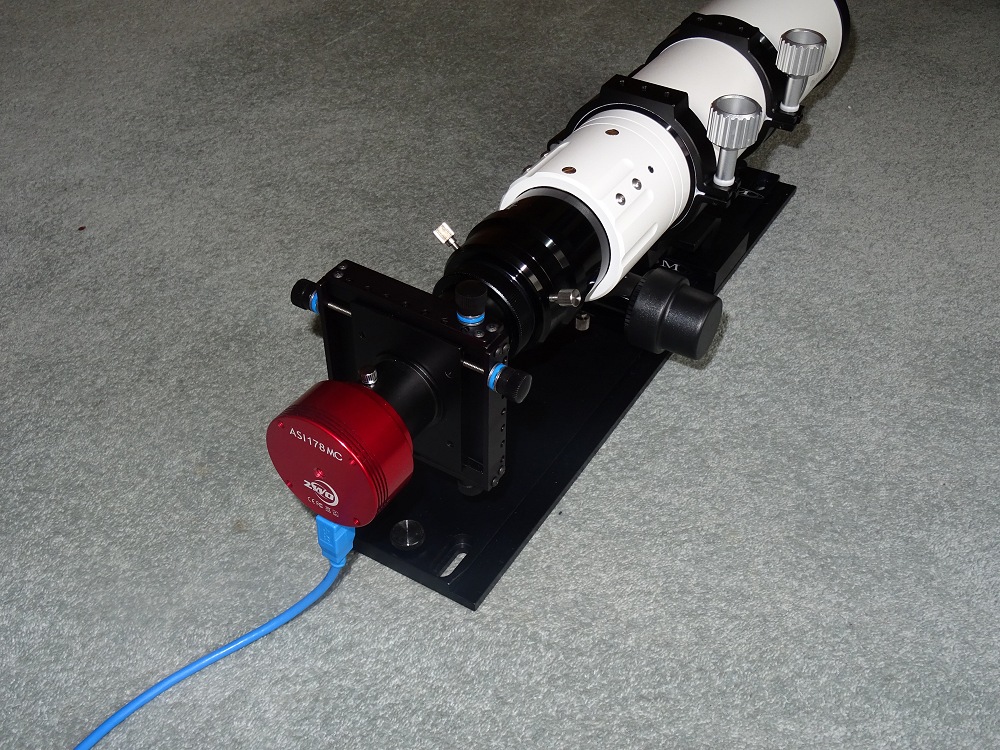
| New TS 80mm APO scope mounted temporarily on Losmandy-Style Dovetail Plate
using an ADM Camera Mount Scope is shown here connected to Orion XY-GuideStar Finder and ASI 178MC Camera |
||
 |
 |
|
Back to Top
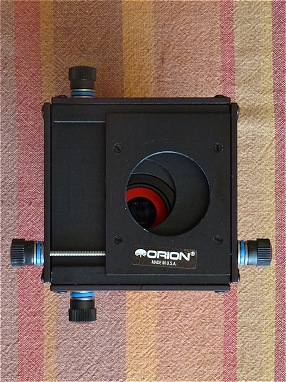
Orion XY Guidestar Finder also arrived today (along with new 80mm APO
refractor)
This is part of a new
equipment plan for the new astro-imaging in 2017.
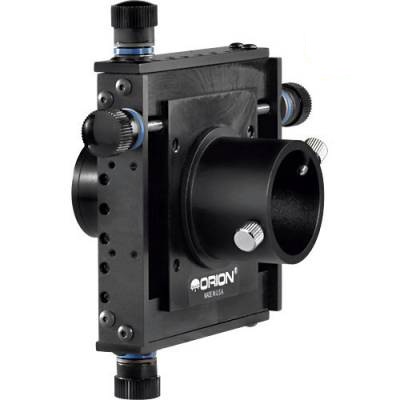
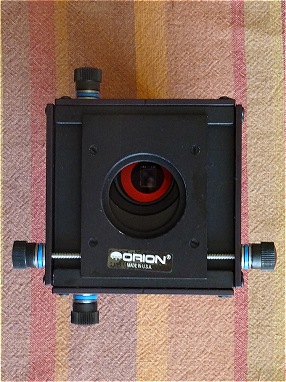
| Views of the new Orion XY Guidestar Finder The device provides +/- 13.8mm (0.54") adjustment in X and Y |
||
| Orion X-Y Guidestar Finder (Sales Picture) |
Orion X-Y Guidestar Finder (shown connected to camera and 80mm APO Refractor) |
|
 |
 |
|
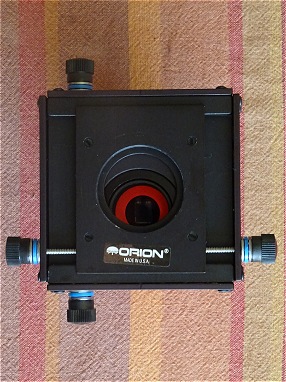
| Guidestar Finder - Centre Position | Centre Position (close-up) | |
 |
 |
|
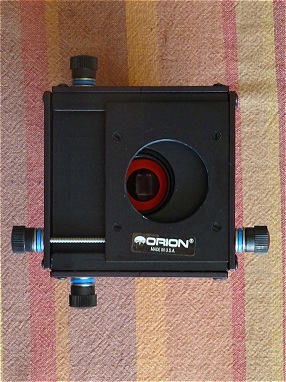
| Guidestar Finder - Top Position Y - 13.8mm |
Guidestar Finder - Bottom Position Y + 13.8mm |
|
 |
 |
|
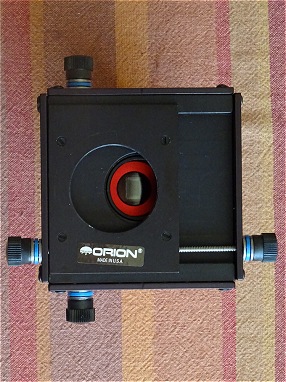
| Guidestar Finder - Left Position X - 13.8mm |
Guidestar Finder - Right Position X + 13.8mm |
|
 |
 |
|
| Guidestar Finder - Bottom-Left Position X - 13.8mm, Y + 13.8mm |
||
 |
The photos above show that the camera sensor (ASI 178MC) recieves good illumination when the Guidestar Finder is adjusted to top, bottom, left & right positions. However the camera sensor becomes partially covered when the Guidestar Finder is moved to either of the 4 corner positions. This may not be significant for autoguiding but is a clear limitation for astrophotography. However one would normally use a central (on-axis), position for best imaging. |
|
Back to Top
Daytime Tests
- Initial attempt with 26mm and 13mm eyepieces sitting in
the scope's 1.1/4" adapter failed completely.
A distant object
couldn't be brought into focus with the rack & pinion focuser, even when
positioned at it's maximum tube extent. This was surprising, was there something
wrong ?
- Removing the eyepiece and adapter revealed a clear large inverted
focussed image when
looking from a position some distance behind the
scope, showing that nothing was fundamentally wrong.
- Tried again with
eyepieces using a 1.1/4" and 2" diagonals that increased the optical path, and
this time
I got good focussed visual views. (using an extension
tube in place of a diagonal should permit
straight-through viewing if
required - this wasn't actually actually tried but it should work)
- Canon
EOS 400D camera connected to scope using EOS-T2 adapter and T2 extension
tubes
Took series of images using EOS Utility software.
- ZWO
ASI178MC camera connected to scope using T2 extension tubes
Took
series of images using SharpCap.
| Visual view through 80mm f/6 scope (no eyepieces) showing large inverted image | ||
 |
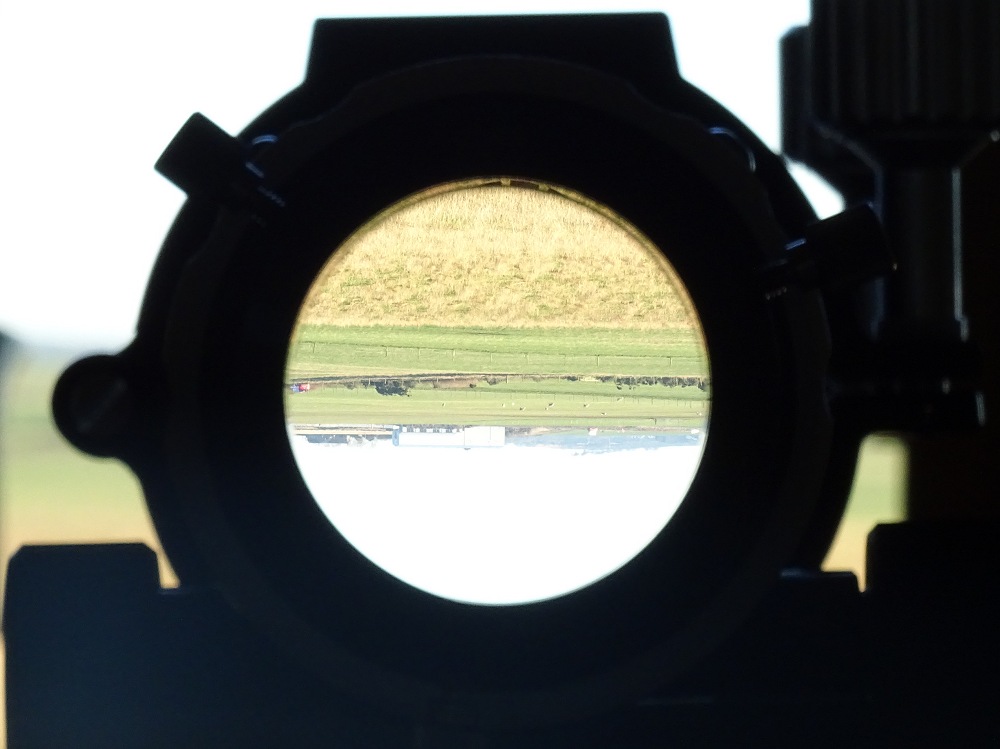 |
|
| Imaging Tests with Canon EOS 400D camera | ||
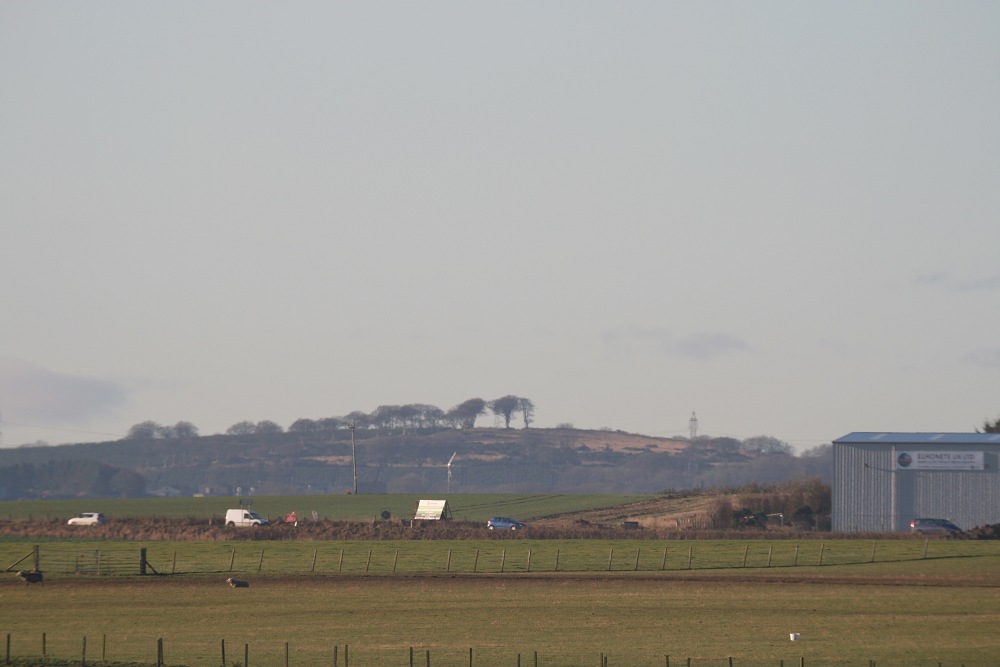
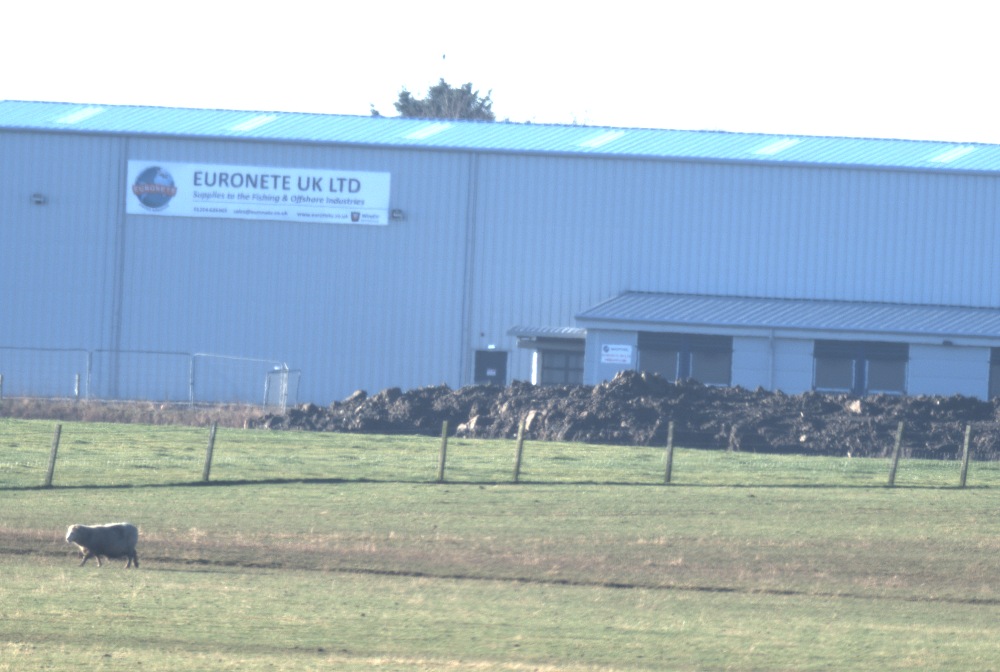
| Euronete Building - 2180m distance | Hill - 5100m distance | |
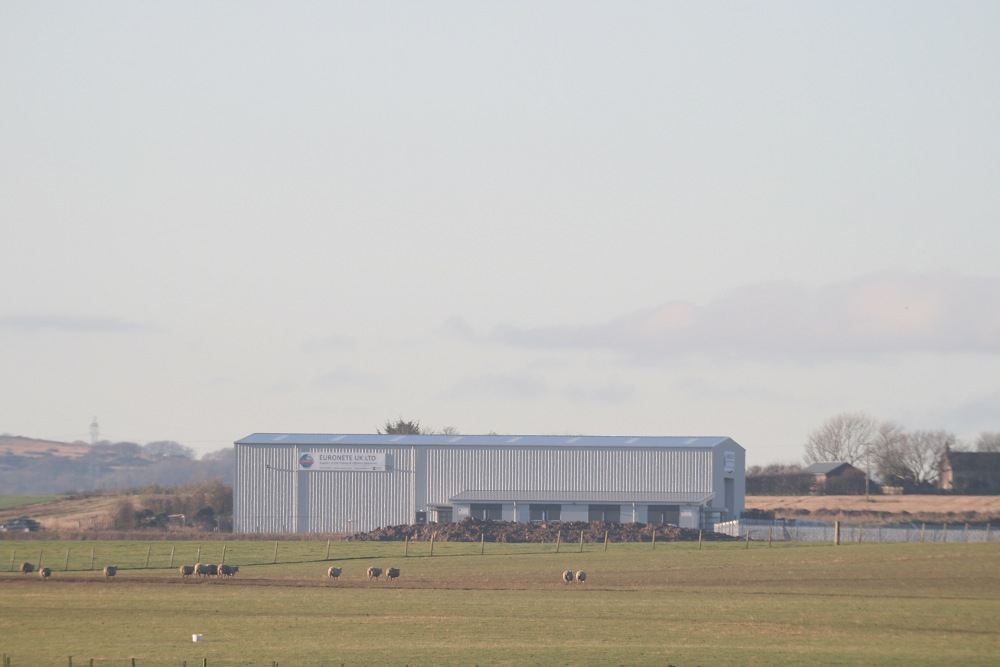 |
 |
|
| Canon EOS 400D, 1/250s, ISO 100 (reduced in size from original image) |
Canon EOS 400D, 1/400s, ISO 100 (reduced in size from original image) |
|
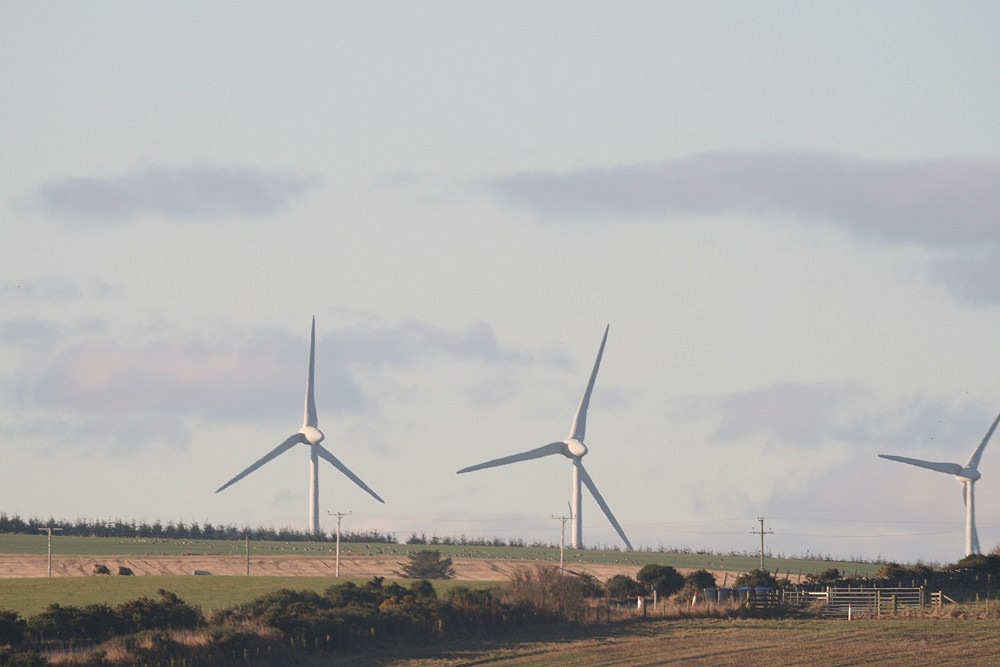
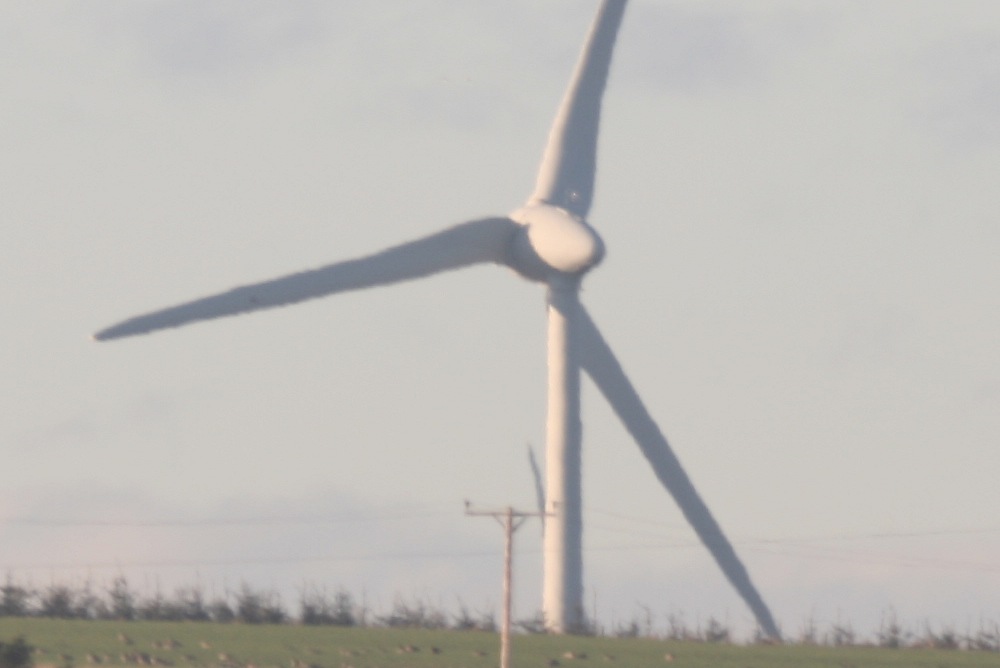
| Wind Turbines - 5900m distance (check!) | Wind Turbine - detail | |
 |
 |
|
| Canon EOS 400D, 1/320s, ISO 100 (reduced in size from original full frame) |
Canon EOS 400D, image details as left (cropped from original image) |
|
| Imaging Tests with ZWO ASI178MC camera | ||
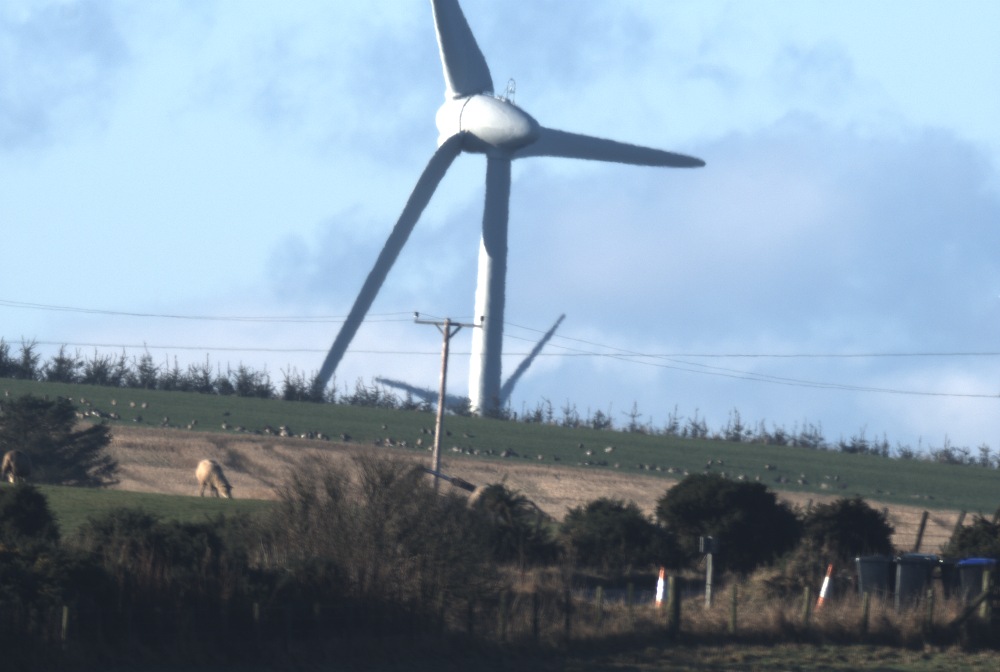
| Wind Turbine - 5900m distance (check!) | Wind Turbine - detail | |
 |
 |
|
| ZWO ASI 178MC, 1/320s, ISO 100 (reduced in size from original full frame) |
ZWO ASI 178MC, image details as left (cropped from original image) |
|
| Euronete Building - 2180m distance | Wind Turbines - detail | |
 |
|
|
| ZWO ASI 178MC, 4ms, gain 84 (reduced in size from original full frame) |
ZWO ASI 178MC, image details as left (cropped from original image) |
|
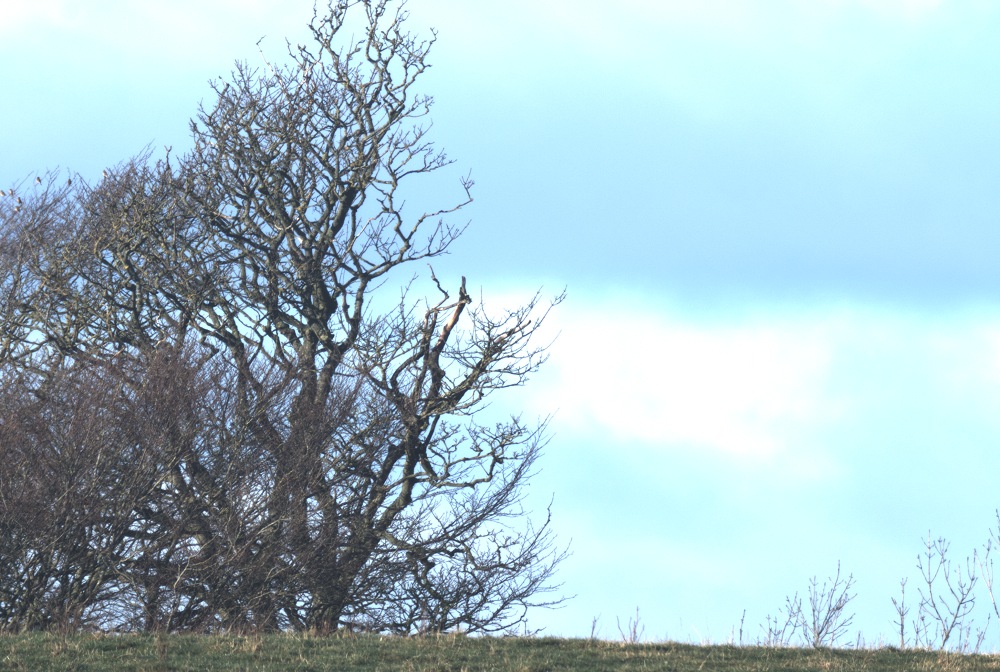
| Trees - 720m distance | Trees - 720m distance | |
 |
 |
|
| ZWO ASI 178MC, 8ms, gain 0 (reduced in size from original full frame) |
ZWO ASI 178MC, 8ms, gain 0 (reduced in size from original full frame) |
|
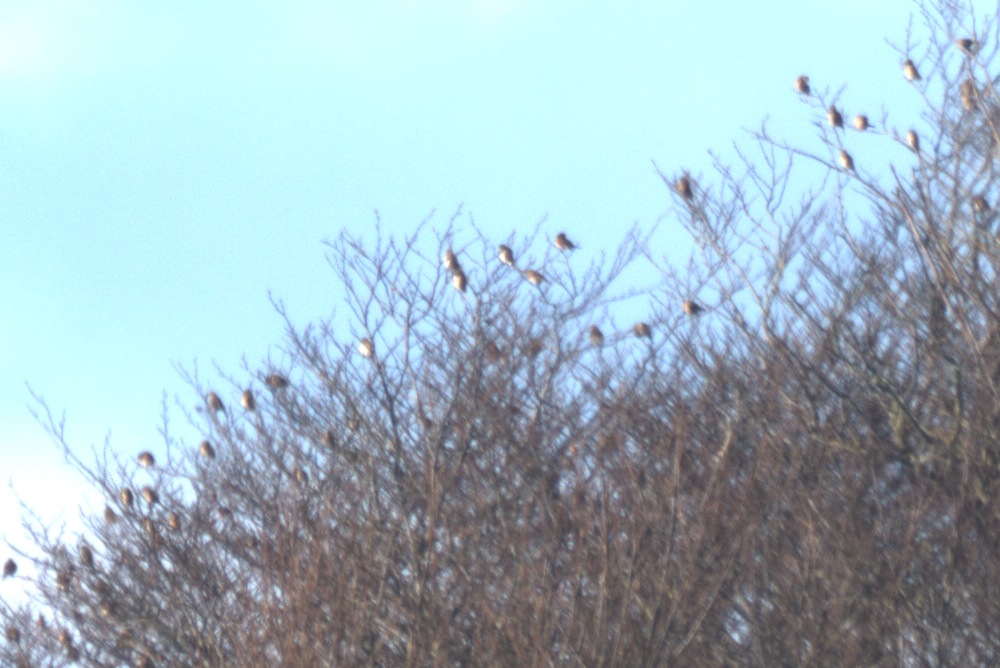
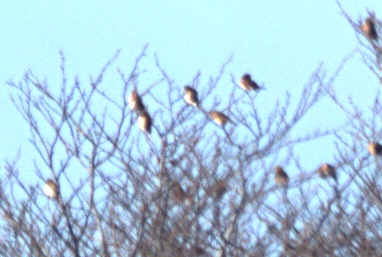
| Birds in Tree - 720m distance | Birds in Tree - detail | |
 |
 |
|
| ZWO ASI 178MC, 8ms, gain 0 (cropped & reduced in size from original full frame) |
ZWO ASI 178MC, Image details as left (cropped from original full frame, unsharp masked) |
|
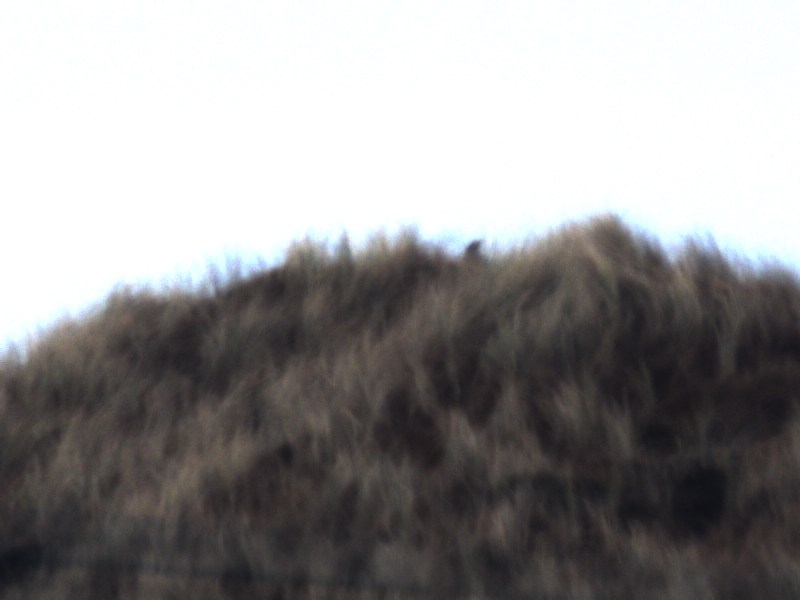
| Telesgraph Pole - 190m distance | Rabbit on Dune - 1650m | |
 |
 |
|
| ZWO ASI 178MC, 8ms, gain 0 (reduced in size from original full frame) |
ZWO ASI 178MC, Image details as left (cropped from original subarea frame) |
|
Back to Top
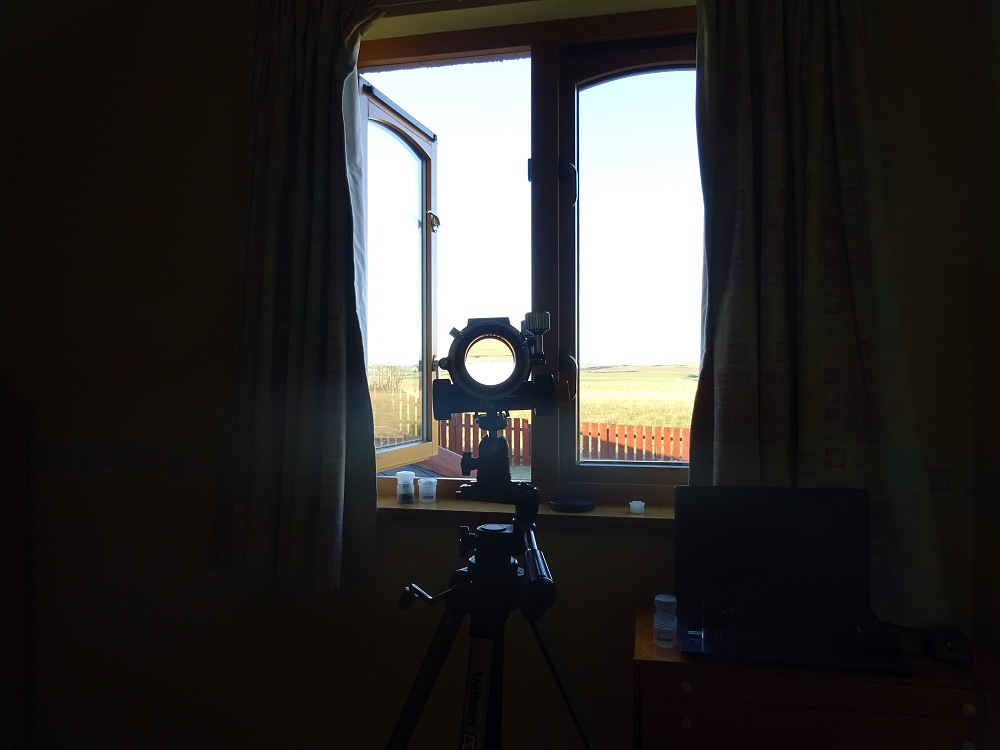
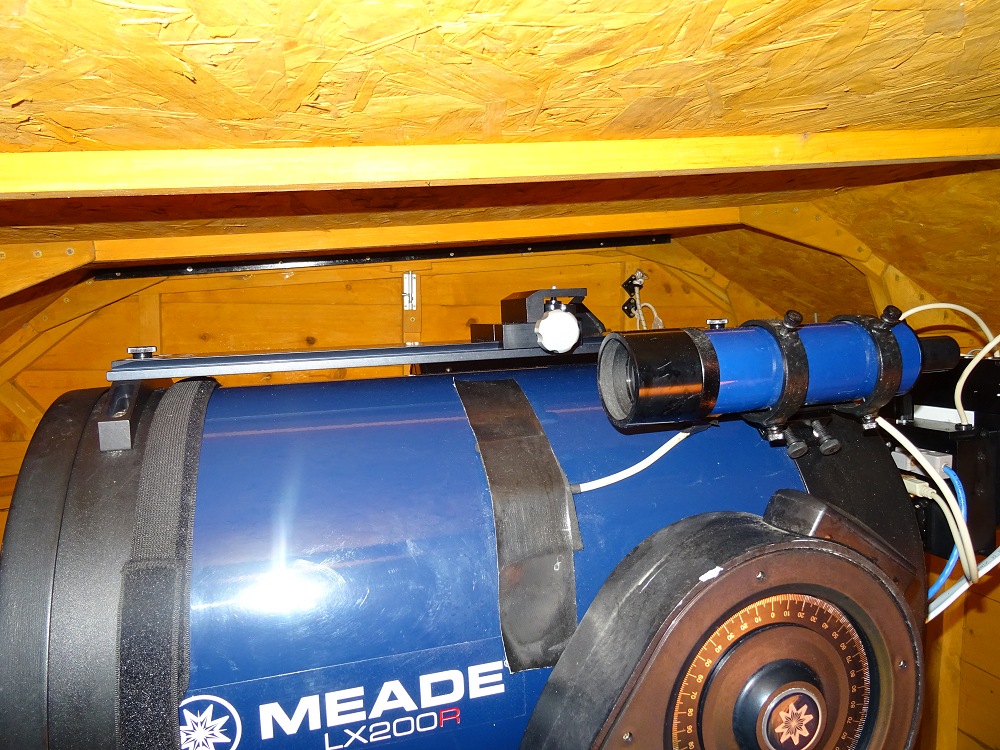
- The new scope is to be mounted to a 3" wide Losmandy dovetail rail attached
to my 12" LX200R main scope.
- The precise fixing to be used was one of the
uncertainties at time new scope was purchased, which wouldn't
be resolved until the new scope arrived and it could be properly examined
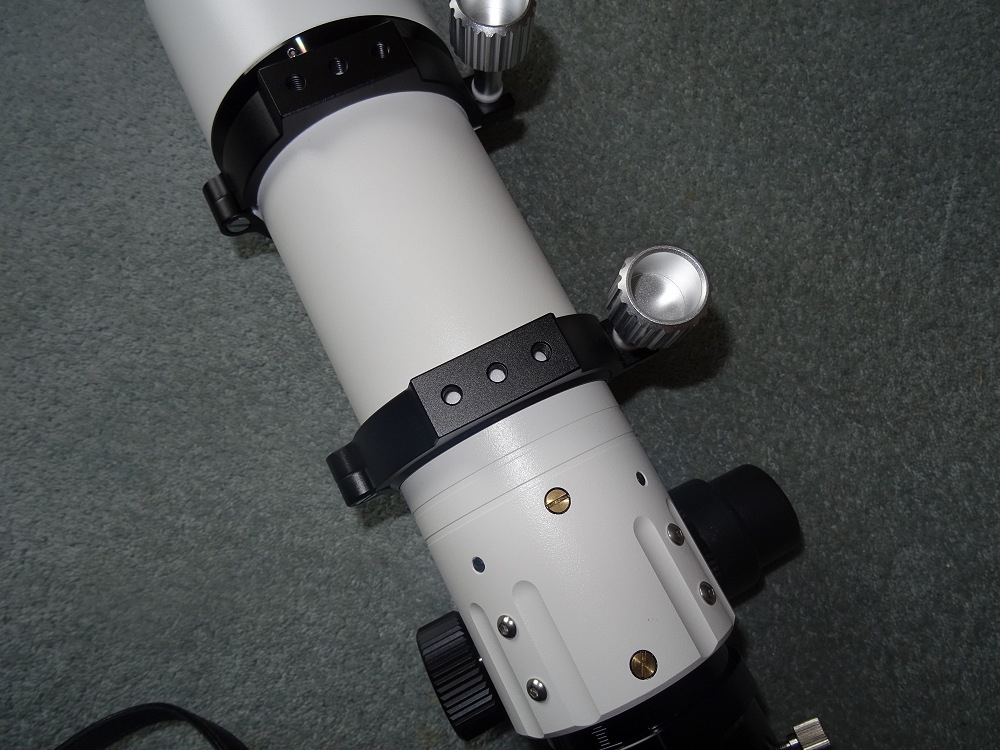
- The TS Photoline 80mm APO comes fitted with a pair of CNC Tube Rings
attached to a Vixen Style Dovetail bar.
- The CNC Tube Rings have 3 holes at
Top and Base. The holes have 15mm spacing (ie Metric Scale)
- This prevent
double bolt fitting to traditional ADM/Losmandy D-Series Dovetail Clamps which
have 1/2" spacing.
- The Tube Rings appear to be securely fitted to the
Vixen Style dovetail, even though there is only one bolt on each ring.
- Given the difficulty of finding a better solution it is proposed to purchase
an 'ADM Losmandy to Vixen Female Adapter' for
mounting the scope to
the Losmandy dovetail rail. In meantime the scope can be mounted, though
in a less firm manner,
by attaching the scope to a Camera Mount on
the LX200R with 1/4" screw.
- The nature of my shed observatory means
that I don't have the head-space below the roof to permanently connect
the TS 80mm APO scope to the LX200R main scope, and will need to attach /
deattach the 80mm APO refractor at
start and end of each session.
- The final method for mounting the TS 80mm APO was eventually decided on 2017-01-26 after successful testing an ADM Universal Adapter Block
| Views of the new TS Photoline 80mm APO scope |
||
| CNC Rings, 3 holes on top / base of each tube ring 15mm (metric) spacings |
TS Vixen Level dovetail bar (PS14 / 138mm long) (single screw connection to each CNC ring) |
|
|
|
|
|
| New TS 80mm APO scope mounted temporarily on Losmandy
Dovetail Plate and connected to Orion XY-GuideStar Finder and ASI 178MC Camera |
||
|
|
|
|
| Views showing Losmandy dovetail rail attached to top of
LX200R main scope (Note lack of room for permanently mounting the TS 80mm APO refractor) |
||
 |
 |
|
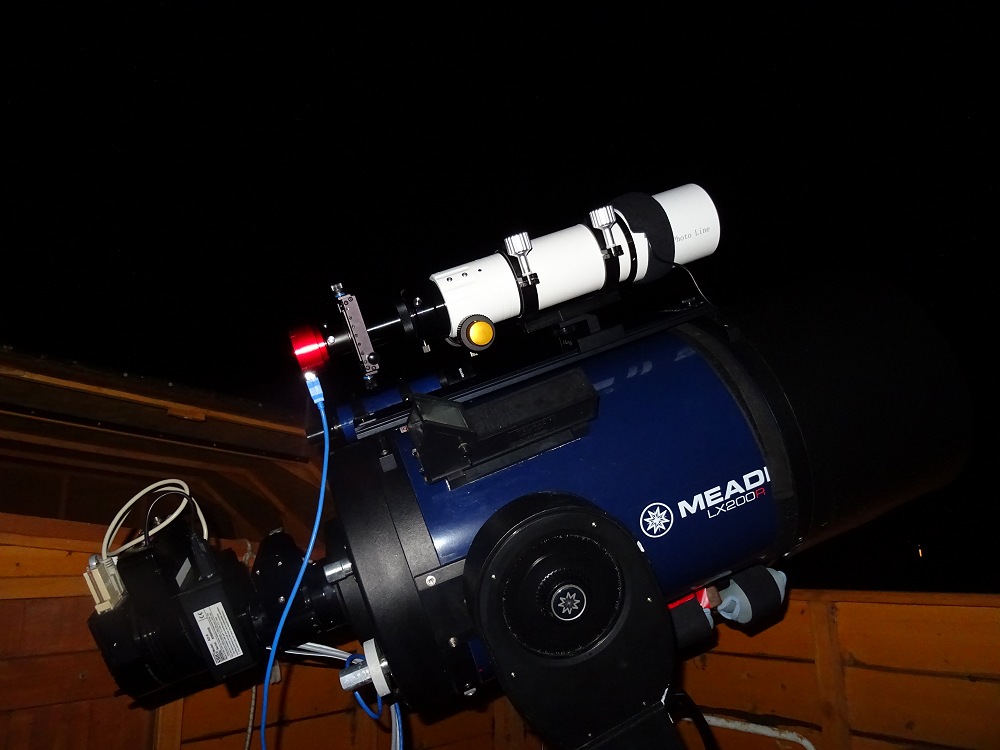
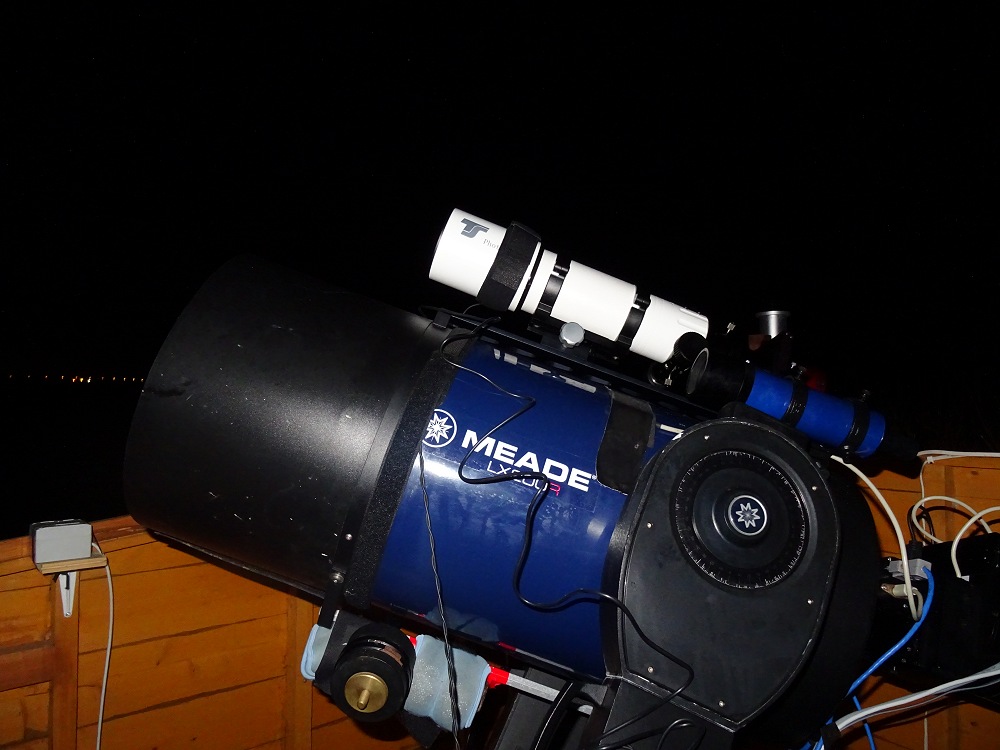
| First Light Mounting for TS 80mm APO refractor. Views showing new scope piggy-backed onto top of LX200 using a Camera Mount (This is a temporary arrangement - see notes on final mounting plan here) |
||
 |
 |
|
Back to Top
| ZWO ASI178MC colour camera and Orion XY Guidestar Finder connected to new TS Photoline 80mm f/6 APO refractor (mounted on top of 12" LX200R) |
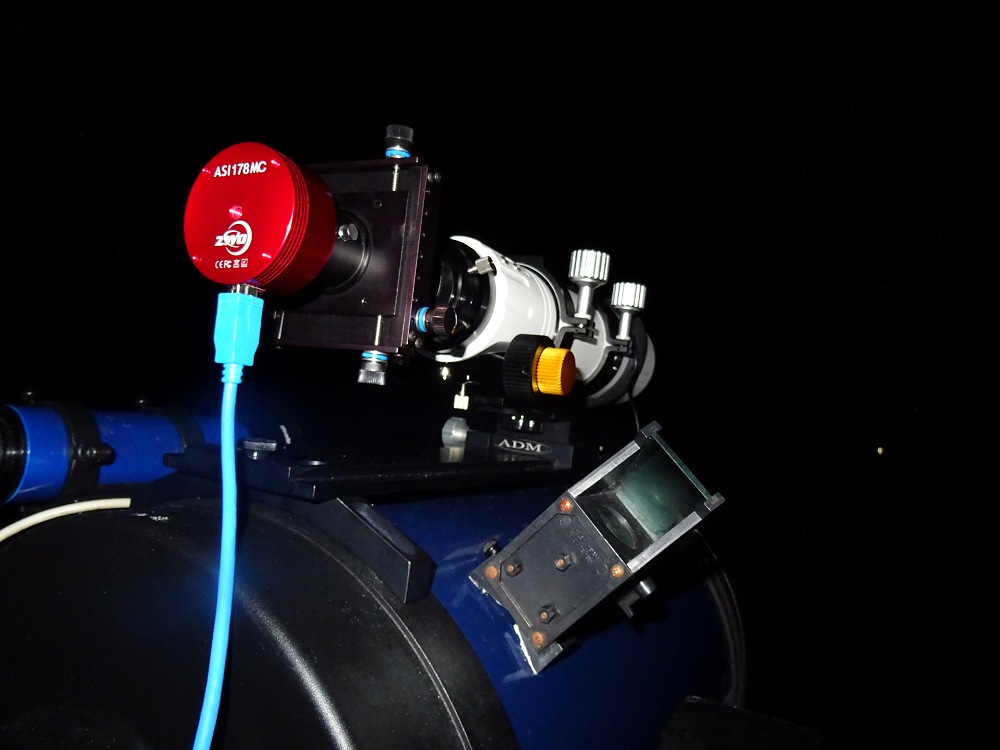 |
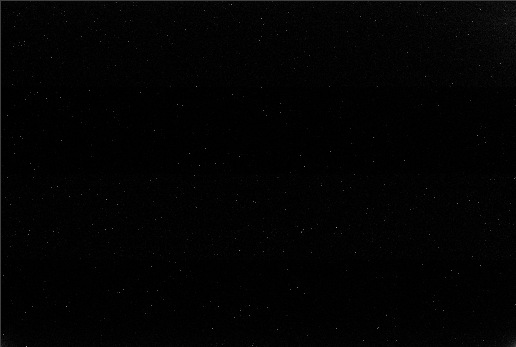
| First Light Image - M42 |
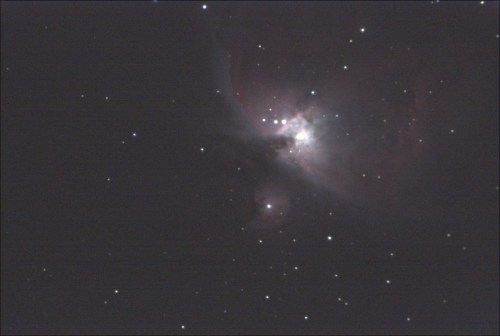 |
| CMOS Colour Image (Full Area, 16% size) 5s exposure, 300 gain, 1x1 binning, RAW16 2017-01-18 18:57h UT (#18_57_41Z / 0001) ZWO ASI178MC camera taken through TS 80mm f/6 APO |
Back to Top
During the second half of the session, the images taken with ASI178MC camera through TS 80mm f/6 APO refractor benefited from autoguiding. This was performed by CCDSoft using 2s exposures taken with ST10 camera through the 12" LX200 main scope. Sky conditions where relatively stable and autoguiding proceeded well for each of the targets.
To be completed ....
| Target | Time | Exp (s) |
No. Subs |
Autoguided | FWHM Median |
FWHM Range |
Aspect % Median |
Aspect % Range |
Curvature % |
Curvature Range |
Collination " |
|
| M42 | 18:57 | 5 | 15 | No | 2.2 | 2.13-2.28 | 80 | 77-84 | ||||
| M42 | 19:14 | 30 | 15 | No | 3.3 | 2.6-10.2 | 72 | 9-96 | Longer exposure | |||
| M1 | 21:54 | 10 | 146 | No | 2.4 | 2.21-2.55 | 71 | 63-82 | ||||
| M1 | 23:59 | 10 | 146 | Yes | 2.49 | 2.35-2.58 | 70 | 67-85 | 19.6 | 10.5-24.7 | 4.6" | |
| M51 | 01:02 | 10 | 50 | Yes | 2.23 | 2.18-2.29 | 81 | 78-83 | 14.9 | 8.8-19.9 | 1.4" | |
| M3 | 01:40 | 10 | 71 | Yes | 2.32 | 2.26-2.37 | 79 | 76-83 | 30.3 | 21.6-33.9 | 3.0" |
Back to Top
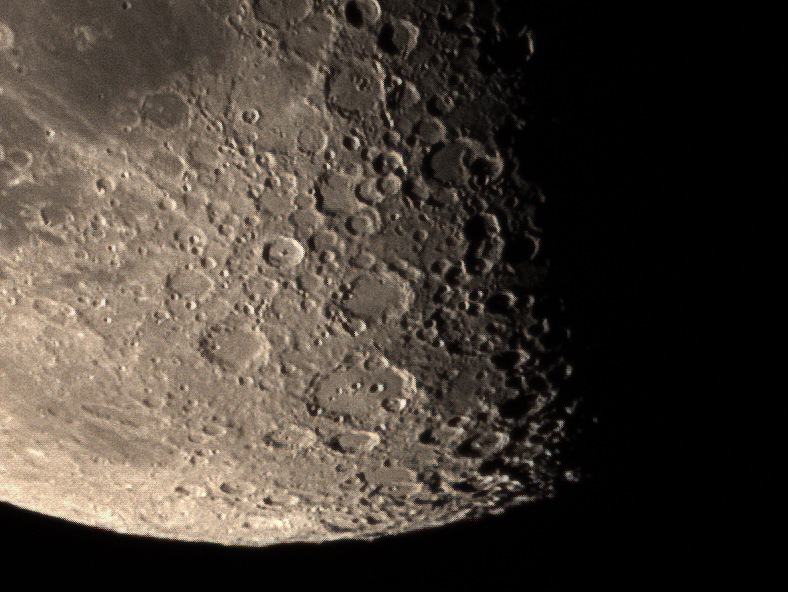
| Screen Shots showing Processing of a set of Lunar Images (02_31_50Z.ser) |
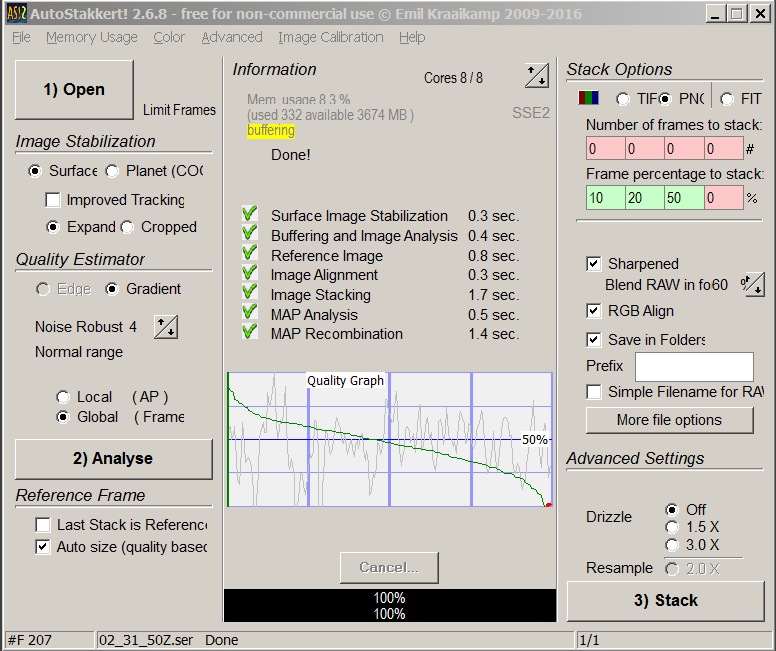 |
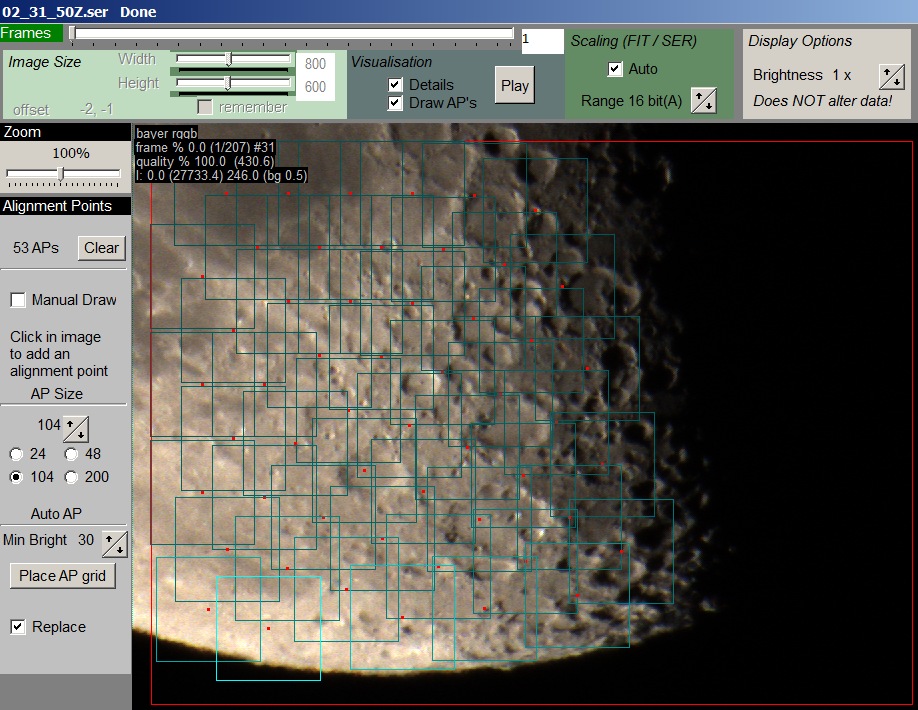 |
| Final Image |
 |
Back to Top
| Initially stacking of images of planet Venus (lying at
16 deg altitude) showed the effects of atmospheric dispersion (i.e. a red tinge on limb closest to horizon and a blue tinge on limb furthest from horizon) Image were then restacked using Autostakkert's RGB Align feature This is performed on a subpixel level after stacking (resampling!) [ At a future session I will try using a ZWO Atmospheric Dispersion Corrector (ADC), this is part of new equipment plan for 2017. Experimentation may begin using 80mm f/6 APO, before using it with 12" LX200 f/10 SCT where it is anticpated to provide the most benefit ] |
|||
| Stacked image without RGB align | |||
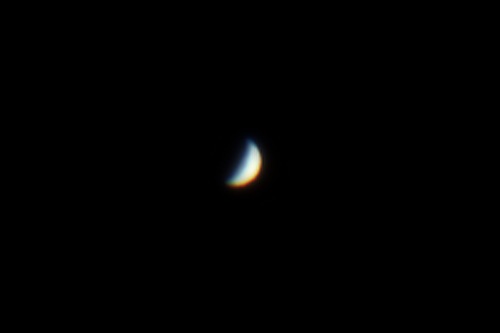 |
Image: Total Exposure: Subs/Exposure Details: Date/Time: Image Set: Equipment: Software: |
CMOS Colour Image (200% size) P20 Stacking, Best 62 frames from 311 Without RGB Align 124 ms (0.12 sec) 62 x 2ms, 1x1 binning Gain 0, Raw16, ROI 320 x 240 2017-01-18 18:32h UT (#18_32_24Z) TS 80mm f/6 APO + ASI178MC (OSC) mounted on 12" LX200R Frames acquired using SharpCap (SER) Stacked using Autostakkert 2 |
|
| Stacked image with RGB align | |||
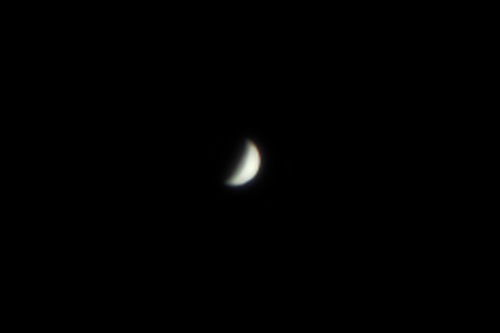 |
Image: |
CMOS Colour Image (200% size) P20 Stacking, Best 62 frames from 311 With RGB Align Image details a/a |
|
Back to Top
It was expected that the image of the TS 80mm f/6 APO would not be flat. The
products web page states:-
"The Photoline f/6 apo is suitable for
astrophotography without restrictions, but, as with any fast refractor, the
field has to be corrected for keeping the stars nicely round even at the edge.
For this, we offer the following options which are linked in the accessories
section ..."
These options being
- 2" field corrector
without change of the focal length (TSFlat2), inserted into the 2" adapter
-
2.5" field corrector without change of focal length (TSFlat2,5), screwed to the
M63 thread.
- 2" Photoline x0.79 reducer and corrector (TSRed279), inserted
into the 2" adapter
- 3" Photoline x0.79 reducer and corrector (TSRed379),
screwed to the M63 thread.
So with several options costing different amounts and with various pros/cons it was decided to hold from buying any corrector (with/without reducer) until the native f/6 APO scope had been characterised and requirements/tradeoffs could be better understood through actual use of the scope for various tasks.
The impact of curvature would likely be non-round stars towards the field edge, uneven focus across the field of view and uneven focus /star shape moving the XY finder between its +/-13.8mm limits.
Whilst the image might be reasonably flat for a relatively small sensor in ASI178MC camera (7.4 x 5.0mm), compared to a larger sensor in say a Canon EOS 400D camera (22.1 x14.8mm) for some tasks the sensor would be placed off-axis using Orion X-Y Guidestar Finder where field curvature effects would be potentially much larger. Working the XY finder at its +/-13.8mm limits means the area of possible placement of the ASI178MC sensor becomes effectively 35.0 x 32.6mm !. This is not dissimilar to the area of 35mm film (36 x 24mm).
To be completed ...
Back to Top
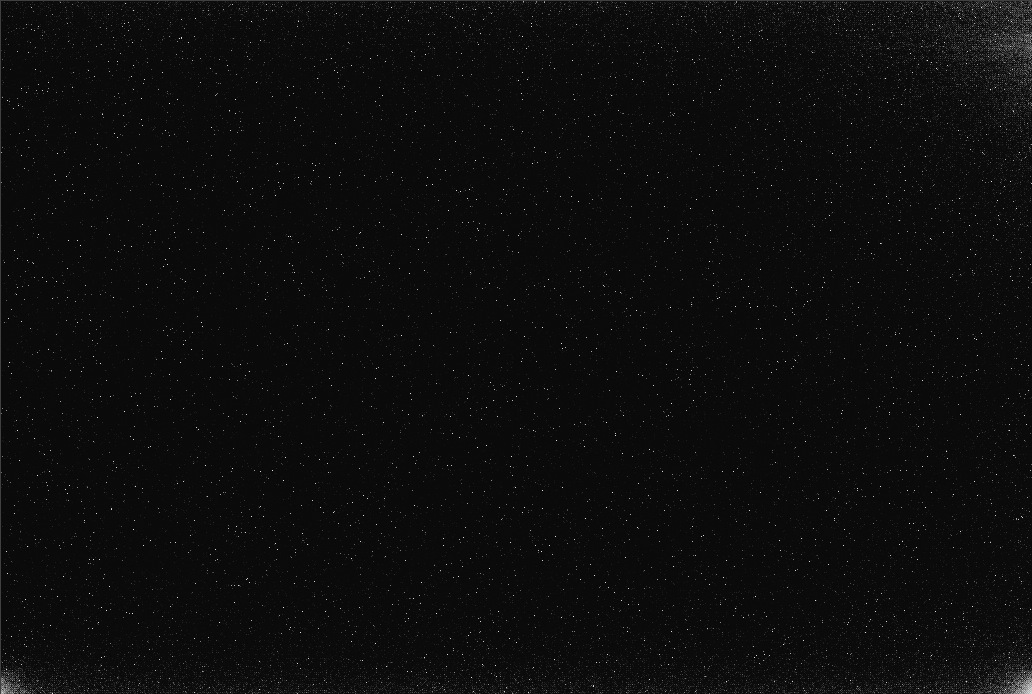
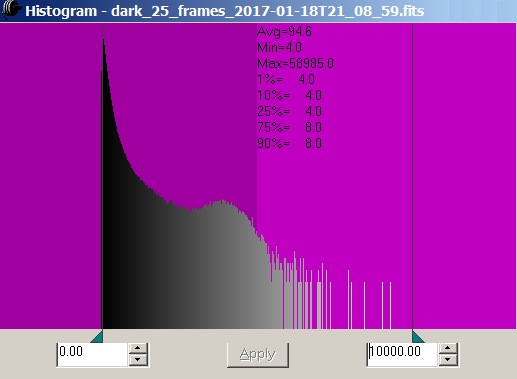
A master dark frame (RAW16, 3096x2080, gain 400, exp 10s) was acquired using SharpCap as an average of 25 individual frames The Master Dark was then used for the realtime (live) reduction of 10s light frames acquired during the session (S00600).
| Master Dark Frame (log scale, 16% size) Raw16, 3096x2080, gain 400, av. 25 x 10s (dark_25_frames_2017-01-18T21_08_59.fits) Levels adjusted to show the brighter areas in bottom-left, bottom-right and top-right corners |
 |
| [ Larger Size, 32% ] |
| Master Dark Frame (linear scale, 16% size) Master Frame details a/a ADU range 0 to 10000 The dark noise is very low apart from a few hot pixels |
 |
| The histogram for above Master Dark Frame indicate that 90% of pixels have ADU value of between 4 and 8. but there is collection of 'hot' pixels with a peak values around 3900 ADU and a set of defective pixels with value from 8000 to 58985 ADU. |
 |
Back to Top
A light artefact was noted whilst imaging a region of M45 (Pleiades). The
artefact is unexplained.
The artefact was present on multiple subframes
on one particular image sets. The artefact would seem to relate to light coming
from a particularly bright star located at a particular part of the field of
view. It it unclear if the artefact is due to some imperfection in
the APO lenses of the TS 80mm scope, some imperfection in the sensor (or glass
cut) or a light reflection inside the optical train.
| Light Artefact Reddish Patch to left of bright star |
|||
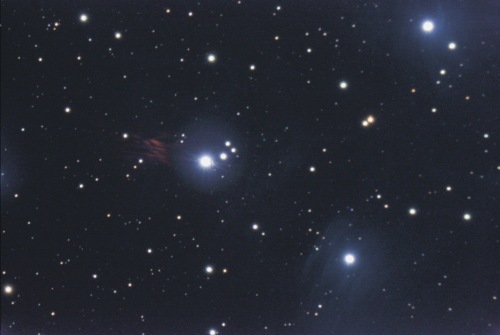 |
Image: Exposure: Details: Image ID: Date/Time: Equipment: Software: |
CMOS Colour Image (16% size) Live Stacking of 60 frames 10 min (60 x 10s) Binning 1x1, Gain 400, Raw16, ROI 3096x2080 #00_19_25Z 2017-01-19 00:19h UT ASI178MC (OSC) + TS 80mm f/6 APO Mounted on 12" LX200R Autoguiding using ST-10XME + 12" LX200R f/10 Frames acquired using SharpCap (Stack FIT) Processed using DeepSkyStacker Autoguiding using CCDSoft |
|
| Same star but re-positioned onto right hand side of
sensor (the 'light artefact' in previous image is clearly not a deepsky object) |
|||
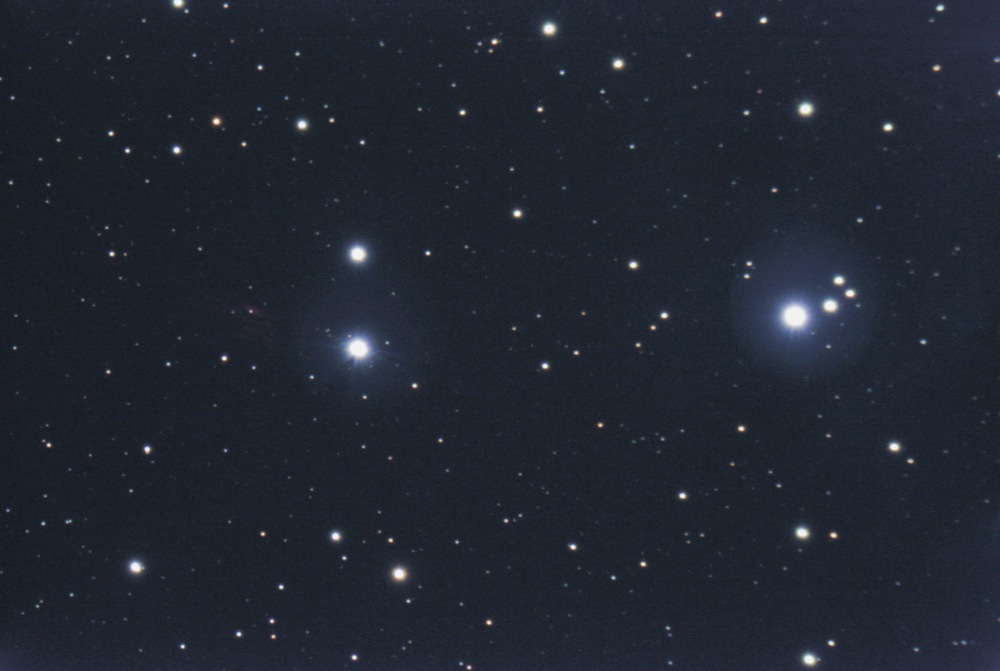 |
Image: Exposure: Details: Image ID: Date/Time: Equipment: Software: |
CMOS Colour Image (16% size) Live Stacking of 66 frames 11 min (66 x 10s) Binning 1x1, Gain 400, Raw16, ROI 3096x2080 #00_32_52Z 2017-01-19 00:32h UT ASI178MC (OSC) + TS 80mm f/6 APO Mounted on 12" LX200R Autoguiding using ST-10XME + 12" LX200R f/10 Frames acquired using SharpCap (Stack FIT) Processed using DeepSkyStacker Autoguiding using CCDSoft5 |
|
| Light Artefact - Detail Reddish patches to the left of bright star also a small yellow-white patch to the immediate right of star (are they related ?) |
|||
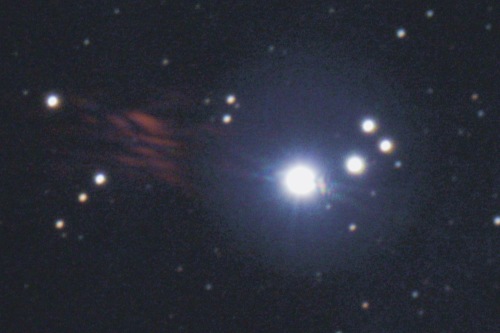 |
Image: Exposure: Details: Image ID: Date/Time: Equipment: |
CMOS Colour Image (50% size, cropped) Live Stacking of 60 frames 10 min (60 x 10s) Binning 1x1, Gain 400, Raw16, ROI 3096x2080 #00_19_25Z 2017-01-19 00:19h UT ASI178MC (OSC) + TS 80mm f/6 APO Mounted on 12" LX200R Autoguiding using ST-10XME + 12" LX200R f/10 |
|
| Light Artefact - Detail artefact to the immediate right of star artefact is present on each of the 60 subframes |
|||
 |
Image: |
CMOS Colour Image (100% size, cropped) Live Stacking of 60 frames Alternative Contrast Setting Image details as above |
Back to Top
Whilst trying to find a suitable workflow for displaying stacked colour
images the program called AIP4WIN was initially used to display Live Stacked
images from SharpCap or post-session stacked images from DeepSkyStacker.
It was quicker noticed however that brightest stars looked very unnatural
in the 'finished' display image, involving what seemed a supersaturated white
peak with a blue spilling in an upwards direction (see first image below)
It was assumed that the problem with the stars was due to the image being
saturated in all three colour channels due to the 10s exposure being simply too
long for correct handling of these brighter stars. However it is now
suspected the problem might be due to AI4WIN's handling of non-signed 16bit and
non-signed 32bit FIT images.
After eventually working out how to
display/manipulate images in DeepSkyStacker, it was discovered that the
DeepSkyStacker display didn't produce these ugly looking stars but instead
produced normal looking stars from the very same stacked FITS image file (see
second image below)
| Stacked Image created using DeepSkyStacker a) displayed in AIP4WIN |
|||
 |
IImage: Exposure: Details: Date/Time: Equipment: Software: |
CMOS Colour Image (40% cropped) P50 Stacking, Best 8 frames from 15 4 mins (8 x 30s) Binning 1x1, Gain 300, Raw16, ROI 3096x2080 ID #19_34_54Z. Non-Guided. 2017-01-18 19:34h UT ASI178MC (OSC) + TS 80mm f/6 APO Mounted on 12" LX200R Frames acquired using SharpCap (FITS) Stacked using DeepSkyStacker Displayed using AIP4WIN |
|
| b) displayed in DeepSkyStacker | |||
 |
Image: Details: Software: |
CMOS Colour Image (40% size,cropped) P50 Stacking, Best 8 frames from 15 Image details a/a Frames acquired using SharpCap (FITS) Stacked using DeepSkyStacker Displayed using DeepSkyStacker |
Back to Top
Further notes taken during continued testing and operation of ZWO ASI178MC camera with
different software.
CCD Inspector 2.5.3
32 bit images are unable to opened by CCDInspector (error message is given to
alert the user)
This means the CCDInspector is unable to open such files as
:-
32-bit .fts files produced by Live
Stacking Process in SharpCap
Back to Top
| This Web Page: | Notes - Session 600 (2017-01-18) |
| Last Updated : | 2017-12-01 |
| Site Owner : | David Richards |
| Home Page : | David's Astronomy Web Site |