David's Astronomy Pages
Notes - Session 604 (2017-11-14)
Notes
(S603)
Notes
Main
Home
Page
Notes
(S605)
David's Astronomy Pages
|
Notes (S603) |
Notes Main |
Home Page |
Notes (S605) |
Main aims of session were to test dual
scope/dual camera operation with autoguiding. The session
utilised
- 12" LX200 + ST-10XME for
imaging
- TS 80mm APO + ZWO ASI178MC for guiding
-
POTH Hub for multi-software access to the LX200 Mount.
- PHD2
for Autoguiding using ZWO ASI178MC camera and the LX200 Mount
- CCDApp2,
CCDSoft5 and TheSky6 for overall control of LX200 Scope and the main imaging
camera (ST-10XME)
This was the first time the APO Scope + ZWO ASI178MC camera had been used since Feb 2017, and I was therefore a little rusty in its use. However some key lessons were learned which will be helpful for future sessions. Not least was the finding/recognition that the APO scope should only be mounted after the LX200 Scope has obtained its GPS Fix otherwise the LX200 fails to start up correctly.
- Telescope API was selected as in TheSky6's Telescope Setup.
-
After clicking Connect Telescope, the POTH Hub duly opened up
- LX200
telescope operations worked fine throughout the session
- PHD2
successfully connected to ASI178MC camera and to the LX200 Scope (via POTH Hub)
- Guiding Calibration worked fine (once the existing Calibration was emptied)
- Looping/Guide Star Selection and Guiding worked fine except for due intervals
of cloud when the Guide Star was lost.
- Autoguiding worked remarkably well
and the majority of images taken by the main scope were useable
- Exposures
of up to 10 minutes were tried during the course of the evening
- With
autoguiding the quality of images was very good with stars showing as relatively
small & nicely circular objects.
- The 'Park Scope' option was used from the POTH Hub to successfully park the
LX200 scope at the end of the session
Guiding was conducted using 2 methods during the evening.
Method 1.
PHD2 was used to manually start looping, select target start, start guiding at
the start of each new target and manually stop guiding once imaging of the
target had been completed. After slewing to each target in the observing
list CCDApp2 presents a dialog box that user clicks to confirm that PHD2 guiding
has been manually initiated so that main imaging can begin. Method 1
was used with M1 (Crab Nebula)
Method 2. After slewing to each
target in the night's observing list, CCDApp2 sends request to PHD2 to initiate
Guiding. Once User clicks to confirm that Guiding is proceeding ok, the
target is imaged. When the requested number of images have been taken,
CCDApp2 commands PHD2 to stop guiding. Once stopped the scope is slewed to the
next target. Method 2 was used to take autoguided images of a sequence of
targets (including M1, M38, M52, M110, C/2015 ER61 (PANSTARRS) & Hickson 46)
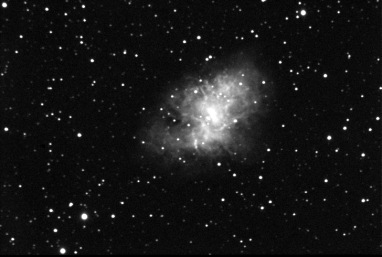
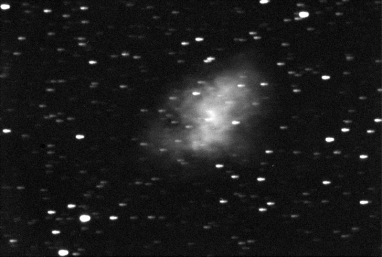
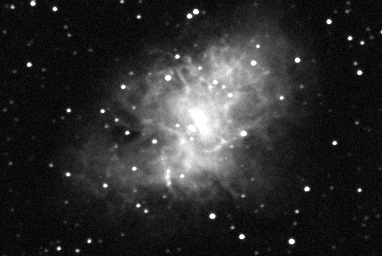
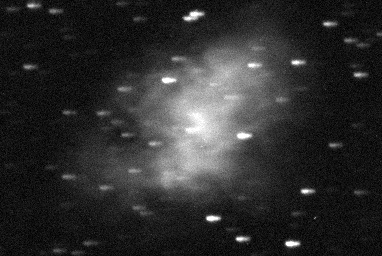
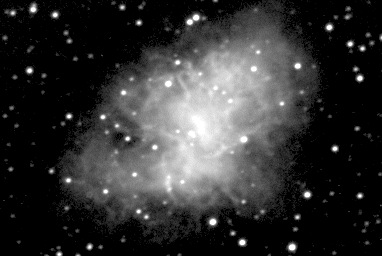
The quality of images acquired with Autoguiding can be examined in the
following images of M1 (Crab Nebula).
Nearly all frames were
useable for stacking. This compares with recent non-guided sessions when 50-75%
of frames have to be thrown away before stacking. Once this level of
waste is normal for stacking planetary images, for deep sky images there
is a strong desire to use as many frames as possible.
| Guided Exposure of M1 (10 mins, Single Frame) |
Unguided Exposure of M1 (10 mins, Single Frame) |
|
 |
 |
|
| CCD Image (50% size) 600s exposure, 3x3 binning, C Filter 2017-11-15 02:11h UT (#604029) 12" LX200R (at f/10.4) + ST-10XME (Autoguided using TS 80mm APO + ZWO ASI178MC) |
CCD Image (50% size) 600s exposure, 3x3 binning, C Filter 2017-11-15 02:49h UT (#604034) 12" LX200R (at f/10.4) + ST-10XME |
|
 |
 |
|
| CCD Image (100% size, cropped) Image details as above |
CCD Image (100% size, cropped) Image details as above |
Back to Top
On attempting to start up and operate the observatory a number of issues arose
Back to Top
Guiding used the latest version of PHD2 (version 2.6.4, Sept 17th 2017).
The application ran robustly throughout the session, and appeared to more
stable than version 2.6.3 and earlier.
Guide Star selection and guiding
worked flawlessly except for when clouds began to cover the target
Report/Log data wasn't showing arc secs correctly since PHD2 settings hadn't
been configured with Focal Length value.
The software uses 1.0 arc sec/pixel
in this situation. Fortunately for my setup (2.4µm pixels (1x1 binning) and
480mm focal length) it just so happens that the image scale is 1.03 arc
sec/pixels)
Lessons
- Ensure Telescope Focal Length is set in Advanced
Setup/Guiding/Focal Length (mm)
(For TP Photoline 80mm EPO scope
the FL is 480mm)
- Ensure Camera's Pixel Size (unbinned pixel size in
microns) is set in Advanced Setup/Camera/Pixel Size
(For ZWO
ASI178MC camera the pixel size is 2.4µm)
- Unless both fields are set,
arc secs on graphs/stats will be shown incorrectly as equal to pixels
(i.e. it uses an image scale 1 arc sec/pixel)
| PHD2 Guiding Calibration 2017-11-14 |
 |
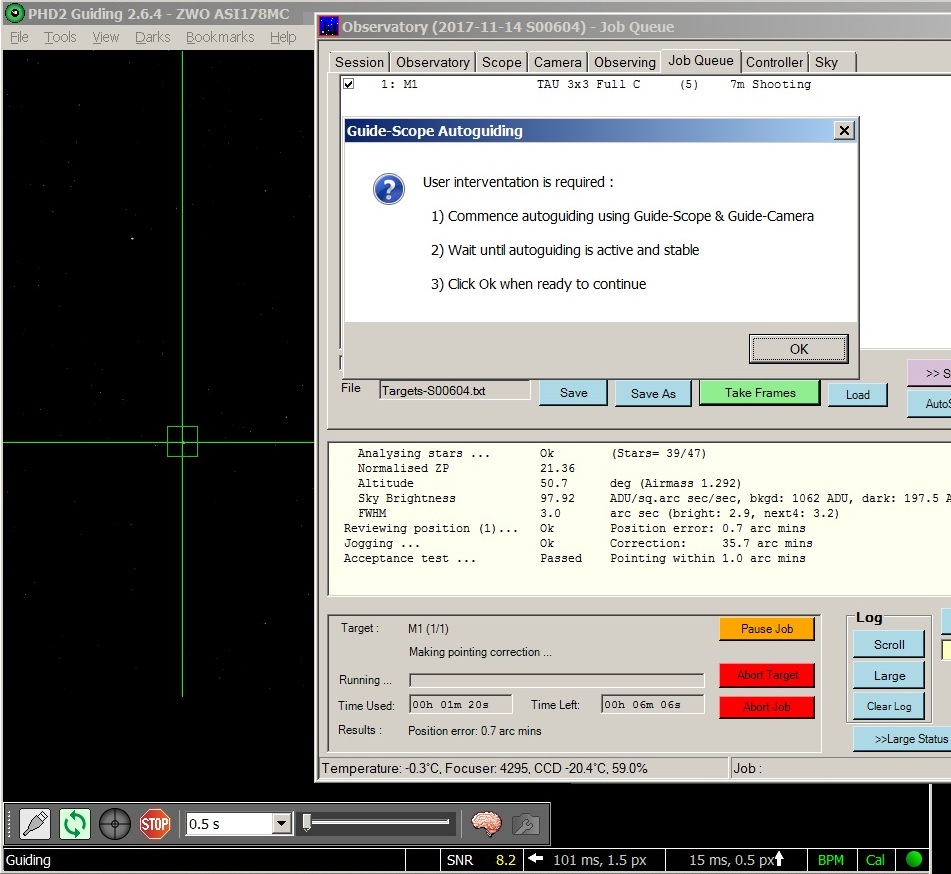
|
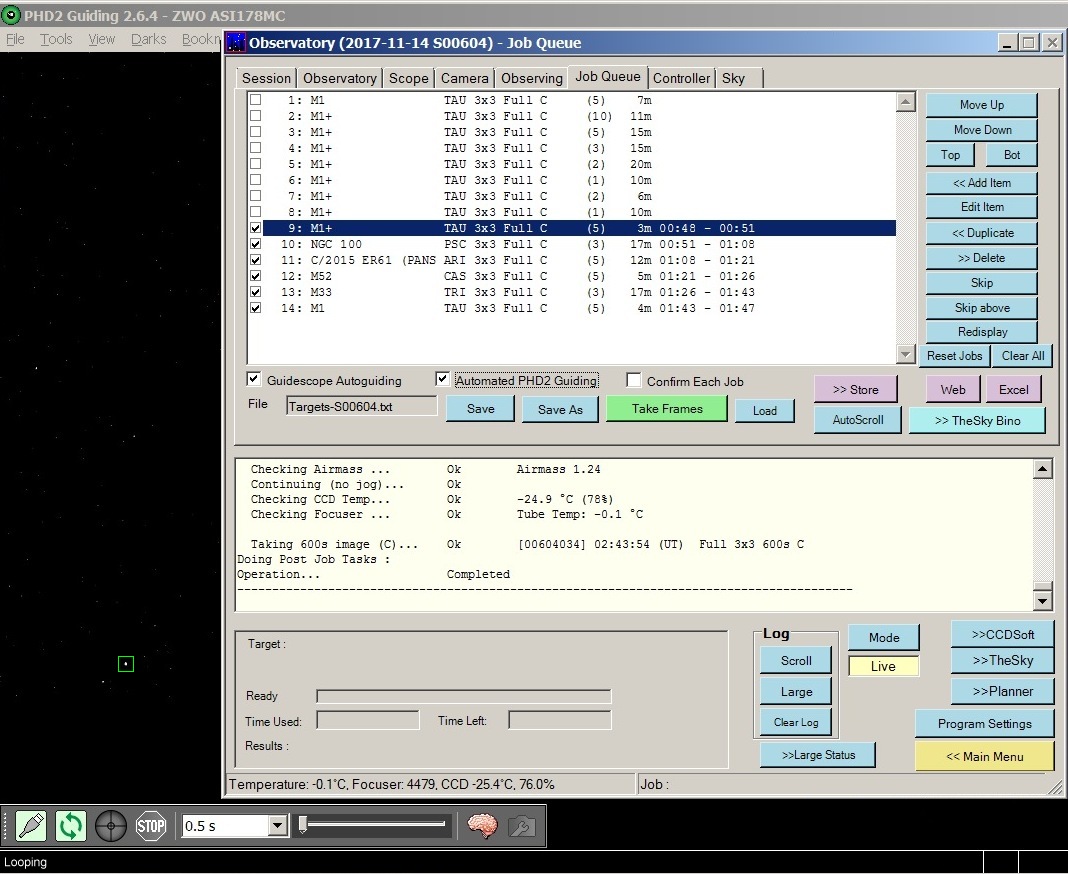
Basic PHD2 Guiding ('Manual PHD2 Guiding') Imaging Queue in CCDApp2 (right) is paused and waiting on user to manually initiate guiding in PHD2 and then confirm when guiding is proceeding ok. (Green Bulb in bottom right of PHD2 status line indicates equipment is all connected. Green 'Cal' indicates that a Mount Calibration is being used and is being automatically adjusted to account for scope pointing position using an ASCOM connection. Green 'BPM' indicates a Bad Pixel Map is being used) White/Yellow 'SNR' field shows the current signal to noise ratio of the guide star.) |
 |
|
PHD2 Guiding Results, 2017-11-15 00:51 to 01:20h 0.5s exposure, good conditions (No wind, reasonable seeing). Stats for first 25 minutes of guiding show RMS Scatter of 1.07 arc sec (0.88" in RA, 0.61" in Dec) Towards the end of section the Guide Star is lost due to passing cloud. (original image produced in Phd Log Viewer, http://adgsoftware.com/phd2utils/ ) |
 |
|
M1 (Crab Nebula) End Result of Above Guiding |
 |
|
CCD Image (Square Root scaling, 100% size, cropped) 15 x 60s exposure (average median combine), 3x3 binning, C Filter 2017-11-15 01:00h UT (#604006-20) 12" LX200R (at f/10.4) + ST-10XME (Autoguided using TS 80mm APO + ZWO ASI178MC) |
|
PHD2 Guiding Results, 2017-11-15 01:49 to 02:42h 1s exposure, good conditions (No wind, reasonable seeing). Stats for first 45 minutes of guiding show RMS Scatter of 1.00 arc sec (0.92" in RA, 0.41" in Dec) Towards the end of the section the Guide Star is affected by passing clouds (star mass & SNR both drop) (original image produced in Phd Log Viewer, http://adgsoftware.com/phd2utils/ ) |
 |
|
More Advanced PHD2 Guiding ('Automated PHD2
Guiding') Imaging Queue in CCDApp2 is executing. Commands are automatically sent to PHD2 to initiate looping, find a suitable guide star and start guiding. After imaging is complete, a command is sent to stop guiding and the telescope slews to the next target. Use of ASCOM POTH Hub is critical (as it allows access to the LX200 Mount by both PHD2 and TheSky6). At present the user is required to confirm that guiding is proceeding ok before Target Images are taken (this step may be made fully automated, by having the software to check and monitor the guide star SNR) |
 |
Back to Top
The principal requirement of autoguiding is to keep the Imaging Scope /Camera fixed onto a specific Target during imaging, to prevent star trails and non-circular stars that will impact image quality either directly or indirectly as poorest images will have to be thrown away prior to stacking.
Autoguiding through a sequence of frames will also help ensure that frames maintain near identical fields of view, which helps later frame stacking.
When doing automated guiding for each target CCDApp2 ('Automated PHD2 Guiding' checkbox) has the potential to automatically handle the schedule of target objects, commanding PHD2 to start guiding on a star upon arrival at each target and later on to stop guiding before slewing to the next target.
Manually control of guiding can be performed instead ('Manual PHD2 Guiding' checkbox). With this option the user is presented with a message after centering each target and before image set is taken requesting the guiding is manually initiated in PHD2 and waits until user confirms that Guiding is active.
Back to Top
On attempting to start up the Aurora Cloud Sensor, the program would seem to
load, but the main application window didn't appear.
and the program's
process had to be killed using Task Manager. Several further attempts to start
the program also failed. Later investigation showed that the program's Display
settings in the user configuration file had become corrupted with invalid X/Y
coordinates.
C:\Program Files (x86)\Aurora Eurotech\Cloud
Sensor\CloudSensorUser.cfg
[Display]
OffsetX=-32000
OffsetY=-32000
SizeX=480
SizeY=509
Resetting the Display parameters to sensible numbers fixed the issue
(administration rights required)
[Display]
OffsetX=400
OffsetY=200
SizeX=500
SizeY=500
Back to Top
Automated operation with CCDApp2 program ('Take Frames') involves the program reading a list of target/frame details and then slewing to the first target on the list, taking a short (5-20s) exposure using CCDSoft5, linking the image using TheSky6 to figure out where the scope is actually point and then jogging the scope to where it should be pointing in order to centre the intended target in middle of CCD Image. If pointing error is more than 1 arc minute a second/third image is taken to adjust centering, before the main imaging starts.
At start of session the scope was already on M1 when Take Frames Job was
begun.
The scope 'slewed' to M1 (no distance as scope was already on
M1), and took a 5 sec exposure which shows M1 within frame.
Linking showed
that the scope was 0.7 arc min away from M1.
Instead of making a 0.7 arc min
jog, the scope ended up making a 35.7 arc min jog
As the apparent error of
0.7 arc min was less than the 1.0 arc min tolerance, no further locate images
were taken.
Three 60s images where then taken, but where of an adjacent
starfield and not of M1 as planned.
(Subsequent image linking showed that
they had pointing errors of 36.8 arc mins).
Report and Log Files below. The show that the correct jog requests
where made, but the scope jogged much further in E/W direction that requested
(-35.7' W vs 0.7' W). This might be a backlash issue, related to the
fact that the original slew was made to the same spot that scope was at.
Potential fixes (outwith any mechanical fixes to the scope or autostar
software) are
- Replace Slew operation with a Take Image / Jog operation if
scope RA/DEC is already close to the planned RA/Dec Target
- Take a
second/third Locate Image if the apparent actual Jog distance (from comparing
telescope coordinates, pre/post jog) is significantly more than the planned jog
distance.
Report File
TAU / M1 (1/1)
Slewing ...
Ok M1
Checking position ...
Ok 4.0s
Selecting Pointing Mode ...
Ok Higher Precision Pointing (up to 4
locate images)
Selecting N/W
offset ... Ok N 0.0, W 0.0
[arc mins]
Selecting Locate Exp
... Ok 5s (Zone: 1-2,
GPOffset 5.8, Alt 50.7)
Checking position (1)
Taking 5s
image (C)... Ok [00604001]
00:31:45 (UT) Full Locate C
Linking image (UCA/USNO)...
Ok Stars 47, Scale 1.329, Angle 180.0°
Reviewing position (1)...
Ok Position error: 0.7 arc mins
Jogging ...
Ok Correction: 35.7 arc mins
Acceptance test ...
Passed Pointing within 1.0 arc mins
Taking 60s image (C)...
Ok [00604002] 00:36:53 (UT) Full 3x3
60s C
Taking 60s image (C)...
Ok [00604003] 00:38:05 (UT) Full 3x3
60s C
Taking 60s image (C)...
Ok [00604004] 00:39:16 (UT) Full 3x3
60s C
Log File
M1 Try Target 1/1 | Target : M1
M1 Data LookupObjectAzAlt | Az = 143.8 Alt= 50.7 Airmass=1.29
M1 Info Slew | Attempting slew
M1 Data Obj Target (RaDec2000 | RA= 05 34 31.899 Dec= +22 00
51.99 | Epoch 2000
M1 Data Slew
Target (RaDec2000 | RA= 05 34 31.899 Dec= +22 00 51.99 | Epoch 2000
M1 Ok Slew | Slew to RaDec started
M1 Ok Slew | Position Checked
M1 Ok Slew | Slew completed
M1 Data Pre-Slew (Scope) | RA= 05 35 38.000 Dec= +22 01 39.00 |
Epoch Current
M1 Data Post-Slew
(Scope) | RA= 05 35 40.000 Dec= +22 01 37.00 | Epoch Current
M1 Data Slew (Target | RA= 05 34 31.899 Dec= +22 00 51.99 | Epoch
Current
M1 Data Slew Amount | 0.008
arc deg (0 deg 0 min)
M1 Data
Slew Discrepency | 0.76 arc min (N=-0.21' W=0.73')
----------------------------------------------------------------------------------------
M1 Ok TakeImage | [00604001] 3x3 5s |2017-11-15 00:31:45.563
M1 Data Obj RA | 05 34 31.899
M1 Data Obj Dec | +22 00 51.99
M1 Data Image File | [00604001] C:\DATA\CCD
IMAGING\NEW\2017-11-14 S00604\00604001.M1.FIT
M1 Data CCDXBIN | 3 (will assume Image Scale of 1.326 arc
sec/pixel)
M1 Data SmartCountStars
| nObjects = 66, Stars=61
M1 Info
Search | Scale = 1.326
M1 Info
Search | ModRA = 6.4355
M1 Info
Search | ModDec= 4.33160
M1 Data
InsertWCS 0/0 | Active Stars= 47 / 47 | Rms=0.26" | Rotation=179.99 | RA= 05 34
36.442 Dec= +22 00 59.23
M1 Data
Search Distance #0 | Best Match : 47 / 47 stars | RMS= 0.26" | Offset 0 / 0 |
Rotation=179.99\ ImageScale=1.329
M1 Data Best Match | 47 / 47 stars | RMS= 0.26" | Offset 0 / 0 |
Rotation=179.99 | ImageScale=1.329
M1 Data Image Check (Orig ) | RA= 05 34 36.442 Dec= +22 00 59.23 | Epoch 2000
M1 Data ImageLink (Image) | RA= 05 34 34.858 Dec= +22 00 34.44 |
Epoch 2000
M1 Data Pointing
Error | 0.6 arc mins (RA= 0.4 arc mins DEC= 0.4 arc mins)
M1 Info Pre-Link Check | Making Pre-Link Checks
M1 Data Pre-Link Check (Scope) | RA= 05 35 40.000 Dec= +22 01
38.00 | Current Epoch
M1 Data
Pre-Link Check (Image) | RA= 05 35 39.791 Dec= +22 01 06.65 | Current Epoch
M1 Data Pre-Link Check (Delta) | 0.5 arc mins
M1 Data Analysis | saved object
M1 Data Analysis
M1
Data Object | RA= 05 34 31.899 Dec= +22 00 51.99 | Epoch 2000
M1 Data Offset | 0.75
M1 Data SepN | 0.293
M1 Data SepW | 0.686
M1 Data OffsetO | 0.75
M1 Data Slew Target (RaDec2000 | RA= 05 34 31.899 Dec= +22 00
51.99 | Epoch 2000
M1 Data Jog
Method | Using NEW METHOD
M1 Info
Pointing Check | Attempting Pointing Check
M1 Data Pointing Check (Target | RA= 05 34 31.899 Dec= +22 00
51.99 | Epoch 2000
M1 Data Pointing
Check (Image) | RA= 05 34 34.858 Dec= +22 00 34.44 | Epoch 2000
M1 Data Pointing Check (Image) | Position Error = 0.75 arc
mins [N: -0.29, W: -0.69]
M1
Data Pointing Check (Image) | Required Dec Correction = 0.29 arc mins (N)
M1 Data Pointing Check (Image) | Required Ra Correction = 0.74
arc mins (W)
M1 Data Jog | Net Jog
N:0.29' | W: 0.74'
M1 Info
Making Jog | 0.80 arc mins (N= 0.29' W= 0.74')
M1 Info Making N Jog | (N= 0.29')
M1 Info Jog | Sleeping for 8.5 secs
M1 Info Making W Jog | (W= 0.74')
M1 Info Jog | Sleeping for 8.5 secs
M1 Ok Jog | [N] [W] Jog Completed
M1 Data Pre-Jog (Scope) | RA= 05 35 40.000 Dec= +22 01 38.00 |
Current Epoch
M1 Data Post-Jog
(Scope) | RA= 05 38 14.000 Dec= +22 01 51.00 | Current Epoch
M1 Data Post-Jog (Delta) | 35.69 arc mins (N= 0.22' W=
-35.69')
----------------------------------------------------------------------------------------
Back to Top
This section summarises the current proposed procedure for setup and
simultaneous operation of two scopes and two cameras
Scope1:
Meade 12" LX200
Scope2 : TS Photoline 80mm APO
Camera1: SBIG ST-10XME
Camera2: ZWO ASI178MC
Normal Equipment Setup
a) Polar aligned 12" LX200
scope, plus ST-10XME camera
b) Piggybacked Photoline 80mm APO
scope, plus ASI178MC camera
Prior Setup
TheSky6
- Use Telescope/Setup to access the
Telescope Setup dialog. Set telescope/control
system name to 'Telescope API'
- Click Settings to access the
ASCOM Telescope Chooser dialog. Set Telescope
to 'POTH Hub'
- Click Properties to access the
POTH Setup dialog. Set Telescope to 'LX200GPS/R'
(Note: previously the TheSky6 Telescope or control system name
would be simply set to 'LX200 GPS')
(see
more complete description of the
one time setup of POTH in
TheSky6)
CCDSoft
- Access Camera Setup
- Set
Camera to 'ST-10XME' or 'SBIG
with AO (ST-7/8/9/10 etc)'
- Set Filter
Wheel to 'SBIG CFW-10'
- Set
Focuser to 'Optec TCF-S'
SharpCap
- Ensure that SharpCap is not set to automatically connect
to camera when SharpCap starts
PHD2 Guiding
Under a Equipment Profile called 'ZWO
ASI178MC' ensure camera is set 'ZWO ASI Camera' and Mount is set to
'POTH Hub'
Startup
- Unlock Observatory and Prepare Laptop
- Attach laptop
power lead, ethernet lead, USB Hub lead and USB Camera lead (ASI178MC) to laptop
- Start laptop. Start CCDSoft 5, TheSky 6 and CCDApp2 (AIS) software
- Check
CCDSoft Camera, Filter Wheel and Focuser are set correctly
- Check TheSky6
Telescope/Control System is set correctly (i.e. to use Telescope API & POTH Hub)
- Ensure that 'Disable Park (Use POTH Hub)' checkbox is ticked in CCDApp2
- If Autoguiding using ASI178MC connect ST-4 cable to LX200 (may not be
necessary),
otherwise connect the ST-10's ST4 cable to LX200
- Turn on Optec TCF-S Focuser
- Turn on ST-10 camera (assuming that
ST-10 camera is already attached to back of LX200 scope from last session)
-
Connect to ST-10 camera (from CCDSoft 5 or CCDApp's Observatory tab). Commence
Temperture Regulation
- Untie and Open Observatory Roof
- Turn on LX200 Scope. Allow it to find GPS Fix (This must be done
before mounting the APO GuideScope)
- Connect
ASI178MC camera to TS Photoline 80mm APO scope (may be already connected from
last session).
- Mount TS Photoline 80mm APO scope on top of LX200 scope
(using Dovetail bar)
(APO GuideScope to be mounted
after starting up
the LX200 scope, otherwise the APO scope stops LX200 from getting a GPS
Fix)
- Connect Dew Heater Band on APO Scope to Dew Heater Controller.
- Attach USB Camera Lead to ASI178MC camera, and check approximate orientation
- Connect to LX200 Scope
(via Telescope API/POTH Hub)
This is done by clicking 'Establish Link'
from TheSky's Telescope Toolbar or Connect Scope from CCDApp2's Observatory tab
Check to see the crosshairs indicating telescope's current position in TheSky6,
and that telescope control works.
- Once active the POTH Status window
automatically opens (DO NOT CLOSE THIS WINDOW)
- Slew to a known star and
confirm telescope pointing (LX200 scope will normally be parked up at end of
last session)
- Take Image using ST-10 camera.
- Check image for absence
of 'frost slugs' or other indications of frost on the camera's CCD Sensor.
-
Check image for good focus (refocus if necessary using autofocus facilities)
(Once focus is set CCDApp2 program automatically adjusts focuser position
according the specific filter being used and a pre-determined calibration that
equates a specific temperature change with a specific focus change)
- Check Orientation of ST-10 camera, if necessary (camera will normally be
already attached & orientated from last session)
- Start PHD2 Software.
- Click on Connect Equipment Button and
Select 'ZWO ASI178MC' Equipment Profile
- Ensure camera is set to 'ASI ZWO
Camera' and mount is set to 'POTH Hub. Click Connect All
- Take one or
more images using ASI178MC camera
- Check image for good focus (manually
refocus TS Photoline 80mm APO if required)
- Check image for orientation
(adjust camera orientation if required)
- Check image centering vs that of
ST-10 image (adjust camera's X/Y position if required using Orion XY Guidestar
Finder )
- Perform a Guiding Calibration using PHD2 Guiding Software
- Review
Guiding Calibration and test guiding on a suitable star/starfield.
- Start SharpCap Software
Shutdown
- Close down ST-10 temperature regulation and disconnect from CCDSoft 5
-
Use 'Park Scope' button on the POTH status window to park the LX200 scope.
(Note: Parking LX200 scope doesn't work in TheSky 6 when it is
connected via ASCOM POTH Hub)
- Check that LX200 is at Park Position
- Shut-Down CCDApp2, TheSky6, CCDSoft 5 and other software (PHD2 Guiding,
SharpCap etc)
- Turn off LX200
- Turn off ST-10 camera.
- Turn
off Optec TCF-S focuser
- Remove TS Photoline 80mm APO scope & ASI ZWO178MC
camera from top of LX200 and store them carefully.
- Close & Tie Observatory
Roof
- Turn of Laptop & disconnect various leads (Power, Ethernet, USB's)
- Lock Observatory
Back to Top
| This Web Page: | Notes - Session 604 (2017-11-14) |
| Last Updated : | 2023-11-29 |
| Site Owner : | David Richards |
| Home Page : | David's Astronomy Web Site |