David's Astronomy Pages
Notes - Session 605 (2017-11-17)
Notes
(S604)
Notes
Main
Home
Page
Notes
(S606)
David's Astronomy Pages
|
Notes (S604) |
Notes Main |
Home Page |
Notes (S606) |
| Session Aims & Highlights | |
| Operational Issues | |
| - Critical Issues (0), Major Issues (1), Minor Issues (4), Small Defects (0), Continuous Improvement (0) | |
| PHD2 Guiding | |
| Autoguided Imaging | |
| 2017-11-19 (Post Session) | |
|---|---|
| CCDSoft 5 Re-Install | |
| 2017-11-23 (Post Session) | |
| SBIG Device Not Found | |
| SBIG Driver Checker 64 | |
| SBIG Camera Error Codes | |
| Sequence Generator Pro (SGP) & SBIG Camera | |
| Visual Studio 2015 / 2017 | |
| JIT Debugging | |
| Python Script Development (SharpCap Interface) | |
|
|
Images from 2017-11-17 >> |
Main aims of session were to test software updates on CCDApp2 control program that support dual scope/dual camera operation with autoguiding.
Equipment & Software
Highlights
Back to Top
Back to Top
Guiding again used the latest version of PHD2 (version 2.6.4, Sept 17th 2017).
Guide Star selection and guiding
was initially compromised by the GuideScope being out of focus.
Once this
was fixed guiding was then compromised by wind shake/poor seeing
Following images show the impact of GuideScope focus on a potential guide
star.
|
GuideScope Focusing Initial out-of-focus position (left) to Final in-focus position (right) (1 sec exposures, screen captures from PHD2, wind & poor seeing) |
 |
|
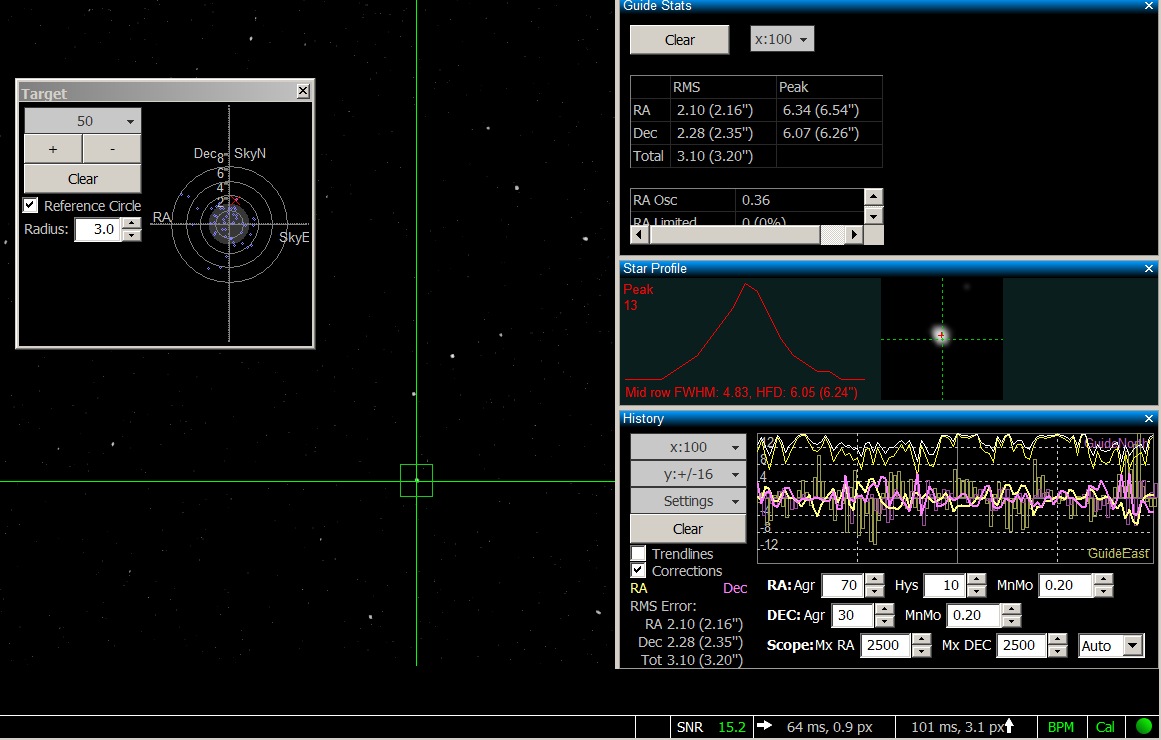
PHD2 Guiding, 2017-11-17 01:46h 2s exposures, poor conditions (8mph wind & poor seeing). RMS Scatter of 3.20" (9" peak), compared to only 1" (4" peak) in the previous session Guide Star SNR and Star Mass is badly affected by the wind and poor seeing (see the large jiiter in white/yellow lines in history graph) |
 |
|
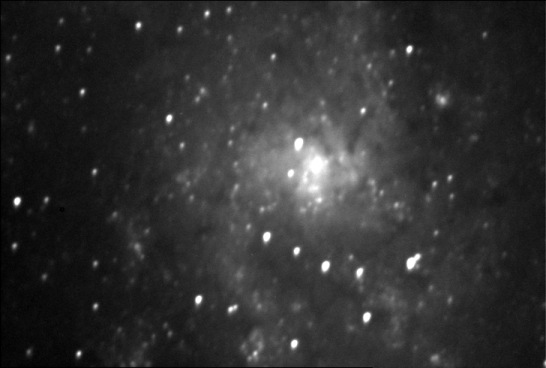
End Result of Guiding - M33 (Pinwheel Galaxy) (whilst errors due to tracking and alignment are corrected, guiding is unable to keep up with the rapid movements of the star due to poor seeing and the effect of wind buffeting the scope) |
 |
|
CCD Image (75% size) 4 x 120s exposure (average combine), 3x3 binning, C Filter 2013-11-18 01:45hUT (#605014-19) 12" LX200R (at f/10.4) + ST-10XME (Autoguided using TS 80mm APO + ZWO ASI178MC) |
|
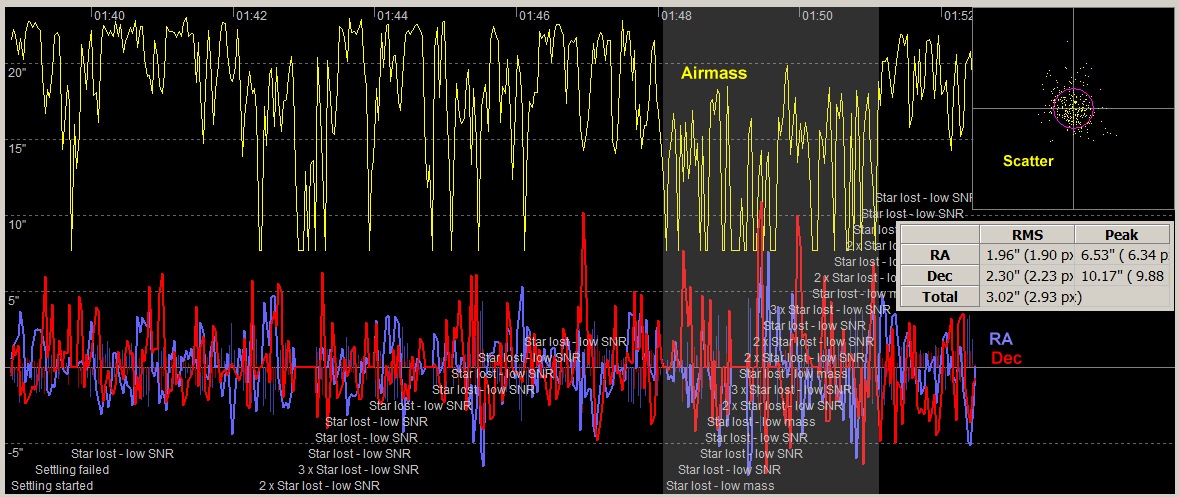
PHD2 Guiding Results, 2017-11-17 01:38 to 01:52h 2s exposure, poor conditions (8mph wind & poor seeing). Stats for main intervak of guiding show RMS Scatter of 3 arc sec SNR peaks at around 15, but the wind/poor seeing result in multiple 'Star lost' events (original image produced in Phd Log Viewer, http://adgsoftware.com/phd2utils/ ) |
 |
Back to Top
The principal requirement of autoguiding is to keep the Imaging Scope /Camera fixed onto a specific target during imaging, to prevent star trails and non-circular stars that will impact image quality either directly or indirectly as the poorest images will have to be thrown away prior to stacking reducing the theoretical SNR. Autoguiding through a sequence of frames will also help ensure that frames maintain near identical fields of view, which helps later frame stacking and provide a consistent presentation.
When doing automated guiding for each target CCDApp2 ('Automated PHD2 Guiding' checkbox) has the potential to automatically handle the schedule of target objects, commanding PHD2 to start guiding on a star upon arrival at each target and later on to stop guiding before slewing to the next target.
More work is required to QC and report the status of PHD2 Guiding. The process relies on OpenPHD / Event Monitoring which I'm still getting to grips with.
Activate Guidescope Guiding
Check Connection
Ok Using PHD2 (ZWO ASI178MC)
Start Looping ...
Ok Exposure 2000 ms
Select Guide Star ...
Ok null
Check App State ...
Ok Looping
Start Guiding ...
? Uncertain result (null)
Review Guiding ...
Fail 1
Back to Top
For some time I lived with a problem where by clicking on a FITS file wouldn't open up in an existing CCDSoft 5 Window, but would try to open a new instance of the CCDSoft 5 program (I would always decline the action, because of a fear of the potential impact on CCDSoft Scripted Operation). Instead of clicking on a FITS file I would therefore drag and drop any FITS files onto my open CCDSoft window (or less easily, by navigating to the FITS files from within CCDSoft).
In trying again to examine why this would happen, I somehow corrupted the behaviour of CCDSoft / FIT files such that I could no longer drag and drop FIT files into CCDSoft and I would get an extra message "There was a problem sending the command to the program".
Unable to restore correct behaviour or and unable to operate my normal workflows in any practicable way I was finally left with no option other than to un-install CCDSoft 5 and begin reinstallation starting from original CDROM version. Unfortunately this didn't make the problem go away.
After multiple re-install attempts I next resorted to deleting every CCDSoft related Key in Windows Registry and clearing the entire CCDSoft Folder in Program Files (x86). After Installing CCDSoft 5 again I was presented with message when starting the program up saying that CCDSoft had encountered an error and had to close. This time I went with a 'Repair' rather than an Uninstall/Install Cycle. This finally did the trick and it resolved both the drag/drop & send command problems and the original multi-instance issue.
I then installed the various updates to CCDSoft including the critical versions 5.00.135 and 5.00.156. Before a final installation of the 5.00.201 update.
During installation of the updates the following message would frequently
appear:
"Self Registration Error - The following files did not
self-register or unregister
C:\Program Files\Common Files\System\SBFocuser.dll
The operating system cannot run. To continue, click OK; Otherwise,
click Cancel
From previous installations I knew this error from previous iinstallation
that this was related a LIBFLI.DLL Version Conflict.
(see
http://www.bisque.com/sc/forums/t/2828.aspx).
"An
older version of the file LIBFLI.DLL causes this message error message. CCDSoft
version 5.00.177 and later distributes the latest version of the Finger Lakes
Instruments Device Drivers in the file named LIBFLI.DLL, and places this file
into the C:\Program Files\System folder. Other software vendors distribute this
file, and place it in various locations on your computer.

If an **older**
copy of LIBFLI.DLL is located anywhere in the computer's PATH, then Windows will
load the older version of this DLL, and CCDSoft will therefore not be able to
attach to any supported focuser."
I already had a copy of libfli.dll with 2007 modification date held in reserve and used this to replace the 2002 version that was is installed with the initial CCDSoft installation/early update. After installing updates up to 5.00.201 I notice that the final libfli file has a 2010 modification date, whilst the final SBFocuser.dll has a 2008 modification date.
Whilst CCDSoft 5 GUI was now operating ok, attempts to run my CCDApp2 control
program to connect to the CCDSoft's camera object failed with 'Library Not
Registered' error messages. I've seen this problem before with
CCDSoft 5/ TheSky6 and reinstalling and apply each update in turn has eventually
worked. I did that this time and it eventually worked (on about the third
attempt). The trick seemed to be to run CCDSoft 5 once as Administrator
(presumably needed to register the CCDSoft libraries).
(a similar
issue/solution was noted before after a installing TPoint,
see notes)
Next problem was that taking a simulated light frame from my CCDApp2 program
caused it to fail when using using the 'Image.Keyword()' method. and other calls
(This was with CCDSoft 5.00.142).
Exception from HRESULT: 0x80020010
(DISP_E_BADCALLEE))
Eventually after installing the key update 5.00.156 and then bringing the program up to version 5.00.201 , the errors associated with the CCDSoft's Image object went away.
Final tasks included
- update SBIG drivers for my ST-10XME camera
using SBIGDriverChecker64.
- check CCDSoft Preferences (to ensure it
used TheSky6 astronomical software integration), (under File/Preferences)
- update CCDSoft File Defaults with observer and telescope details (under
Camera(Control)/Setup/File Defaults)
- check parameters in Source
Extraction Setup. (under Research/Analysis Folder of
Images/PreAnalyse(Data Analysis) )
- create an Image Reduction
group for reduction of Light Frames (under Image/Reduce/Reduction Group)
- Darks : ..\_Darks\Auto Masters\MasterDark.FIT
-
Flats : ..\_Darks\Auto Masters\MasterFlat.FIT
- create a
Flats Reduction group for reduction of Flat Frames
- Darks
: ..\_Darks\Auto Masters\MasterDark.FIT
- update Filter Names
for SBIG CFW-10 filter wheel (under Camera(Control)/Setup/Filter
Wheel/Settings)
- copy third party camera drivers (AscomCCDSoft.dll
& Starlight Xpress SXV Plug In.dll) into CCDSoft's "Camera Plug Ins"
folder
(C:\Program Files (x86)\Software Bisque\CCDSoft
Version 5\Camera Plug Ins)
Latest News: (2017-11-23)
Whilst CCDSoft works with Camera
Simulator and my CCDApp2 control program indoors during post installation
testing, it gave a show stopping problem
when trying to connect to my SBIG camera out in the Observatory when attemptong
an observing session.
 |
The problem persisted even after installing latest SBIG Driver Checker software, and
downloading and installing the latest SBIG drivers. Attempts to
connect to the SBIG Camera from other applications also failed. After trying various things the observing session
was eventually cancelled
for the night.
This 'SBIG Device Not Found' problem and
eventual solution is discussed in section below.
Back to Top
These notes describe the 'SBIG Device Not Found' problem and its eventual solution
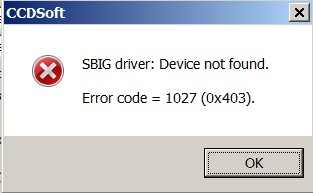
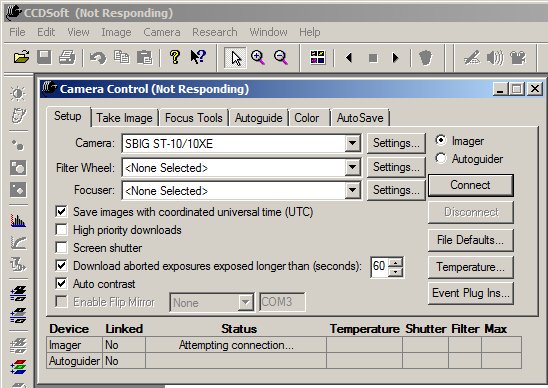
After re-installing CCDSoft including installation of SBIG drivers a showstopping problem arose when trying to connect to my SBIG ST-10 camera in the Observatory (2017-11-23), with CCDSoft giving the message "SBIG Driver: Device not found. Error Code = 1027".
In trying to find a log file reporting any further information about SBIG
Device not found I came across a list of all CCDSoft's SBIG Camera Errors
in "C:\Program
Files (x86)\Common Files\System\sberror.h". This suggests that
the 1027 Error Code is specifically "Device (Camera) not found" since there is a separate code (1019) for "Driver not found".
|
|
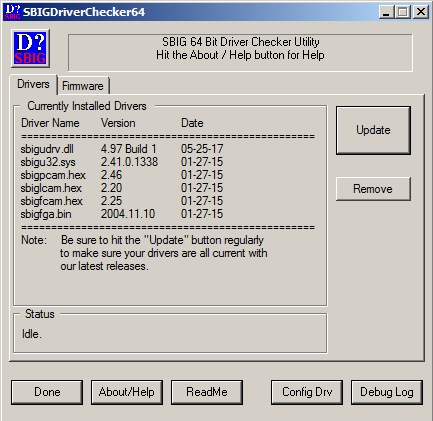
I checked and installed the latest version of SBIG Driver Checker 64, downloaded & pre-installed the latest (64 bit) SBIG drivers, and reconnected the camera to automatically install the drivers.
 |
CCDSoft continued hwoever to give the error message that the SBIG Device is not found. The message was given regardless of whether the ST-10XME camera is physically connected to the laptop or not.
Now was the continuing 'Device Not Found' messages due to CCDSoft (possible as I had just reinstalled it), due to SBIG Drivers (unlikely as I had just downloaded and installed the latest drivers), a broken Camera (unlikely it was working at end of last session and is recognised when USB cable is plugged into computer) or something else ('DLL Hell' perhaps)
A whole series of tests was conducted over the next few days to help diagnose and solve the problem. The last thing I wanted to do was start a fresh re-installation of CCDSoft given the earlier problems.
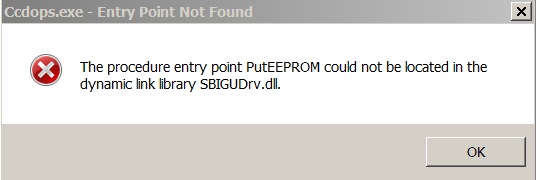
- Tried running CCDOps 5 (for USB camera) but it immediately fails with
the message "The procedure entry point PutEEPROM could not be located in the
dynamic link drive SBIGUDrv.dll". This error message is
again given regardless
of whether the ST-10XME camera is physically connected to the laptop or not.
 |
- Tried connecting to SBIG camera from PHD2. This gave some message about being unable to open the SBIG camera or device
- Tried connecting to SBIG camera using Sequence Generator Pro (trial version). This program also failed to find the SBIG device with the error message "SBIG Error while querying for USB devices: None found" . The message is again given regardless of whether the camera is physically connected to the laptop or not.
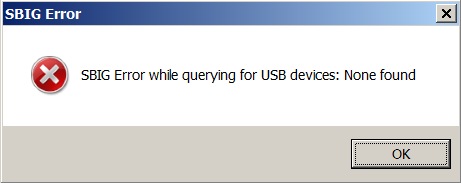 |
SGP's logfile records the following messages:/p>
[Main Thread] Connecting camera in main thread...
[Main Thread] Connecting
SBIG camera...
[Main Thread] SBIG Driver name: SBIGUDrv.DLL Ver ???
[Main
Thread] SBIG Driver version: 0
[Main Thread] SBIG Error while querying for
USB devices: DEVICE_NOT_OPEN
[Main Thread] SBIG Error while querying for USB
devices: None found
[Main Thread] Disconnecting SBIG camera...
[Main
Thread] SBIG Error while closing device
(Logfile at C:\Users\username\AppData\Local\SequenceGenerator\sg_logfile_timestamp.txt)
SysInternal's Process Monitor 3.40 shows the following records when SGP attempts to connect to the SBIG Camera.
FASTIO_NETWORK_QUERY_OPEN   C:\winnt\system32\SBIGUDrv.DLL        FAST IO
	DISALLOWEDbr>
IRP_MJ_CREATE               C:\winnt\system32\SBIGUDrv.DLL
	PATH NOT FOUND

FASTIO_NETWORK_QUERY_OPEN   C:\winnt\system32\SBIGUDrv.DLL.DLL    FAST IO
	DISALLOWED
IIIRP_MJ_CREATE               C:\winnt\system32\SBIGUDrv.DLL.DLL    PATH NOT FOUND
- With the observation that SBIGDeviceChecker64.exe installs SBIGUDrv.dll into "C:\Windows\system" folder on my Windows 7 computer (where its the only file in the \system folder ! ) I copied the .dll into "C:\Windows\System32" folder assuming that is where it is maybe meant to go (a SharedDll key in the windows registry suggests as much) however SGP, CCDSoft, and CCDOps still failed to connect.
HKLM\SOFTWARE\Wow6432Node\Microsoft\Windows\CurrentVersion\SharedDLLs\
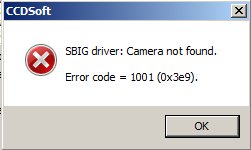
Value Name: C:\Windows\system32\SBIGUDrv.dll- I next tried to connect to the ST-10XME Camera from my 32 bit AllSky Laptop which
has CCDSoft installed for acquiring allsky pictures with a Starlight Xpress
Oculus AllSky Camera, using the camera plug-in 'Starlight Xpress SXV Plug
In.dll'. Initially CCDSoft gave the error message "SBIG driver:
Camera not found. Error Code = 1001" when attempting connection with
the ST-10XME camera.
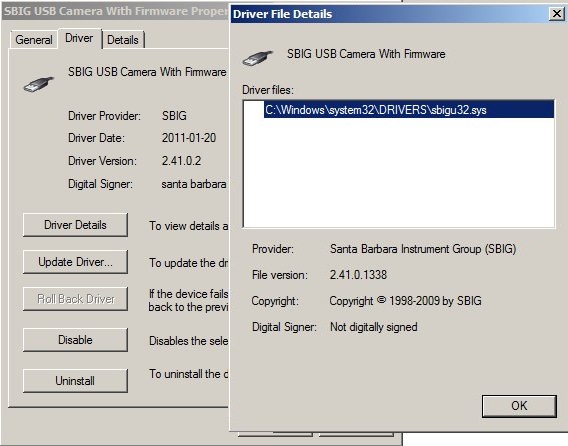
However since this laptop has never be used with a SBIG camera before the error message most probably relates to the presence of older drivers for Classic ST camera that were installed with the original CCDSoft installation and/or early updates. The old SBIGDriverChecker program was uninstalled and existing 'SBIG USB Camera' uninstalled in Device Manager. The latest version of SBIG Driver Checker 64 was then installed, and used to download & pre-install the latest SBIG drivers. (Note that the program downloads 32 bit version of the driver as well as 64 bit versions)
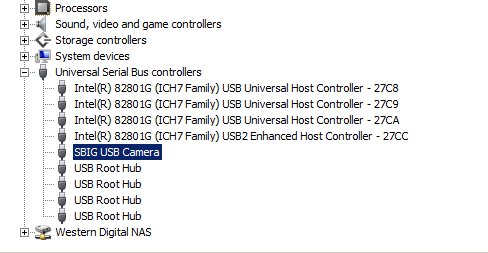
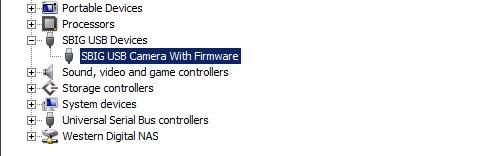
The ST-10XME camera was then reconnected to the computer whereupon drivers for 'SBIG USB Camera With Firmware' were automatically installed.
| SBIG - Old USB Drivers | SBIG - New USB Driver | |
 |
 |
|
| Old SBIG Drivers | New SBIG Drivers (32 bit computer) | |
 |
 |
|
| Device Manager - Old SBIG Drivers | Device Manager - New SBIG Drivers | |
 |
 |
After the driver for SBIG camera were installed CCDSoft was used to connect to the camera, but the program hung. It hung in such a manner that not even attempting to the CCDSoft.exe process in TaskManager could kill the program. The computer had to be powered down and rebooted.
CCDOps 5 program also failed to connect to the SBIG camera but didn't
hang.
After reading some of the older guidelines to SBIG Driver installation, I uninstalled the drivers for SBIG USB Camera With Firmware, and then installed drivers from within Device Manager and navigating to "C:\Program Files\SBIG\Driver Checker 64\SBIG Drivers 3r2\32 Bit\Pro" to ensure than the Pro version of the SBIG drivers were picked up. (As I understand things, the ST-10XME doesn't firmware stored but relies on firmware being uploaded from the computer onto the camera by the driver on start-up. The ST Classic Camera has firmware built-in and uses a different version of the driver. Maybe this is why CCDSoft hung like it did ). I believe I saw the driver installation process flash up a message about installing 'SBIG USB Camera Without Firmware', but the name is left as SBIG USB Camera With Firmware' in Device Manager.
After this CCDSoft was able to connect to SBIG ST-10XME camera ok. CCDOps was also able to connect to the Camera ok.
- I then returned to my main 64bit laptop used for Astro Imaging. As per AllSky laptop I installed drivers for SBIG USB Camera from within Device Manager but this time navigating to "C:\Program Files\SBIG\Driver Checker 64\SBIG Drivers 3r2\64 Bit\Pro" to pick up 64 bit Pro drivers. Everything should work now, surely. But no. Yet again CCDSoft would give the message 'Device Not Found message when trying to connect to the ST-10XME camera. CCDOps would also failed with the message about "PutEEPROM" point.
- I tried using 'Config Drv' button in SBIG Driver Checker 64 and made sure that ST Model was 'My ST is a Pro Model with the RGH Connector'. But again the same error message when connecting to the ST-10XME Camera.
- Final Step was to remove SBIG Drivers from within SBIG Driver Checker 64,
rename all renaming occurances of SBIGUDrv.dll to old_SBIGUDrv.dll and then
reupdate/install SBIG drivers. This time, after a slight
hestitation, CCDSoft was able to connect to the ST-10XME camera ok. CCDOps
was also tested and able to connect (no message this about being not able to
locate the PutEEPROM entry point in SBIGUDrv.dll).
So all down to a classic case of 'DDL Hell' ! (see
DDL Hell on Wikipedia)
Any way PROBLEM SOLVED.
Whilst looking for product information/ information about SBIG Drivers and Cameras I noticed that the former SBIG website (www.sbig.com) no longer exist and that it automatically redirects to the Diffraction Limited website (www.diffractionlimited.com)Manuals, Drivers Support for discontinued SBIG products can be found at http://diffractionlimited.com/support/sbig-archives/
Back to Top
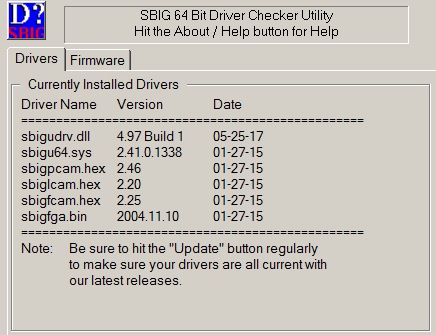
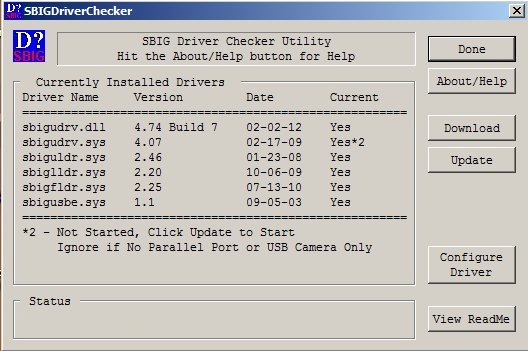
A part of the attempt to resolve 'SBIG Device Not Found' Issue the latest version of SBIG Driver Checker 64 application was downloaded from the SBIG Archives page (Diffraction Limited), and 'Update' was used to download and install the latest drivers.
As at 2017-11-23, the latest drivers downloaded were as follows (on 64 bit computer):
|
|
Despite the '64' in the name SBIGDriverChecker64.exe is a 32-bit application and can work on a 32-bit computer to install 32-bit SBIG drivers
It was noted that SBIGDriverChecker64 installs latest driver files into the following locations on my 64bit laptop running Windows 7
C:\Windows\system : sbigudrv.dll
C:\Windows\System32\drivers\ : sbigu64.sys, sbigfcam.hex, sbiglcam.hex, sbigpcam.hex, sbigfga.bin
sbigudrv.dll is observed to be the only file contained in the
\Windows\system folder on my 64 bit computer
It's unclear how other programs manage to find it. Examining the Windows Registry with Regedit shows just a single reference to
SBIGUDrv.dll (see below) which points to
a C:\Windows\System32 location for the
.dll
HKLM\SOFTWARE\Wow6432Node\Microsoft\Windows\CurrentVersion\SharedDLLs\


Value Name: C:\Windows\system32\SBIGUDrv.dll
Back to Top
In trying to find a log file reporting any further information about "SBIG Device not found" errors I came across the following list of all CCDSoft SBIG Camera Errors in "C:\Program Files (x86)\Common Files\System\sberror.h". .
SBIG Camera Errors

CE_CAMERA_NOT_FOUND         1001  |SBIG driver: Camera not found.|

CE_EXPOSURE_IN_PROGRESS     1002  |SBIG driver: Exposure already in progress.|

CE_NO_EXPOSURE_IN_PROGRESS  1003  |SBIG driver: Exposure not in progress.|

CE_UNKNOWN_COMMAND          1004  |SBIG driver: Bad PC Command.|
CE_BAD_CAMERA_COMMAND
1005  |SBIG driver: Bad camera command.|
CE_BAD_PARAMETER            1006  |SBIG driver:
Bad parameter.|
CE_TX_TIMEOUT               1007  |SBIG driver: Transmission timeout.|

CE_RX_TIMEOUT               1008  |SBIG driver: Receive timeout.|
CE_NAK_RECEIVED             1009  |SBIG driver: NAK received.|
CE_CAN_RECEIVED             1010  |SBIG driver: CAN
received.|
CE_UNKNOWN_RESPONSE         1011  |SBIG driver: Unknown response.|

CE_BAD_LENGTH               1012  |SBIG driver: Bad length.|
CE_AD_TIMEOUT               1013  |SBIG
driver: A/D timeout.|
CE_KBD_ESC                  1014  |SBIG driver: Keyboard Escape.|

CE_CHECKSUM_ERROR           1015  |SBIG driver: Checksum error.|
CE_EEPROM_ERROR             1016  |SBIG driver: EEPROM error.|
CE_SHUTTER_ERROR            1017  |SBIG driver:
Shutter error.|
CE_UNKNOWN_CAMERA           1018  |SBIG driver: Unknown camera.|

CE_DRIVER_NOT_FOUND         1019  |SBIG driver: Driver not found.|
CE_DRIVER_NOT_OPEN          1020  |SBIG driver: Driver not open.|
CE_DRIVER_NOT_CLOSED        1021  |SBIG
driver: Driver not closed.|
CE_SHARE_ERROR              1022  |SBIG driver: Driver share
error.|
CE_TCE_NOT_FOUND            1023  |SBIG driver: TCE not found.|
CE_AO_ERROR                 1024  |SBIG driver: AO error.|
CE_ECP_ERROR                1025  |SBIG driver: ECP error.|

CE_MEMORY_ERROR             1026  |SBIG driver: Memory error.|
CE_DEVICE_NOT_FOUND         1027  |SBIG driver: Device not found.|
CE_DEVICE_NOT_OPEN          1028  |SBIG driver:
Device not open.|
CE_DEVICE_NOT_CLOSED        1029  |SBIG driver: Device not
closed.|
CE_DEVICE_NOT_IMPLEMENTED   1030  |SBIG driver: Device not
implemented.|
CE_DEVICE_DISABLED          1031  |SBIG driver: Device disabled.|

CE_OS_ERROR                 1032  |SBIG driver: Operating system error.|
CE_SOCK_ERROR               1033  |SBIG driver: Socket error.|
CE_SERVER_NOT_FOUND         1034  |SBIG driver:
Server not found.|
CE_CFW_ERROR                1035  |SBIG driver: General CFW error.|


CE_CFWE_NONE                1040  |SBIG driver: CFW error none.|
CE_CFWE_BUSY                1041  |SBIG driver: CFW error busy.|
CE_CFWE_BAD_COMMAND         1042  |SBIG driver:
CFW error bad command.|
CE_CFWE_CAL_ERROR           1043  |SBIG driver: CFW error
calibration error.|
CE_CFWE_MOTOR_TIMEOUT       1043  |SBIG driver: CFW error
motor timeout.|
CE_CFWE_BAD_MODEL           1045  |SBIG driver: CFW error bad model.|
Back to Top
Downloaded and installed Sequence Generator Pro today (fully featured 45 day trial). Principal aim is to gain an independant view & diagnosis of the SBIG Camera Not Found problem that I've been experiencing whilst trying to connect to my SBIG ST-10 camera from a recently reinstalled copy of CCDSoft 5 . However it will also give me an opportunity to understand if the SGP offers me anything of benefit, considering its cost $99 USD versus it features which strongly overlap with the functionality of my own AIS/CCDApp2 observatory control program.
Back to Top
VS2010 Express Edition has been my principal program development environment in the last 6 years or so for developing my CCDApp2 and CCDApp2_AllSky programs for observatory control and for AllSky Image Capture respectively. However I begun to move my program development into more recent Visual Studio products.
VS2015 and 2017 have a lot of new features that I don't need use for regular Windows Forms / Console Programming and their GUI in are both less appealing than VS2010's GUI due to MicroSoft's move towards dumbing down the window bars, dividers, scoll bars etc (It can be hard to pick out the window your're working on and hard to find & move scroll bars etc). However both offer JIT debugging which is useful and both advertise support for Python Programming.
In practice VS2015 (Vn 14.0.25431.01 Update 3) is found to be highly resource
intensive, consuming significant CPU and large amounts of memory. A lot of
online blogs and forum postings report this. None of the 'solutions' I've
tried provide an adequate fix to this problem. (It is noted that
VS2015 starts up a side process called 'Microsoft.VsHub.Server.HttpHostx64.exe'
which also consumes resources and still runs for some 15 mins after VS2015 is
closed).
See
https://connect.microsoft.com/VisualStudio/feedback/details/1610160/microsoft-vshub-server-httphostx64-exe
VS2017 (Vn 15.4.4) is
altgether a lot lighter installation and consumes far less CPU and memory.
Hence VS2017 will gradually become my main programming environment for VB.Net
programs.
[VS2017 was updated to Vn 15.5.0 on 2017-12-06, it's meant to
have faster project opening and faster building]
For my Pthyon scripts and programs (e.g SharpCap Interface
application) VS2015 will be the programming environment of choice, since python
code debugging works in VS2015, but doesn't in VS2017 (I've seen this reported
as an VS2017 issue in various online forums)
Some legacy VB.Net programs will remain for the time being in VS2010.
I've tried to install VS2017 on my AllSky Laptop in order to access JIT debugging to solve an annoying runtime error that occurs after several hours or days of operation which stops a particular thread and eventually brings down the whole program. Unfortunately VS2017 refuses to load as the laptop is running Windows XP.
Back to Top
For some time JIT debugging hasn't been working on my main laptop. Whilst it may not have be a feature in VS2010 Express Edition, it is a feature of VS2015 Community Version and although I had enabled JIT from Tools/Options/Debugging/JIT Debugging, I was not presented with an option to debug the program when one of my VB.Net programs crashed or otherwise failed during testing.
Eventually I came across a solution online which solved the issue
https://stackoverflow.com/questions/32988364/vs-just-in-time-debugging-wont-work
The trick was to go to Windows "\Control Panel\System and Security\Action Center\Change Action Center Setting\Problem Reporting Settings" and set it to 'Never Check For Solutions". This may require administrator permissions.
Back to Top
A method of
Connection and Control of SharpCap image acqusition program from my
own Observatory Control Program (AIS/CCDApp2) has been described previously.
This involves a python script (SharpCap Interface v10.py) that is run
from within SharpCap to act as a server/interface application. Once
started the script opens Port 4000 (localhost), and waits/listens for a
connection from the CCDApp2 program running on the same machine. After
connection is made the server than waits for request messages from CCDApp2's job
queue, such as 'take_image_set' request to record a set of Live Stacked Images
for a specified Target Object. Progress during image capture is
communicated through 'get_appstate' and 'get_lastresult' requests.
(Note
that since SharpCap 3.0 a special
£10 licence is required to access certain feature in SharpCap, including
Scripting)
Whilst the Python Scripts can be created and edited in a simple text editor, there is an advantage in being able to create & develop them in a proper source code development package that can colour code text, spot language errors and be able to run the program under debugging conditions.
Since the Script uses Windows Forms with data fields, labels and buttons etc, there is an extra benefit if the source code development package can also build forms interactively (visually rather than simply in code). However I haven't found a package yet that can develop Forms interactively for use with Python Code. So I'm left to define my form using code alone.
SharpCap uses a built in scripting language called IronPython (http://ironpython.net/). IronPython is an implementation of the Python programming language which is tightly integrated with the .NET Framework. I've therefore installed IronPython on my computer (Current Version 2.7.7)
At the present moment I'm using two alternative packages for
developing my Python Code:
a) Microsoft Visual Studio 2015 (Community
Edition, V14) (including PythonTools)
b) JetBrains PyCharm (Community
Edition, 2017.2.4)
Both packages seem have issues for developing and debugging Python code. I'm see trying to see which one provides the most productive environment to work. Visual Studio is the environment I've previously worked with whilst developing VB.Net applications
At the moment PyCharm produces the critical error message when attempting to
run the Script with debugging.
"Unable to proceed
(sys._current_frames not available in this Python implementation)."
This is
apparently a known problem for running PyCharm with IronPython but one that has
not been solved yet.
Running Python Code in PyCharm however works ok
(It's understood that the sys._current_frames problem was introduced with
IronPython 2.7.6 and 2.7.7 and thus debugging might work ok if using version
2.7.5)
VS 2015 will run the program with debugging, but initially whilst it stopped at Breakpoints, the step-in/over/out operations didn't move through the code in the interactive screen but simply caused the program to run until the next breakpoint. This was eventually fixed by going to Debug Tab in the Project's Properties (accessed by Right Clicking on the Project in Solution Explorer) and changing the debug Launch Mode from "IronPython (.NET) launcher" to "Standard Python launcher". 'Execute Project in Python Interactive' (accessed from Debug or Tools/Python Tools menus) is used for running the Script in the development environment. This provides a console window that highlights any runtime errors and warnings.
More recently I've tried moving my SharpCap Interface project into VS2017, but I find that I'm unable to successfully run Python Code with debugging. This is understood to be an issue with VS2017.
In both VS2015 and PyCharm running the Script in development environment (outside of SharpCap) is not able to access SharpCap data and methods. An include file containing dummy classes and objects representing those in SharpCap itself is used to prevent the Script from crashing in the development environment. This is not ideal, but allows connectivity between the Server Interface and my CCDApp2 program to be tested. The presence of a flagging file (SimFlag.dat) is used to tell the script if it is in the test (Simulation) environment or the live (SharpCap) environment:
import os.path
if os.path.exists('SimFlag.dat'):
   sim = 1

from SharpCap_Dummy import SharpCap
else:
   sim = 0
Proper testing requires the Script to be run from within the SharpCap program itself however. To speed up my workflow I have added a Button (& subroutine) to my Observatory Control Program plus accompanying routine that allow me to quickly copy the Python Script Files from the VS2015 project areas into the particular folder that I use for running Python scripts in SharpCap.
Beside an .htm report file summarising the session, the script also outputs a .log file that contains more detailed information about the session and the communications between CCDApp2 and the SharpCap interface. Both of these can be helpful for understanding any issues or bugs.
Back to Top
| This Web Page: | Notes - Session 605 (2017-11-17) |
| Last Updated : | 2023-11-29 |
| Site Owner : | David Richards |
| Home Page : | David's Astronomy Web Site |