David's Astronomy Pages
Notes - Session 606 (2017-11-26)
Notes
(S605)
Notes
Main
Home
Page
Notes
(S607)
David's Astronomy Pages
|
Notes (S605) |
Notes Main |
Home Page |
Notes (S607) |
Main Aims
Main aim of this daytime session was to conduct a first light test of an
Altair Herschel Wedge, recently purchased for the task of making observations
and images of the sun.
Equipment & Software
Highlights
See
- Herschel Wedge
-
Procedures for setup and operation
- Photos of Solar Observing Equipment
Back to Top
Back to Top
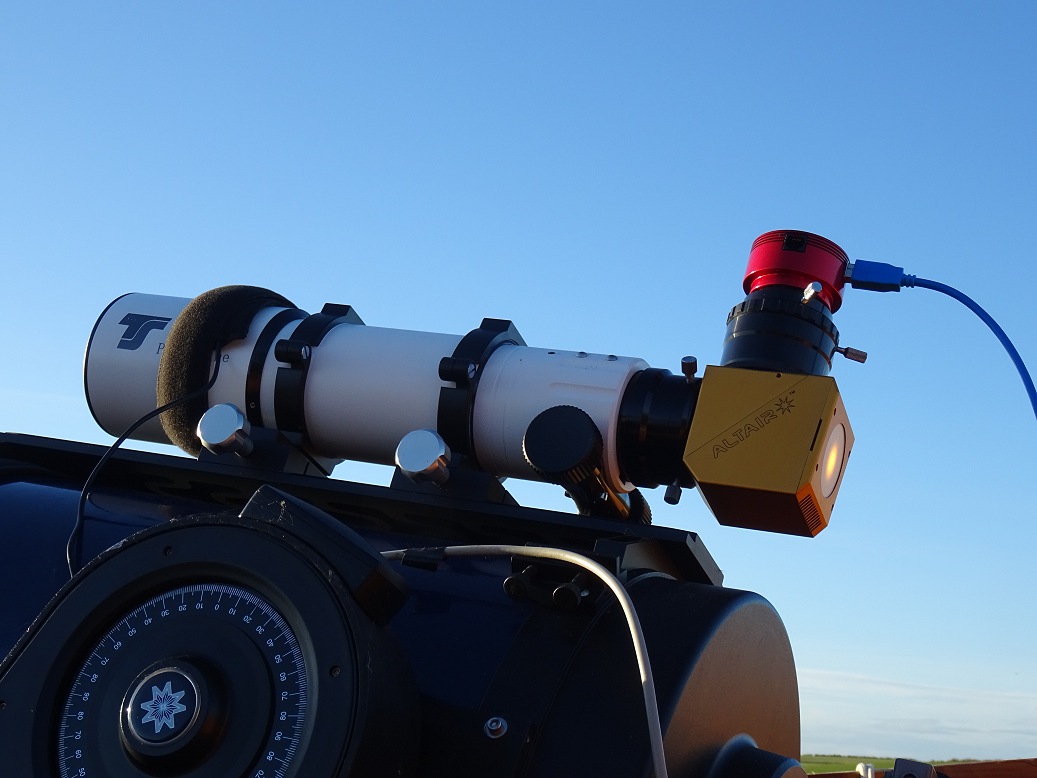
An "Altair Imaging-Ready 2" Solar Herschel Wedge" was a
recent birthday present and will enable the daytime observing and imaging of the
sun with my 80mm APO telescope, extending my astronomical hobby in a new
direction.
Session S606 was the first opportunity to try it out.
[ Observing Setup : Photos
showing the Herschel Wedge + ASI178MC attached to TS 80mm APO Telescope ]
[ First Light Images : Solar Images S606 ]
[Product Website
https://www.altairastro.com/Altair-Imaging-Solar-Herschel-Wedge.htm ]
[Seller's Website
https://www.harrisontelescopes.co.uk/acatalog/altair-herschel-wedge.html
Back to Top
This section summarises the current proposed procedure for setup and
simultaneous operation of two scopes and one camera
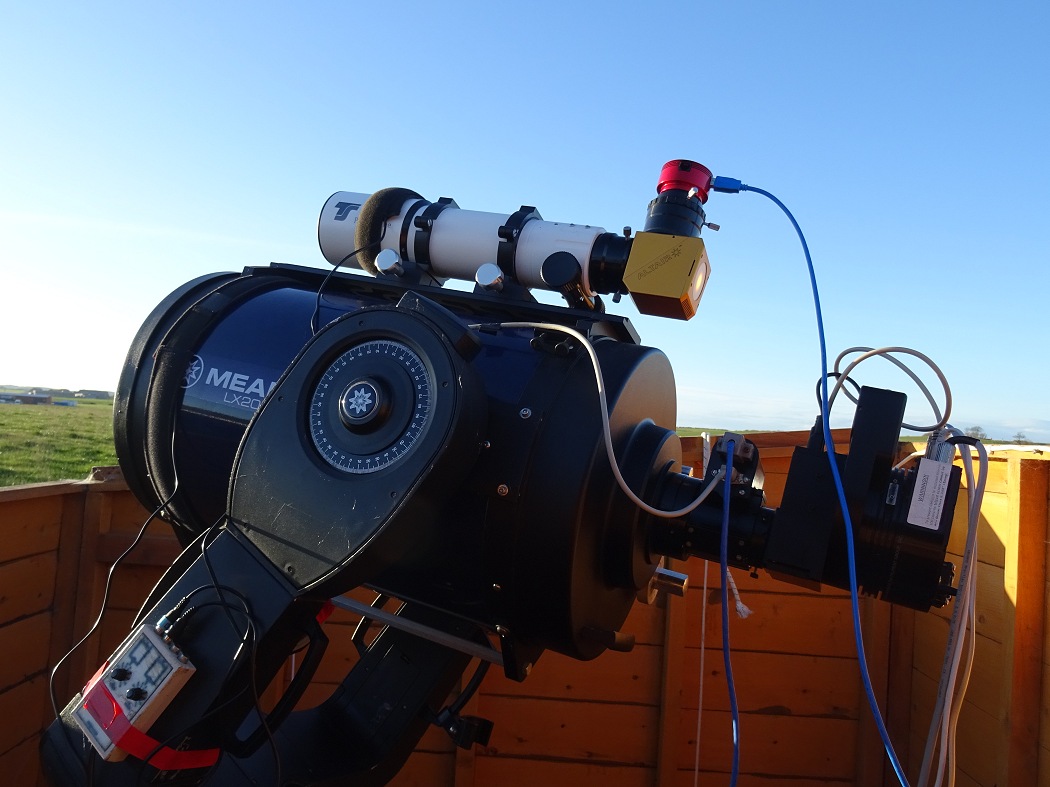
Scope1:
Meade 12" LX200 (utilising LX200 Mount)
Scope2 : TS Photoline 80mm APO
Camera: ZWO ASI178MC
Equipment Setup
a) Polar aligned 12" LX200 scope
b) Piggybacked Photoline 80mm APO
scope, plus ASI178MC camera
Prior Preparation
- Look at latest images of sun online and get
expected location of sunspots for the upcoming session.
- Check the Herschel
Wedge for any damage or issues.
Startup
- Unlock Observatory and Prepare Laptop
- Attach laptop
power lead, ethernet lead, USB Hub lead and USB Camera lead (ASI178MC) to laptop
- Start laptop. Start CCDSoft 5, TheSky 6 and CCDApp2 (AIS) software
- Check
that TheSky6's
Telescope/Control System is set correctly (i.e. to use Telescope API / POTH Hub)
- Ensure that 'Disable Park (Use POTH Hub)' checkbox is ticked in CCDApp2
- Ensure LX200's lens cover is on, and secured with tape as an added
precaution.
- Ensure LX200's finder scope is removed
- Untie and Open Observatory Roof
- Turn on LX200 Scope. Allow it to achieve
a GPS Fix (This must be done
before mounting the APO GuideScope)
- Connect
Herschel Wedge and ASI178MC camera to TS Photoline 80mm APO scope (may be already connected from
last session).
- Mount TS Photoline 80mm APO scope on top of LX200 scope
(using Dovetail bar)
(APO GuideScope to be mounted
after starting up
the LX200 scope,
otherwise the APO scope stops the LX200 from getting a GPS
Fix)
- Optionally connect the Dew Heater Band on APO Scope to Dew Heater
Controller
(if temperatures are near to freezing) or remove if conditions are
warm/dry.
- Attach USB Camera Lead to ASI178MC camera, and check approximate orientation
of camera.
- Connect to LX200 Scope
(via Telescope API/POTH Hub)
This is done by clicking 'Establish Link'
from TheSky's Telescope Toolbar or Connect Scope from CCDApp2's Observatory tab
Check to see the crosshairs indicating telescope's current position in TheSky6,
and that telescope control works.
- Once active the POTH Status window
automatically opens (DO NOT CLOSE THIS WINDOW)
- Set LX200's Custom tracking rate to -27 (this is for 4.2G v19 firmware, x10 finer tracking rate, see Solar Tracking Rate)
- Again ensure that all telescope optics have been covered except those
designed for solar observing
- Slew LX200 scope to the
sun's RA/Dec coordinates.
(Assuming the LX200 scope was parked
successfully at the end of the last session the requested slew should
automatically put the sun (32' diameter) within the ASI178MC camera's 53' x 36'
field of view as seen through the TS 80mm APO scope.
Imaging
- Open SharpCap and
Connect to ASI178MC camera
- Take series of images of sun and adjust focus
(initially using solar limb as a guide and later using any features that come
into view on the sun's disk)
- Adjust exposure time to 2 - 10 um and adjust
brightness level using Polariser Adjustment on the Herschel Wedge to provide
shortest possible exposure times with reasonable depth and no pixel saturation.
- Take an Image of sun's disk and use 'Button X' to calculate the centre
of the sun's disk in pixels ( x,y) the offset of the sun centre from the
image centre (pixels, N, pixels W) and the required jog amounts (Jog N, Jog W,
in arc mins)
- Jog the LX200 scope to correct the pointing error and enable
imaging to be centred on the sun's disk
- Take some initial images and
identify any targets of particular interest for the session such as sun-spot
groups and other noteable features (e.g granulation)
- Make Solar
observations. Take image sets as
required (full-disk and selected areas). Adjust focus as required.
Shutdown
- Disconnect the ZWO ASO178MC camera from
SharpCap
- Set LX200's Tracking Rate to Sidereal
-
Use 'Park Scope' button on the POTH status window to park the LX200 scope.
- Check that the LX200 has reached the Park Position
- Turn off LX200
Scope
- Shut-Down CCDApp2, TheSky6, CCDSoft 5 and SharpCap.
-
Disconnect USB leads from ZWO ASI178MC camera
- Remove TS Photoline 80mm APO scope & ASI ZWO178MC
camera/Herschel Wedge from top of LX200 and store them carefully.
- Replace
finder scope
- Turn off Laptop & disconnect
the various leads (Power, Ethernet, USB Hub, USB Camera)
- Close & Tie Observatory
Roof
- Lock Observatory on departure.
Back to Top
Pictures is section summarises the current proposed procedure for setup and simultaneous operation of two scopes and one camera
| Solar Observing Setup TS 80mm APO Telescope, Herschel Wedge + ZWO ASI178MC Camera (Mounted on 12" LX200R/GPS) |
Solar Observing Setup TS 80mm APO Telescope, Herschel Wedge + ZWO ASI178MC Camera (Camera in 'North-Down' orientation) |
|
 |
 |
|
| Altair Herschel Wedge + ASI178MC Camera attached to TS 80mm APO Telescope (Camera in 'North-Up' orientation) |
Altair Herschel Wedge + ASI178MC Camera attached to TS 80mm APO Telescope (Camera in 'North-Up' orientation) |
|
 |
 |
|
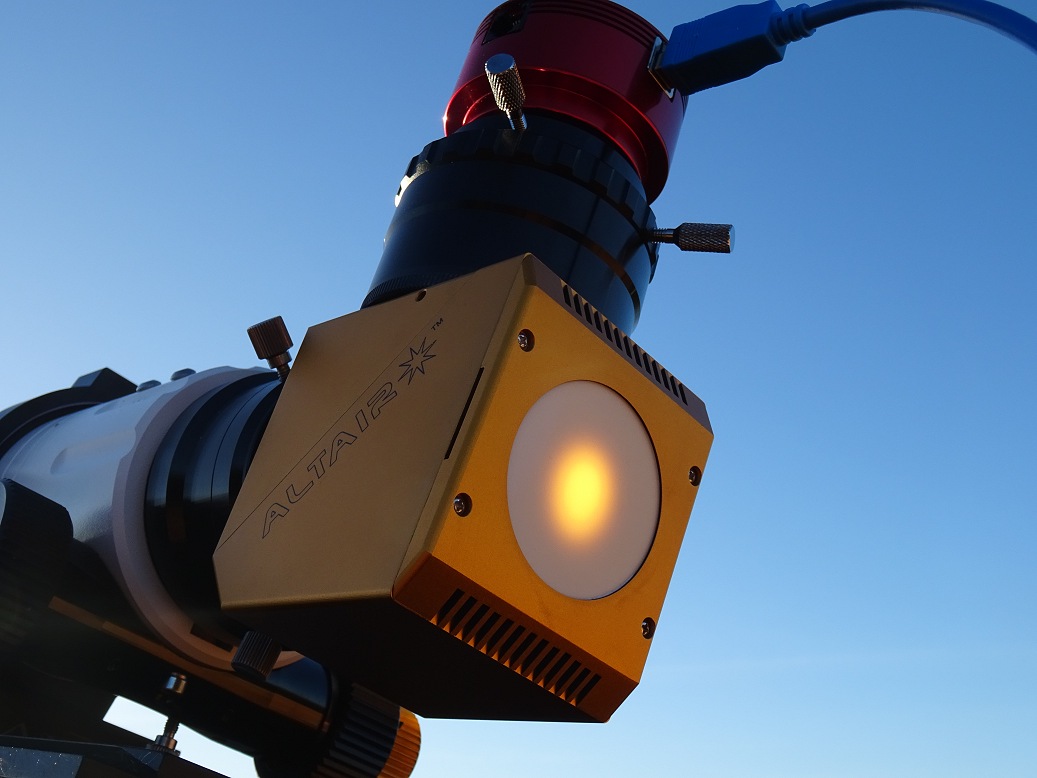
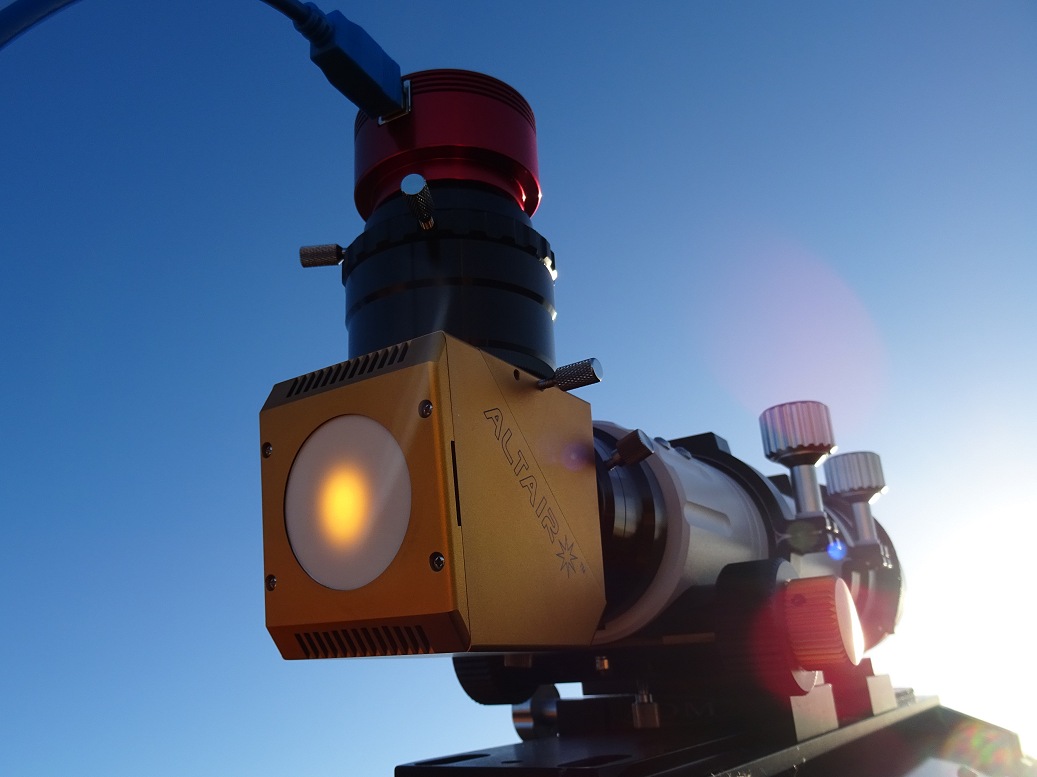
| TS 80mm APO Telescope pointing at Sun (glowing ball on viewfinder/heat disperser at back of Altair Herschel Wedge) |
TS 80mm APO Telescope pointing at Sun (glowing ball on viewfinder/heat disperser at back of Altair Herschel Wedge) |
|
 |
 |
|
Back to Top
Pictures below demonstrate the raw image orientation and required geometric
processing for two principal camera orientaions
(Equipment : TS 80mm
APO telescope, Altair Herschel Wedge (with right-angle prism) & ZWO ASI178MC
camera)
| Solar Observing Setup A Camera in 'North-Down' orientation |
Solar Observing Setup B Camera in 'North-Up' orientation |
|
|
|
|
|
| V V |
V V |
|
| Raw View - 'North Down' (North-Down, E-W normal) |
Raw View - 'North Up' (North-Up, E-W reversed) |
|
 |
 |
|
| V V |
V V |
|
| Flip Processing V V |
Mirror Processing V V |
|
 |
|
|
Back to Top
A list of the image sets acquired during the session can be found
here
(this
is created using new Tabulated SharpCap
Information tool)
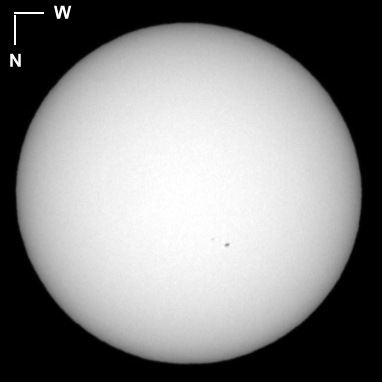
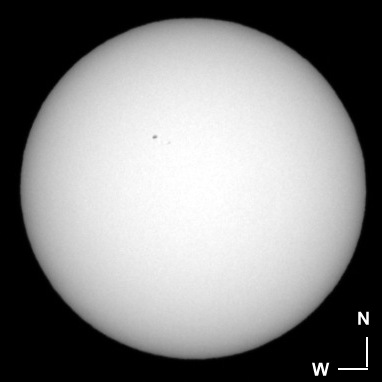
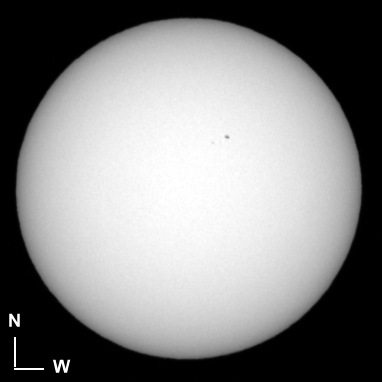
| Single Frame (Full Area, 3096x2080) (The field of view of TS 80mm APO + ASI178MC is just right for viewing the entire solar disk) |
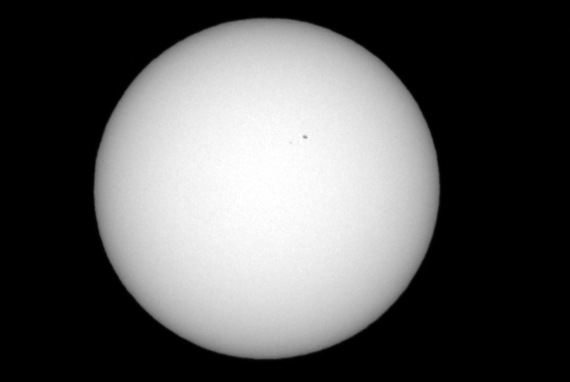
Single Frame (Cropped ) | |
 |
 |
|
| CMOS Monochrome Image (27% size scaling) 2017-11-26 13:53h UT (13_53_41Z / 0001) 0.42ms, 3x3 binning, Mono8 Gain 51, ROI 3096x2080 (Full) TS 80mm f/6 APO + ASI178MC mounted on 12" LX200R (image acquired using SharpCap) |
CMOS Monochrome Image (27% size scaling, cropped) Image Details as left [ larger image - cropped, 50% size ] |
|
| TS 80mm APO Telescope pointing at Sun (glowing ball on viewfinder/heat disperser at back of Altair Herschel Wedge) |
TS 80mm APO Telescope pointing at Sun (glowing ball on viewfinder/heat disperser at back of Altair Herschel Wedge) |
|
Back to Top
The Sun move slightly slower across the sky than the celestrial (sidereal) background. So instead of using Sidereal Tracking Rate the telescope needs to track at a slightly slower rate in order to keep the sun precisely centered in the telescope view. This is necessary or at least a significant benefit if observing/imaging over the course of a few hours.
This adjustment is performed for the LX200R/GPS scope by setting a custom tracking rate in Autostar II (accessed from Setup/Telescope/Tracking Rate/Custom). Custom rates are set by specifying a number that represents what percentage slower (-ve) or faster (+ve) than sidereal tracking is to be used. But what is that percentage and what number should be entered into Autostar II ?
A Solar day is exactly 24 hours, so the sun tracks at 360.0000 deg/day.
A Sidereal day is 23 hours 56 minutes 4.091 seconds, so sidereal tracking is
360.9856 deg/day (24.000000/23.934470 *360)
Therefore the sun
tracks at 99.7270% that of sidereal rate (360.0000/360.9856 *100).
In other
words the sun tracks at a rate that is 0.2730% slower than sidereal
(100.0000-99.7270)
Normally this would be entered in Autostar II's Custom Tracking as -3,
representing 0.3% slower than sidereal
(-999 would stand for 99.9%
slower). However for my LX200 which has firmware updated to 4.2G v19 and
uses 10x finer tracking rate (see
more) the Custom Tracking should be set as -27, representing 0.27%
slower than sidereal
To Set Tracking Rate for Solar Observations
- Go to Setup/Telescope/Tracking Rate/Custom. Enter -27
To return to Sidereal tracking rate
- Go
to Setup/Telescope/Tracking Rate/Sidereal
(I presume that
setting Custom Tracking to 0 would have the same effect)
Back to Top
- Routine to capture an image of the sun, and work out the centre of the
solar disk, the offset from the image centre (telescope pointing error), the
image scale and the jog required to move the telescope in order to point
precisely towards the centre of the solar disk.
- Routine to support the
positional referencing of sunspots on the solar disk.
- Routine to facilitate the centering of sunspots in centre of image
- Routine to produce a summarised report for a SharpCap based imaging session
(needs to be able to read the names of the session image set folders
(session date \ object \ time) and read "..CameraSettings.txt" files containing
information on the image acquisition details)
Online
References :
-
Linear least squares fit for a set of points
-
Find-the-Intersection-Point-of-Two-Line-Segments
Back to Top
SharpCap can be configured to save images files in a number of configurations. My own preference is firstly by date(session), then by target name and finally by time set. SharpCap can save a number of files types, (Fits files, Stacked Fits files & Raw Fits Files), SER files (video files) and PNG files (PNG files and Processed PNG files). Camera settings used to acquire images can be optionally saved in a CameraSettings.txt file at the same folder location as the assocated image/video file. A lot of image data can be acquired during a session using a large resolution CMOS camera (especially if imaging the sun, moon or planets) In the first main session with new ASI178MC camera (2017-01-18 (S600)) some 30 GB of image and video data was acquired from 18 Targets comprising 2112 files & 132 subfolders. Remembering exactly what one has acquired in an evening and navigating to the data can be a difficult task.
Existing tools (Delphi Pascal Fits Header Analysis, Excel Fits-Summary Sheets and CCDApp2 Folder /Processing & Viewing Tools) have been invaluable for recording and working with Fits Image data acquired with SBiG camera using CCDSoft.
In order to provide self documentation of data acquired using SharpCap & ASI178MC camera and a means to more quickly use and navigate that data a new tool set has been developed with my Observatory Control & Analysis Program called AIS/CCDApp2. There are two main tools/features:
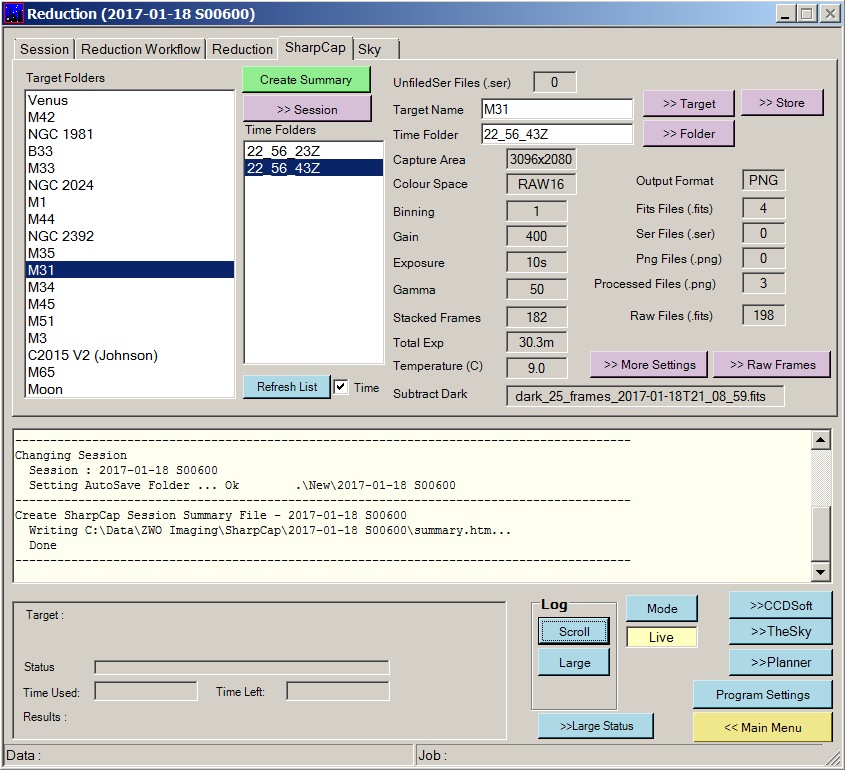
Firstly there is a new windows tab that shows interactive lists of the Target and Time folders created by SharpCap during an imaging session, several data fields that display the camera settings used and the number and types of image files generated, together with various buttons that can quickly open the folders or open the Camera Settings file for more details. Targets can be displayed in either smart alpha-numeric order or in the order that they were imaged. (see Example Screenshot below)
Secondly there is a new button/routine that navigates the same directory structure and builds a htm-based tabulation of the various targets, time based image sets, plus camera settings used and the number & type of files. Targets can be tabulated in either smart alpha-numeric order or in the order that they were imaged. The resulting table can be copied into Excel or pasted within the Session's web page (see Example Table below).
| Example Screenshot New 'SharpCap' Tab in AIS/CCDApp2 Program |
|||||||||||||||||||||||||||||||||||||||||||||||||||||||||||||||||||||||||||||||||||||||||||||||||||||||||||||||||||||||||||||||||||||||||||||||||||||||||||||||||||||||||||||||||||||||||||||||||||||||||||||||||||||||||||||||||||||||||||||||||||||||||||||||||||||||||||||||||||||||||||||||||||||||||||||||||||||||||||||||||||||||||||||||||||||||||||||||||||||||||||||||||||||||||||||||||||||||||||||||||||||||||||||||||||||||||||||||||||||||||||||||||||||||||||||||||||||||||||||||||||||||||||||||||||||||||||||||||||||||||||||||||||||||||||||||||||||||||||||||||||||||||||||||||||||||||||||||||||||||||||||||||||||||||||||||||||||||||||||||||||||||||||||||||||||||||||||||||||||||||||||||||||||||||||||||||||||||||||||||||||||||||||||||||||||||||||||||||||||||||||||||||||||||||||||||||||||||||||||||||||||||||||||||||||||||||||||||||||||||||||||||||||||||||||||||||||||||||||||||||||||||||||||
 |
|||||||||||||||||||||||||||||||||||||||||||||||||||||||||||||||||||||||||||||||||||||||||||||||||||||||||||||||||||||||||||||||||||||||||||||||||||||||||||||||||||||||||||||||||||||||||||||||||||||||||||||||||||||||||||||||||||||||||||||||||||||||||||||||||||||||||||||||||||||||||||||||||||||||||||||||||||||||||||||||||||||||||||||||||||||||||||||||||||||||||||||||||||||||||||||||||||||||||||||||||||||||||||||||||||||||||||||||||||||||||||||||||||||||||||||||||||||||||||||||||||||||||||||||||||||||||||||||||||||||||||||||||||||||||||||||||||||||||||||||||||||||||||||||||||||||||||||||||||||||||||||||||||||||||||||||||||||||||||||||||||||||||||||||||||||||||||||||||||||||||||||||||||||||||||||||||||||||||||||||||||||||||||||||||||||||||||||||||||||||||||||||||||||||||||||||||||||||||||||||||||||||||||||||||||||||||||||||||||||||||||||||||||||||||||||||||||||||||||||||||||||||||||||
|
Example Tab produced by new Tool in CCDApp2 program SharpCap Session - 2017-01-18 S00600
|
Back to Top
As described above a SharpCap Browser tool has been built in my CCDApp2 observatory program to browse folders and files created by SharpCap, and create and .htm table that can provide an automated listing of the SharpCap folders and files. To facilitate the optimum use of this tool some post session management of the SharpCap folders & files is necessary and appropriate.
My own practice and probably the practice of other observers is to consider all the images acquired during the same session (whether acquired before or after midnight) as part of the same dataset, whilst obviously preserving the precise date and time that each image was acquired. SharpCap however does things differently:
SharpCap places files recorded after midnight into a different date folder to the images recorded before midnight.
(ie they become separated even though they form part of the same observing session)
SharpCap places files recorded on the following evening in the same date folder as the images acquired after midnight on the previous night. (i.e they become grouped together even though they belong to two different observing sessions)
In order to follow a 'session based storage structure' the following post-session management is undertaken
Post-Midnight Target Folders (from say the '2017-01-19' date folder) are moved into the session folder containing the pre-midnight data. (i.e into the folder '2017-01-18' )
A Session ID suffix is added to then Date folder containing the Merged Data
(the folder '2017-01-18' is for example renamed as '2017-01-18 (S00600)' )The post-midnight data obviously needs to be moved before further data is acquired on the following evening.
The Session Browser and Session Table Builder tools employ smart alphanumeric sorting and automatically sorts folders acquired after midnight (00h to 08h) after folders acquired before midnight (09h to 23h). The cutoff of 09:00h is used in case solar images are acquired during daytime observing. (In practice solar images might well be treated as a separate session).
Back to Top
| This Web Page: | Notes - Session 606 (2017-11-26) |
| Last Updated : | 2023-11-29 |
| Site Owner : | David Richards |
| Home Page : | David's Astronomy Web Site |