David's Astronomy Pages
Notes - Session 647 (2019-01-02)
Notes
(S646)
Notes
Main
Home
Page
Notes
(S648)
David's Astronomy Pages
|
Notes (S646) |
Notes Main |
Home Page |
Notes (S648) |
Main aims
Equipment & Software
Highlights
Lowlights
Summary Plots & Logs
| Observing Plan (2019-01-02, S647) | ||||||||||||||||||||||||||||||||||||||||||||||||||||||||||||||||||||||||||||||||||||||||||||||||||||||||||||||||||||||||||||||||||||||||||||||||||||||||||||||||||||||||||||||||||||||||||||||||||||||||||||||||||||||||||||||||||||||||||||||||||||||||||||||||||||||||||||||||||||||||||||||||||||||||||||||||||||||||||||||||||||||||||||||||||||||||||||||||||||||||||||||||||||||||||||||||||||||||||||||||||||||||||||||||||||||||||||||||||||||||
 |
||||||||||||||||||||||||||||||||||||||||||||||||||||||||||||||||||||||||||||||||||||||||||||||||||||||||||||||||||||||||||||||||||||||||||||||||||||||||||||||||||||||||||||||||||||||||||||||||||||||||||||||||||||||||||||||||||||||||||||||||||||||||||||||||||||||||||||||||||||||||||||||||||||||||||||||||||||||||||||||||||||||||||||||||||||||||||||||||||||||||||||||||||||||||||||||||||||||||||||||||||||||||||||||||||||||||||||||||||||||||
| Observing Result (2019-01-02, S647) | ||||||||||||||||||||||||||||||||||||||||||||||||||||||||||||||||||||||||||||||||||||||||||||||||||||||||||||||||||||||||||||||||||||||||||||||||||||||||||||||||||||||||||||||||||||||||||||||||||||||||||||||||||||||||||||||||||||||||||||||||||||||||||||||||||||||||||||||||||||||||||||||||||||||||||||||||||||||||||||||||||||||||||||||||||||||||||||||||||||||||||||||||||||||||||||||||||||||||||||||||||||||||||||||||||||||||||||||||||||||||
 |
||||||||||||||||||||||||||||||||||||||||||||||||||||||||||||||||||||||||||||||||||||||||||||||||||||||||||||||||||||||||||||||||||||||||||||||||||||||||||||||||||||||||||||||||||||||||||||||||||||||||||||||||||||||||||||||||||||||||||||||||||||||||||||||||||||||||||||||||||||||||||||||||||||||||||||||||||||||||||||||||||||||||||||||||||||||||||||||||||||||||||||||||||||||||||||||||||||||||||||||||||||||||||||||||||||||||||||||||||||||||
|
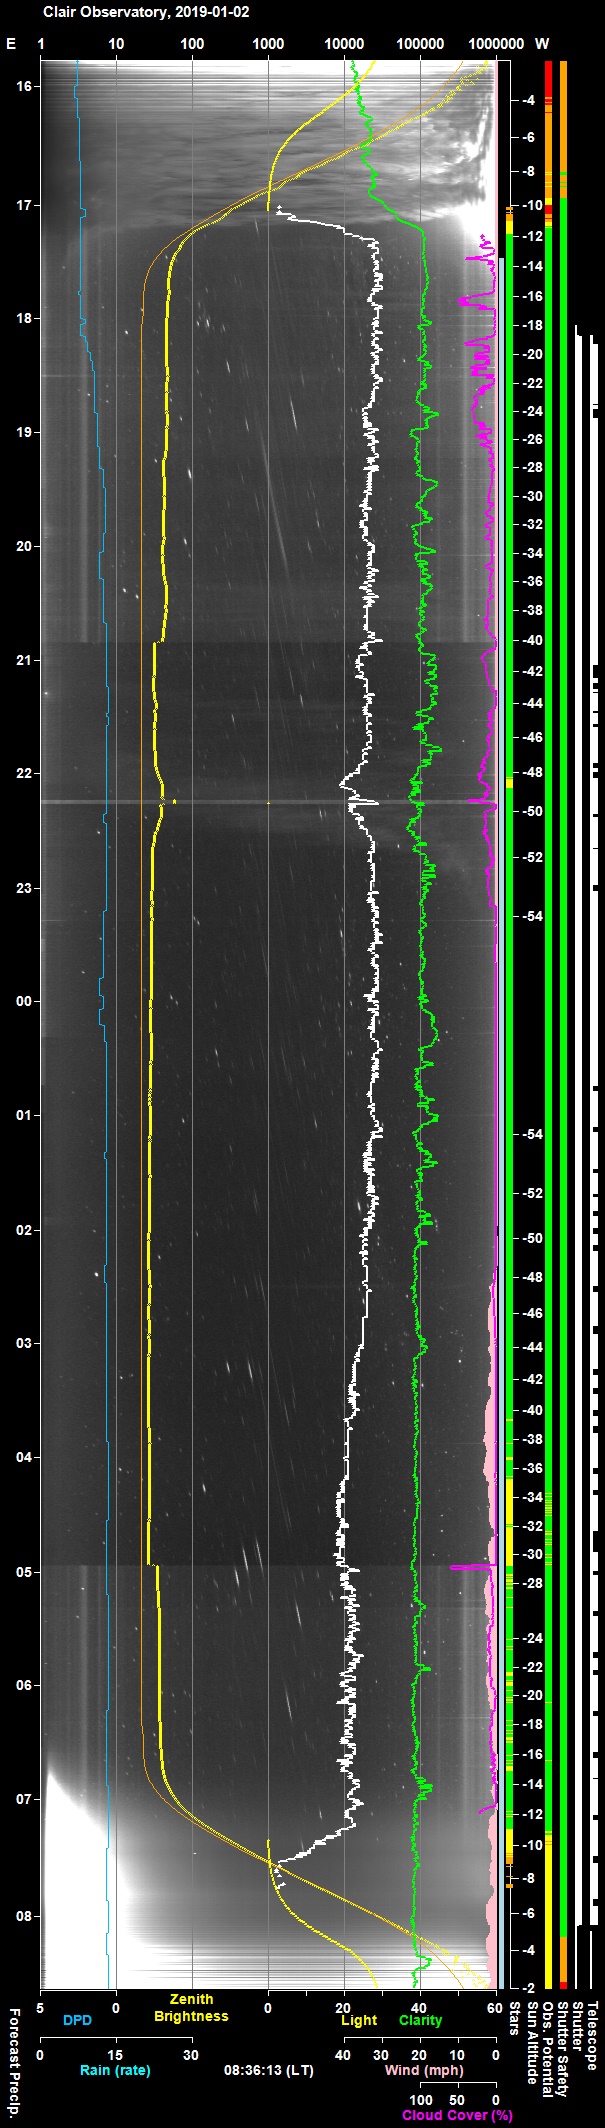
Night Sky Summary Plot -
2019-01-02, S647 Top axis: Sky Brightness at Zenith (in ADU/s) Lefthand axis: Local Time (hh LT). Righthand axis: Sun Altitude (degs) |
||||||||||||||||||||||||||||||||||||||||||||||||||||||||||||||||||||||||||||||||||||||||||||||||||||||||||||||||||||||||||||||||||||||||||||||||||||||||||||||||||||||||||||||||||||||||||||||||||||||||||||||||||||||||||||||||||||||||||||||||||||||||||||||||||||||||||||||||||||||||||||||||||||||||||||||||||||||||||||||||||||||||||||||||||||||||||||||||||||||||||||||||||||||||||||||||||||||||||||||||||||||||||||||||||||||||||||||||||||||||
 |
||||||||||||||||||||||||||||||||||||||||||||||||||||||||||||||||||||||||||||||||||||||||||||||||||||||||||||||||||||||||||||||||||||||||||||||||||||||||||||||||||||||||||||||||||||||||||||||||||||||||||||||||||||||||||||||||||||||||||||||||||||||||||||||||||||||||||||||||||||||||||||||||||||||||||||||||||||||||||||||||||||||||||||||||||||||||||||||||||||||||||||||||||||||||||||||||||||||||||||||||||||||||||||||||||||||||||||||||||||||||
| Session Event Log (2019-01-02, S647) | ||||||||||||||||||||||||||||||||||||||||||||||||||||||||||||||||||||||||||||||||||||||||||||||||||||||||||||||||||||||||||||||||||||||||||||||||||||||||||||||||||||||||||||||||||||||||||||||||||||||||||||||||||||||||||||||||||||||||||||||||||||||||||||||||||||||||||||||||||||||||||||||||||||||||||||||||||||||||||||||||||||||||||||||||||||||||||||||||||||||||||||||||||||||||||||||||||||||||||||||||||||||||||||||||||||||||||||||||||||||||
|
Back to Top
Autoguiding Problem (out of
focus guide star). Several targets failed during the session with an autoguiding problem where
invalid guide corrections where produced which resulted in zig-zag star traces
on the resulting images. Not only were the targets not
successfully observed , but some 2.3 hours worth of precious imaging time
was wasted. The problem was investigated further with conclusion that the
problem is most likely due to a defocused guide scope. (See
more detailed notes on this Autoguiding
Problem ). Finally fixed in August 2020, with wide and standard Foc2
autofocusing on near zenith focus field at start of session.
![]() Fixed August 2020 (AstroMain / AstroShCap)
Fixed August 2020 (AstroMain / AstroShCap)
Back to Top
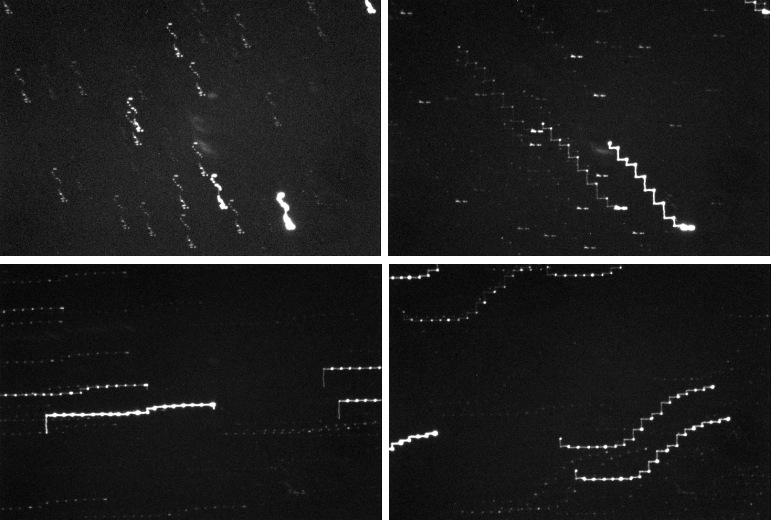
Several target attempts failed during the session with an autoguiding failure, that is best illustrated by looking at a sequence of 4 x 180s frames from Hickson 54. Similar problems affected image attempts on U Gem, Hickson 39, 40, 47, 64, 67, 72, 76 & 80 and C/2017 S3 (in part). It would seem that PHD2 Autoguiding failed to lock onto a suitable guide star or lost it during imaging and sent a series of invalid guide corrections to the mount leading to a series of zig-zag star traces on the resulting image frames.
Not only were the targets not successfully observed , but some 2.3 hours worth of imaging time was wasted.
Problem began on the 31st target of the night. This was after the start of unattended operation and continued for the rest of the night. The failed targets are interspersed with a few targets where autoguiding was successfully achived which show that there wasn't a total failure of the guiding software or the telescope facility to perform guide corrections.
The most likely diagnosis is that temperature drift occured over the course the session which has caused the TS 80mm Guidescope to become sufficiently defocused that it became difficult for the PHD2 to find & maintain a suitable guide star (particularly in relatively dim star fields typical of Hickson Galaxy Clusters)
| Sequence of Frames from Hickson 54 |
 |
|
CCD Images (50% size) 4 x 180s exposure, 3x3 binning, C Filter 2019-01-03 01:22 UT (#647320-23) 12" LX200R (at f/10.4) + ST-10XME Auto-guided attempt using TS 80mm APO, ZWO ASI178MC & PHD2 |
Typical log files from one of these failed targets :
Activate Guidescope Guiding
Ok Using PHD2 (ZWO ASI ASCOM Cam)
Guide Exposure: Ok Exposure 2s
Send Guide Request
Guiding ... Ok Guide Request Returned
Lock Position OK X: 2090.0, Y: 82.0
Star Selected OK X: 2090.0, Y: 82.0
Lock Position OK X: 2080.0, Y: 76.2
Guiding ... Ok Guiding Started
Settling Begun Ok
Star ... Fail Star lost - mass changed
Star ... Fail Star lost - mass changed
Star ... Fail Star lost - low SNR
Settling... Fail Error: timed-out waiting for guider to settle
Review Guiding ... Fail Guiding failed to start within Settle Period
Using C filter...
Taking 180s image (C)... Ok [00647311] 00:51:09 (UT) Full 3x3 180s C
Guide Stats rms error 11.0" 9.3" / 5.9", SNR: 18.8, SM: 1926, Guide: 75% (Lost: 25%), N: 36
Taking 180s image (C)... Ok [00647312] 00:54:14 (UT) Full 3x3 180s C
Guide Stats rms error 34.9" 25.3" / 24.0", SNR: 16.4, SM: 1617, Guide: 42% (Lost: 58%), N: 31
Taking 180s image (C)... Ok [00647313] 00:57:20 (UT) Full 3x3 180s C
Guide Stats rms error 21.1" 14.1" / 15.6", SNR: 32.4, SM: 44777, Guide: 79% (Lost: 21%), N: 34
Taking 180s image (C)... Ok [00647314] 01:00:33 (UT) Full 3x3 180s C
Guide Stats rms error 4.0" 3.8" / 1.4", SNR: 28.2, SM: 38347, Guide: 66% (Lost: 34%), N: 41
Taking 180s image (C)... Ok [00647315] 01:03:38 (UT) Full 3x3 180s C
Guide Stats rms error 4.7" 4.0" / 2.5", SNR: 31.9, SM: 43239, Guide: 56% (Lost: 44%), N: 39
Guiding Results 15.6 mins (elapsed)
Guide Stats rms error 16.6" 12.0", 11.5", SNR:26.4, SM: 28178, Guide: 64% (Lost: 36%), N:181 (65)
Back to Top
PegasusAstro Power Supply (12V, 10A, 2.5mm) arrived today from AstroShop.EU
This is sealed and certified switching power supply unit that is
promoted as being the perfect match for the Pegasus Astro Products. It can
provide 12V and up to 10Amps. (120W of total power). Low ripple and noise are
meant to ensure that it provide the required and correct “electric juice” to
one's precious equipment.
Specification:
Protections:
The new 10A Power Supply will replace a 5A 12V supply that originally supplied power to my old manual dew heater controller and more recently powered the UPB Power box for a couple of months during its commissioning phase. The old 12V supply was noisy (with an incorporated fan), of probable high electrical noise and of insufficient power for future requirements using the UPB (such as powering the LX200 telescope and future equipment)
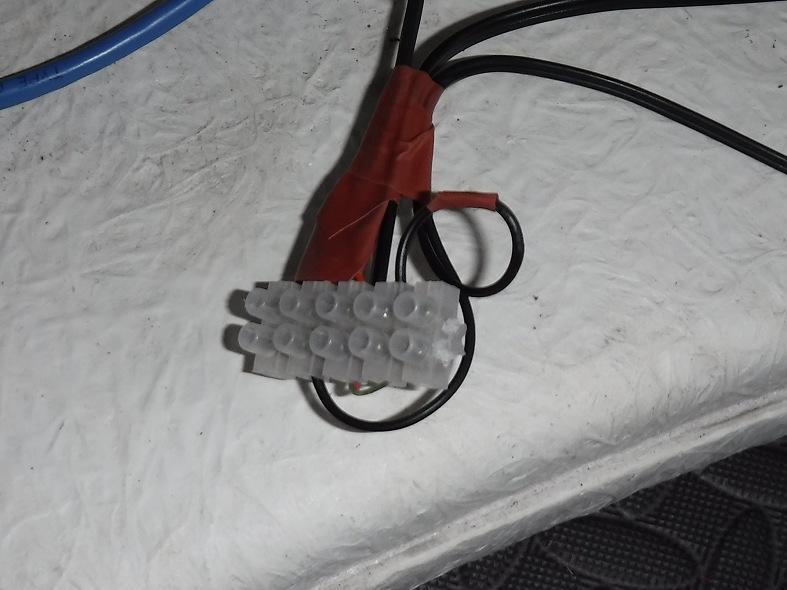
Extension Cable Issue (1). The cable on the Power Supply is too
short to reach the UPB mounted on the scope and therefore an extension cable
will need to be used. It is proing difficult to find a cable with 2.5mm
male plug that fits securely into the power-in port on the PowerBox. The cable
that I bought for the purpose (and other cables that will eventually become
available) has a 2.5mm/5.5mm plug that is too loose and produces power
disconections to the UPB if the cable moves in any way. This is a
particular issue as the placement of the powerbox on one of the arms of the
LX200 Fork Mount means that it is always prone to some movement even if taped. Until a suitable extension cable can be found, the current extension cable is
being used with a small piece of wood and vinyl to wedge the plug in a 'as
secure as possible' manner.
(See notes below on
Observatory Cabling
Changes & Daytime Tests
Extension Cable Issue (2). Once the PowerBox was used to
power the LX200 mainscope it became evident that a regular (thin wire) 12V
extension cable (2.5mm male to 2.5mm female) was generating significant voltage
drops to the UPB. With dew heaters on full power voltage would drop
to as lower as 10.5V and produce short-circuit messages in the UPB software.
This was eventually resolved 2019-04-22 by the introduction of a new 16 AWG
Extension Cable to reduce the voltage drop going to the UPB powerbox, allowing
dew heaters to be run at full power whilst still providing 11.9V input voltage
to the UPB (see
Pegasus UPB - 16 AWG Extension Cable, 2019-04-22)
Back to Top
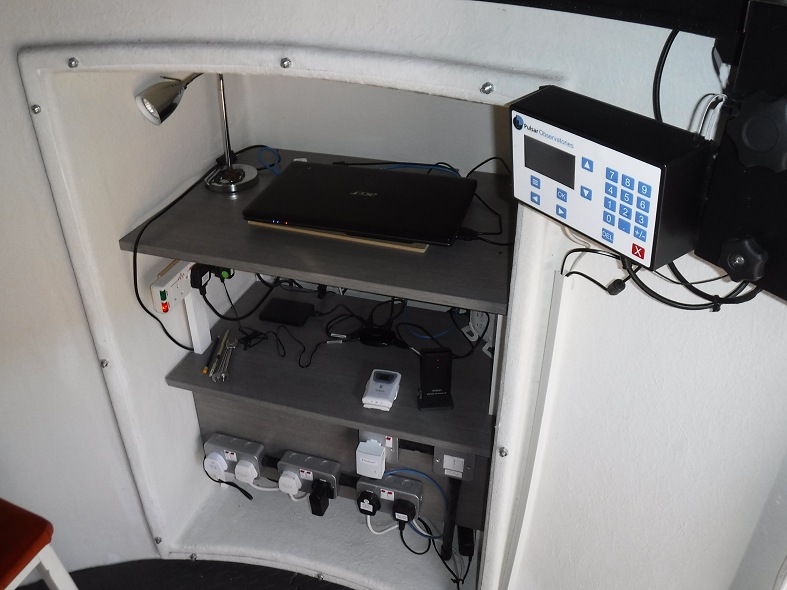
Cabling Changes
A number of cabling changes were made
in the observatory today
- Removed old 5A 12V Dew Heater Power Supply and cabling (including extension)
-
Removed old RS232 cable and Serial -USB Adapter for LX200 telescope (a new
Serial Cable with embedded USB adapter is already in use)
- Removed old
power supply and cabling used for old AllSky Laptop (new power supply &
cabling for new AllSky Laptop is already in use)
- Added new 12A 12V
Pegasus Power Supply and cabling (including extension)
- Added 2.1mm to
2.5mm 12V cable to output power port on Pegasus UPB (including extension)
Daytime Tests
With new 10A Power Supply and cabling to Pegasus UPB in place the LX200 scope was powered up and a series of slew tests were made including moving the scope to extreme positions (just east of North and just west of North).
Previous tests had shown potential issues with USB and Power Cable to the UPB and the Serial Cable to the LX200 being pull tightly across the front of the LX200 base when the scope is moving westwards to positions just west of North. As a result a no-go area (between 340 and 360 deg) was implemented in the Observatory Control program.
Whilst moving the scope westwards to the Due North and just beyond Due North
there was a loss of connection to the UPB and consequently a loss of connection
to the LX200 Scope. Checking show that the USB plug on the cable to the
Pegasus UPB had been pulled sufficiently far out of its USB input port that
comms to UPB stopped.
It was already noted that the 2.5mm
plug on the 12V cable going into the UPB sat fairly loosely in its power port
and some movements of the scope would cause sufficient power outage to the UPB
that communications with the UPB to fail.
Operational Issues (2019-01-08, Day Time Tests)
Critical Issues
|
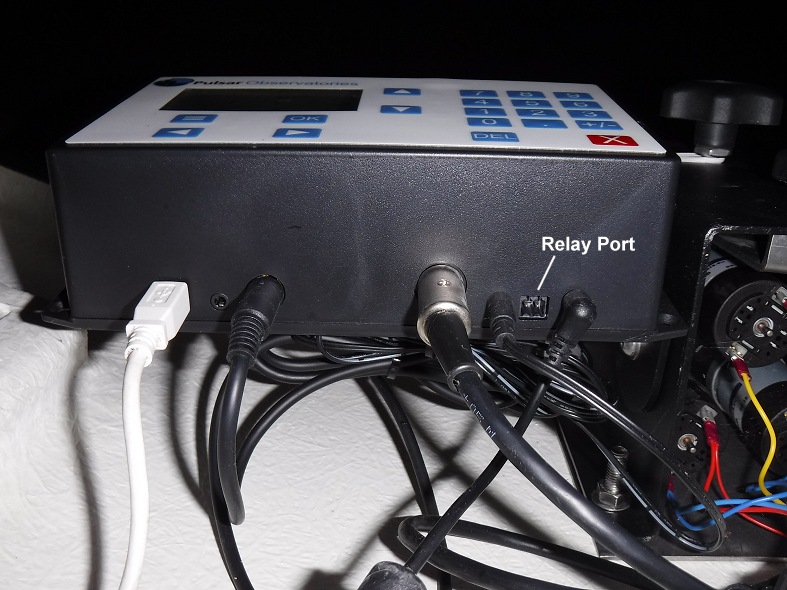
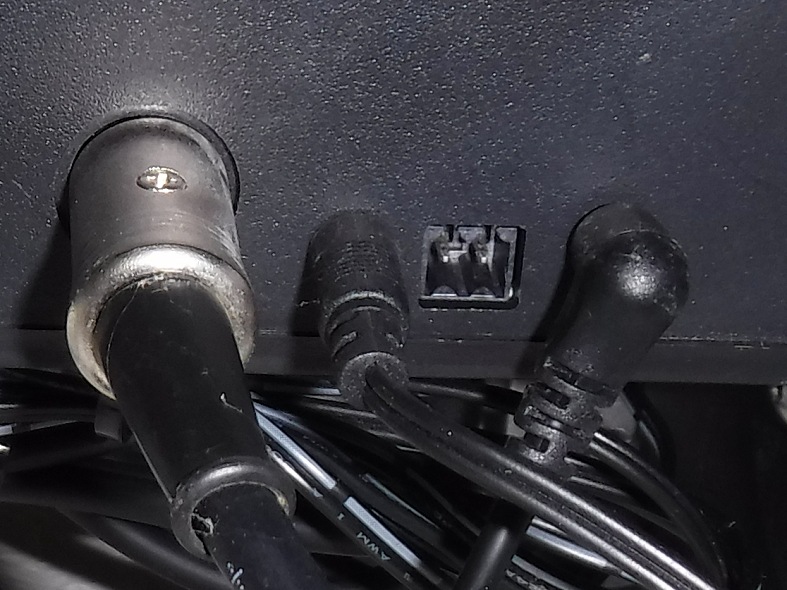
Annotated Picture showing Cabling to Pegasus Power Box , the positions of the USB In and Power In ports, and the newly added taping used to stablise the cable connections (note the cable bundle from the PowerBox was later reconfigured to descend from the back of the fork base rather than descend directly from the fork arm |
 |
Back to Top
Cabling Changes
Both the Observatory PC and AllSky
PC seem to suffer from loose fitting USB Plugs, such that a small movement
of the either computer or a small knock on the attached USB cables causes
the attached
devices to Disconnect/Reconnect. This is a problem because in some cases the
momementary disconnection causes a change in
associated COM Port numbers or upset of the connected USB Hub or connected
device. Both
computers are fairly old and the 2 metal retaining 'springs' in each
USB port have become flattened & weakened.
After watching a YouTube video (
https://www.youtube.com/watch?v=B_ruqSrkxNU )
a repair to the Observatory Computer was made by pushing 'out' the
metal lugs/spring in order make the USB plugs fit more tightly.
(The fix was subsequently made to the USB Ports on the AllSky PC on
2019-01-12)
It is unclear if the slackness in the USB port had played any role in COM Port switch events that can occur whilst the observatory is unoccupied, however the Observatory equipment has been now (2019-01-18) running now for a full week without any COM Port Switch events.
|
Two of the three USB ports on the Observatory PC Each port has a couple of small metal lugs which have gradually become flattened loosing the grip on any insert USB Plug. These having being given rise to disconnection events when computer is moved or the cables are accidently knocked. There are actually a further pair of metal lugs at the top of the USB and these were lifted down to again tighten the USB Port's hold on any inserted USB plugs |
 |
|
Fixing the USB Ports with a very small screwdriver Tip of the screwdriver is used to slightly lift up the metal lugs |
 |
Back to Top
Humidity Sensor from Pegasus UPB ( a combined external Temperature/Humidy Sensor) has failed and has been returned to supplier for a replacement yesterday.
Nov 2018 . Humidty values from sensor not to be reading
higher than than of an oregon scientific humidty sensor also situated in the
observatory
( see
5 day chart
comparing different sensor readings - Nov 2018)
Dec 2018. Humidty values noticed to be reading
99% for 12-24 hours at a time or otherwise reading considerably higher than the
Oregon Scientific sensor.
(Tried the Pegasus sensor in a number for locations
but problem persisted. The reading of 99% would imply the sensor
area might be dripping in condensation but the area was plainly still dry.
Contacted PegasusAstro about the problem (16th Dec) but had no reply. A plot comparing the Pegasus Humidity value with Oregon Scientific Humidities is
shown below.

Jan 2019. Humidity values reading 99% for 3 weeks now. Contacted AltairAstro about the problem on 2019-01-07 and returned the sensor for a replacement by mail on 2019-01-11. ( see 5 day chart comparing different sensor readings - Jan 2019)
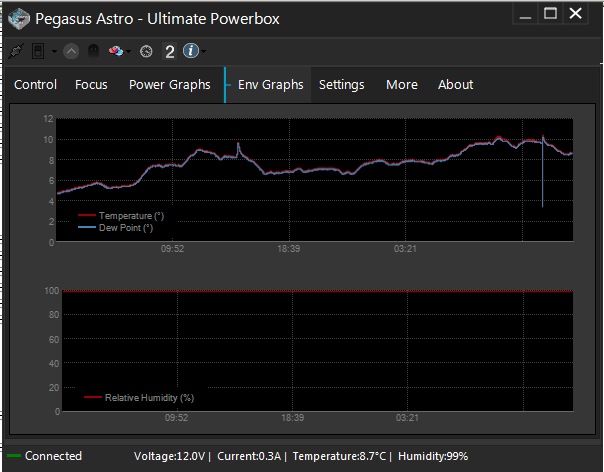
Progression in failure of Humidity Sensor from Nov 2018 to Jan 2019 is shown in the following picture.

Screenshot of the Pegasus PowerBox software showing 99% RH readings
Sensor. Examining the bottom of the sensor before sending it away for replacement shows that it is ASAIR AM2301 Temperature/Sensor with stated precision of +/-3% RH and +/- 0.5 degC. It seem similar to other products known as SONOFF AM2301 (available for £4.38) and AOSONG DHT21 / AM2301

Back to Top
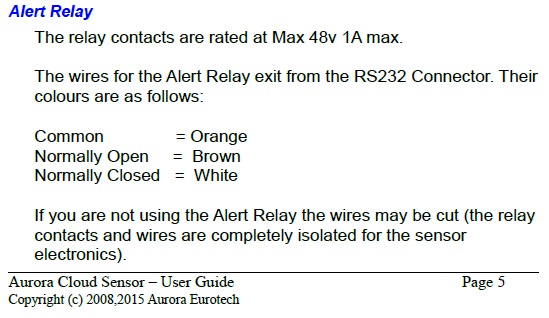
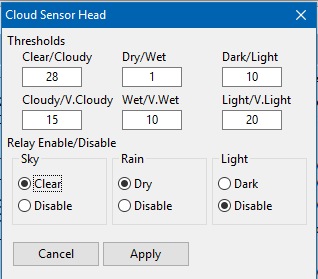
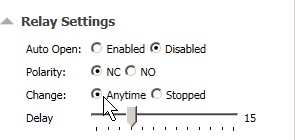
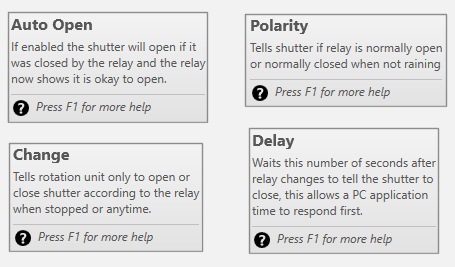
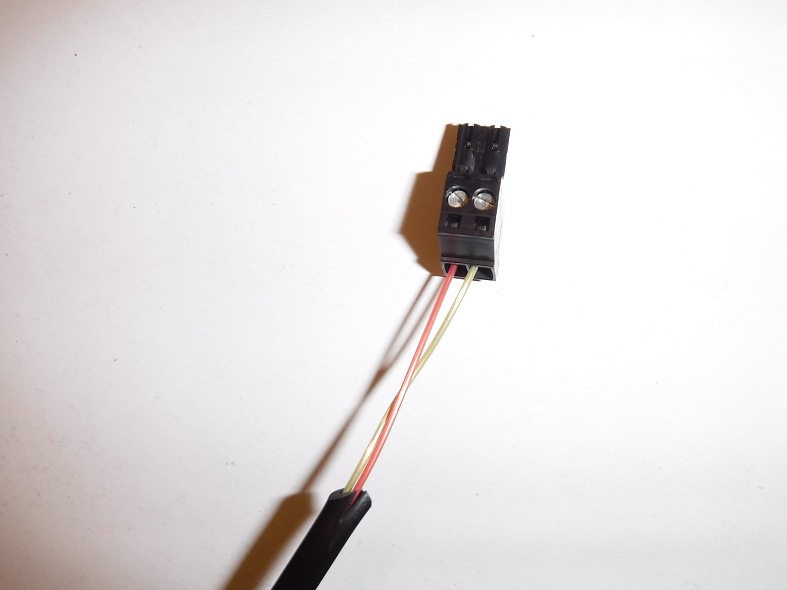
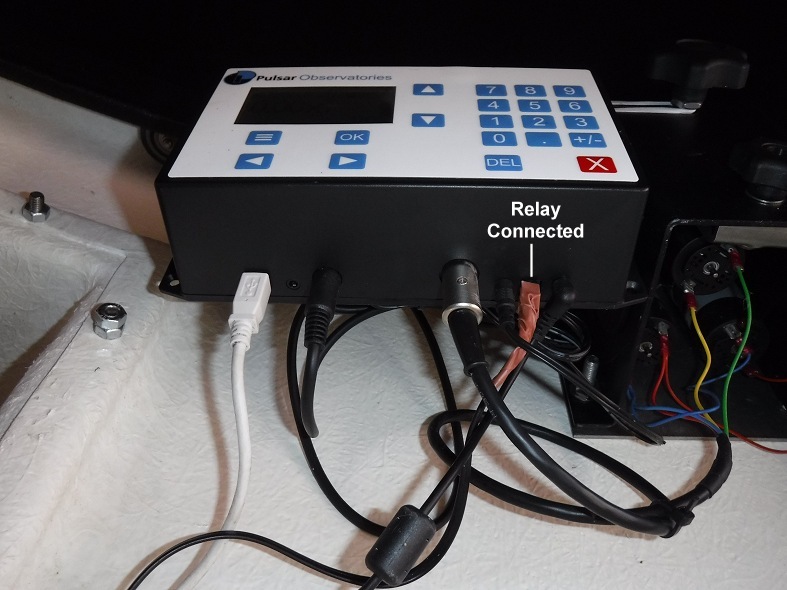

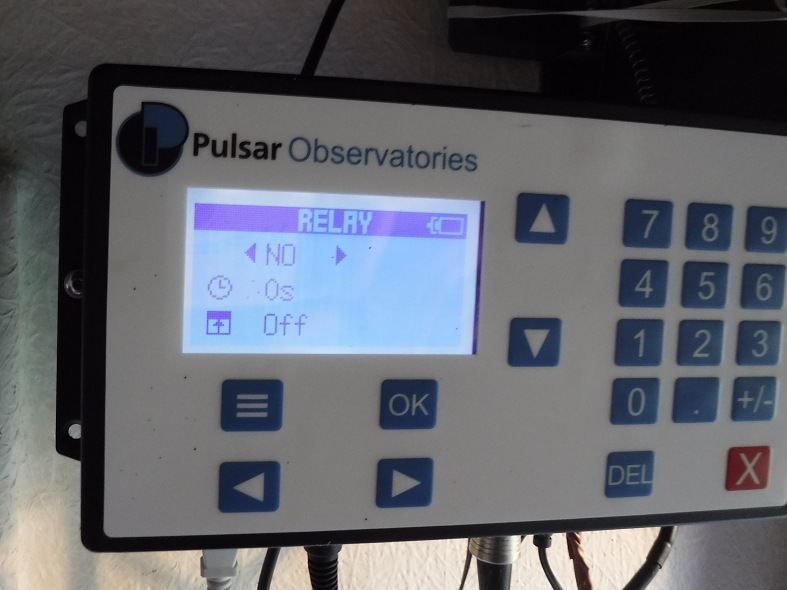

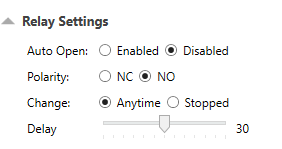
Note that 'Polarity' is set to the 'NO' option for it to get the replay state intended by the observatory's CloudSensor.
Back to Top
Following earlier Cabling Changes (2019-01-08), a tighter fitting 2.5mm power extension cable was fitted to the Pegasus Ultimate PowerBox to solve the risk of UPB disconnection events that earlier extension cable was prone to.
The bundle of 4-cables from the Pegasus UPB (comprising 12V Power & USB going to the powerbox and 12V power & serial connection going to the LX200 Mount) was reconfigured to descend from the back of the fork base ather than descend directly from the arm. This is prevent the bundle being pulled across the front of the LX200 Panel when scope is in the NNW-N position and to provide slightly more protection against cable being wrapped around the mount. However to eliminate the risk of the bundle being caught behind any of the 3 knobs on the Wedge, shaped foam inserts were placed under each knob.
A new set of daytime slew tests were conducted to ensure that the Slews could be safely made.
| Picture showing the reconfigured cable bundle from Pegasus UBP PowerBox | ||
|
|
 |
|
Back to Top
During risk assessment for unattended operation of the
Observatory it was identified that there was a need to reduce or eliminate
the risk of telescope cable getting snagged or otherwise getting hung up as the
telescope slews or rotates round at sidereal pace. Beside the risk to successfully imaging of a target, there is the more significant risk of
damage to cabling, to telescope and equipment ports and potentially to the
telescope motor and electronics.
One particular risk (and believed to
have occurred during one particular session) which caused disconnection of the
SBIG camera) is the snagging of cables from the back of the scope (a USB cable to the ZWO Camera, a power cable to SBIG Camera and a serial cable to the TCF-S
focuser) to become snagged on the pier bolts when the scope is pointing at high
altitudes. ( This was not a risk in my previous roll-off
observatory as the pier bolts lay below floor level. In the new dome observatory
the pier bolts are above the floor surface )
To eliminate this risk shaped foam inserts have pushed into the gaps between the pier and the pier bolts. Other options were considered involving make a protective circular shuttering, but the form inserts was the simplistic method.
| Picture showing the protective measure to eliminate hang-up of telescope cables on pier bolts | ||
 |
 |
|
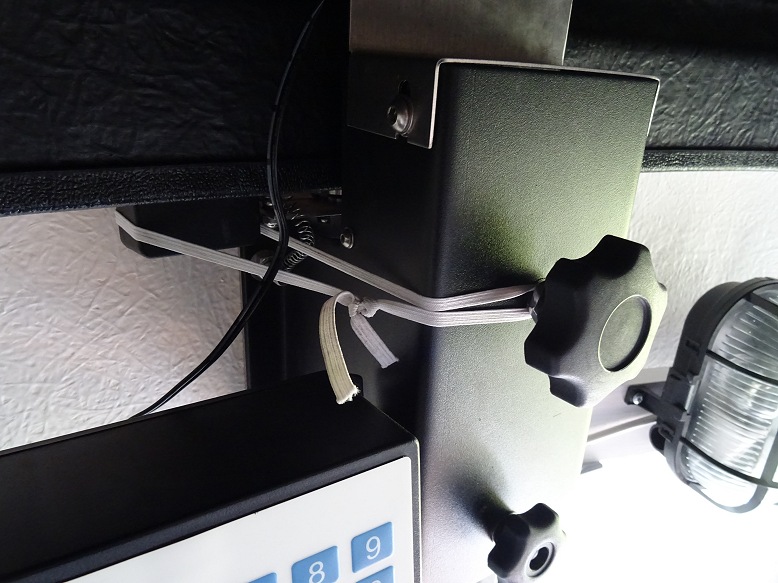
Another risk that has been introduced since the installation of a Pegasus Ultimate PowerBox is the snagging or hang-up of it's cable bundle (comprising 12V Power & USB going to the powerbox and 12V power & serial connection going to the LX200 Mount) behind any of the 3 control knobs on the Wedge. To eliminate this risk shaped foam inserts have been placed under each knob. This is the simplest method to stop cables getting into places they could get trapped in.
|
Picture showing the protective measures to eliminate hang-up
of cables on wedge control knobs |
||
| Right Side of Wedge | Right Side of Wedge (close-up) | |
 |
|
|
| Left Side of Wedge | Rear Side of Wedge | |
 |
 |
|
Back to Top
Pegasus UPB Software was updated to 1.4.10 today. I
Earlier in the
week ASCOM UPB Switch Driver was updated to version 1.4, however testing
shows that it is still unable to be used whilst the UPB Software is running &
connected to the UPB and thus cannot work at the same time as the ASCOM UPB
Stepper Focuser and ASCOM UPB Observing Conditions drivers.
Back to Top
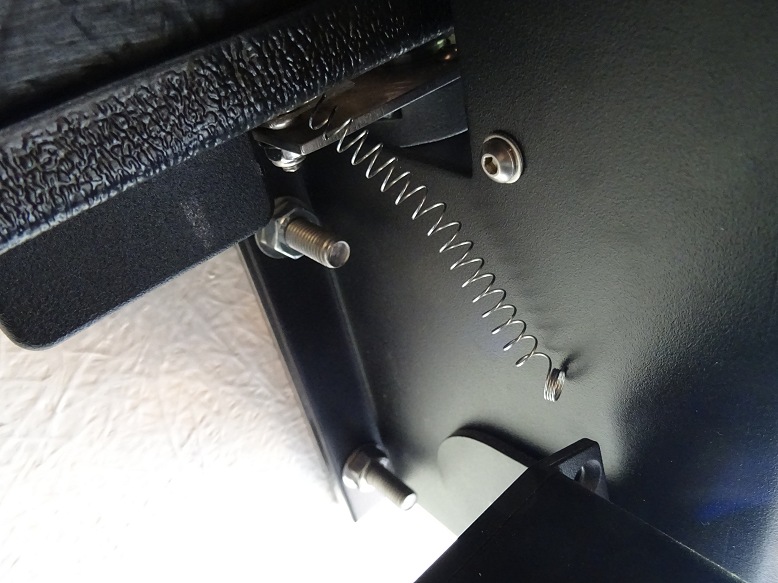
During earlier repositioning of the Dome's Rotation Drive Unit, the spring that holds the encoder off the dome wall & against the roof rim was accidently damaged. This happened when the two parts of the Drive Unit where separated without first disconnecting the spring. The spring was irrepairably overstretched and a length of elastic tape has been used in the meantime to perform the function of the spring.
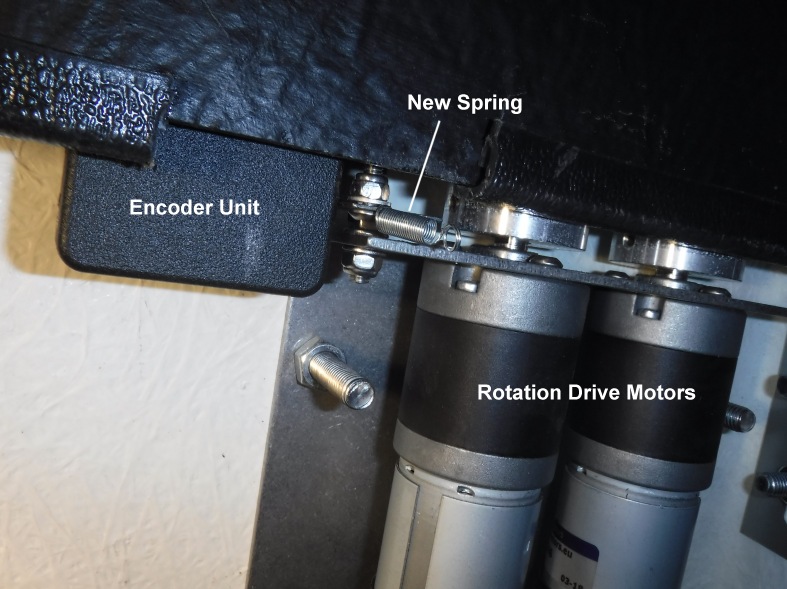
A replacement spring was finally fitted today and the elastic tape bush fix removed.
The spring is mounted onto the encoder arm by means of a small bolt with round head (with hexagonal slot for taking an allen key), washer and self-tightening nut. Removing the bolt and nut, and then putting them back with the new spring is very fiddley as the space for working is very confined and one almost needs 3 hands to do the task. After trying multiple times (with either the spring, the washer, the bolt, the nut, the spanner or the allen key falling to the ground) the front part of the rotation drive with control panel was removed to give a bit more working space.
|
Pictures showing the replacement of Encoder Arm Spring |
||
| Over-stretched Spring on Encoder Arm (spring on encoder arm that became irrepairably overstretched when front motor / driver controller was removed from back motor plate without unhooking the spring) |
Temporary Bush Fix (elastic loop wrapped around the encoder unit to keep the encoder wheel tensioned against the roof flange) |
|
 |
 |
|
|
Rotation Drive Motors with the Front Part of Drive Unit removed to provide more space |
New Spring Fitted to Encoder Arm | |
 |
 |
|
|
Comparison of the new spring with the overstretched, non-functional spring |
Rotation Drive re-assembed with Spring attached between
the Encoder Arm and the Front Part of the Drive Unit |
|
 |
 |
|
Back to Top
Whilst replacing the encoder arm spring on the rotation drive unit it was noticed that head of one of the rotation driver motors was somewhat loose and its grub screw was partially unscrewed/loose. Opportunity was taken to tighten the grub screw and ensure that the motor head was secure. It was fortunate that the problem was caught before it caused a complication during observatory operation.
|
Rotation Drive Motor (from front part of Drive Unit) |
Close Up of Drive Motor Head showing the grub screw that was loose (picture taken after grub screw was tightened) |
|
 |
 |
Back to Top
A suite of 3x3 Dark Sets were acquired at -25 degC (average CCD Cooling 71%)
Bin|Num|Exp |
3 15 0.12
3 15 0.2
3 15 0.5
3 15 1
3 15 2
3 15 3
3 15 4
3 15 5
3 15 8
3 17 10
3 17 15
3 17 20
3 17 30
3 17 45
3 17 60
3 17 90
3 17 120
3 17 180
3 17 300
3 9 600 Set terminated early
Operational Issues
(2019-01-19, Dark Frames)
Major Issues
Minor issues
Back to Top
| This Web Page: | Notes - Session 647 (2019-01-02) |
| Last Updated : | 2024-02-20 |
| Site Owner : | David Richards |
| Home Page : | David's Astronomy Web Site |
