David's Astronomy Pages
Notes - Session 926 Attempt 1 (2021-10-15)
Notes
(S925)
Notes
Main
Home
Page
Notes
(S926B)
David's Astronomy Pages
|
Notes (S925) |
Notes Main |
Home Page |
Notes (S926B) |
|
|
Session Aims & Highlights |
| - Observing Result - Night Summary Plot - Session Event Log |
|
|
|
Operational Issues |
| - Critical Issues (0),
Major Issues (0),
Minor Issues (6), Small Defects (2),
Continuous Improvement (9) |
|
 |
No Images >> [ Local Files >> ] |
|
|
Pegasus Astro USB Control Hub |
| 2021-10-12 | |
|---|---|
|
|
AllSky/Weather Computer - Installation of Pegasus Astro USB Control Hub |
Main aims
Equipment & Software
Highlights
Summary Plots & Logs
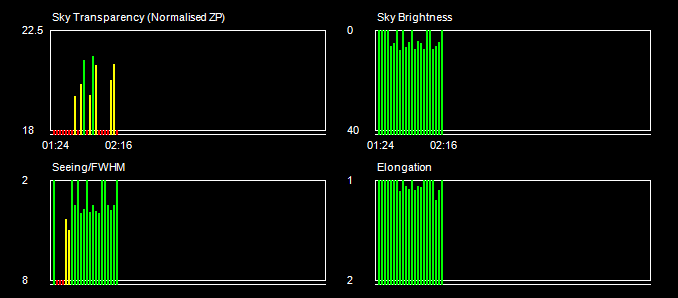
| Sky Conditions (Locate Frames) | ||||||||||||||||||||||||||||||||||||||||||||||||||||||||||||||||||||||||||||||||||||||||||||||||||||||||||||||||||||||||||||||||||||||||||||||||||||||||||||||||||||||||||||||||||||||||||||||||||||||||||||
 |
||||||||||||||||||||||||||||||||||||||||||||||||||||||||||||||||||||||||||||||||||||||||||||||||||||||||||||||||||||||||||||||||||||||||||||||||||||||||||||||||||||||||||||||||||||||||||||||||||||||||||||
|
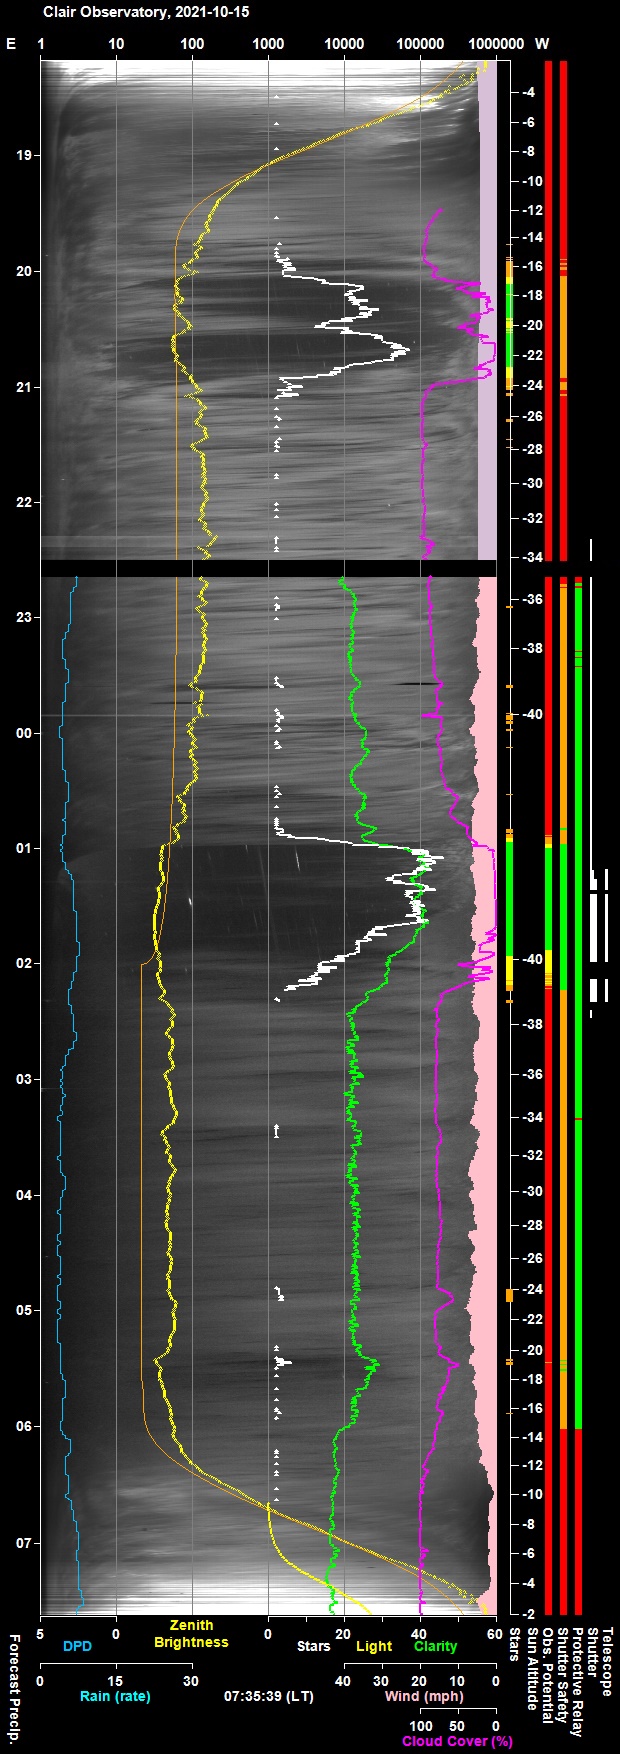
Night Sky Summary Plot Top axis: Sky Brightness at Zenith (in ADU/s) Lefthand axis: Local Time (hh LT). Righthand axis: Sun Altitude (degs) |
||||||||||||||||||||||||||||||||||||||||||||||||||||||||||||||||||||||||||||||||||||||||||||||||||||||||||||||||||||||||||||||||||||||||||||||||||||||||||||||||||||||||||||||||||||||||||||||||||||||||||||
 |
||||||||||||||||||||||||||||||||||||||||||||||||||||||||||||||||||||||||||||||||||||||||||||||||||||||||||||||||||||||||||||||||||||||||||||||||||||||||||||||||||||||||||||||||||||||||||||||||||||||||||||
|
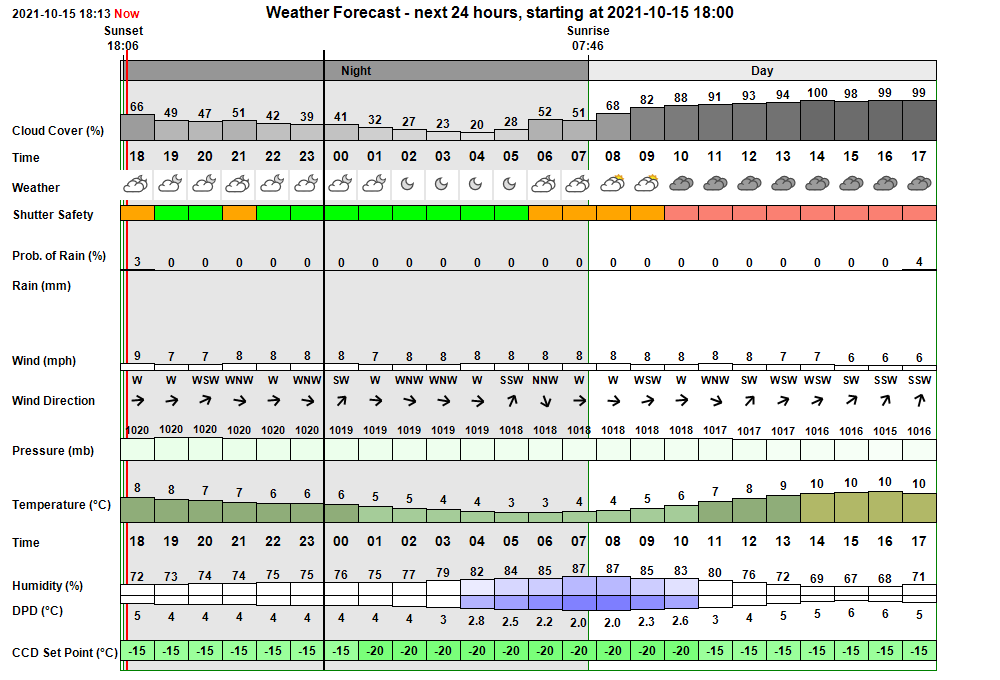
Actual Weather vs Pre-Session Weather Forecast |
||||||||||||||||||||||||||||||||||||||||||||||||||||||||||||||||||||||||||||||||||||||||||||||||||||||||||||||||||||||||||||||||||||||||||||||||||||||||||||||||||||||||||||||||||||||||||||||||||||||||||||
 |
||||||||||||||||||||||||||||||||||||||||||||||||||||||||||||||||||||||||||||||||||||||||||||||||||||||||||||||||||||||||||||||||||||||||||||||||||||||||||||||||||||||||||||||||||||||||||||||||||||||||||||
 |
||||||||||||||||||||||||||||||||||||||||||||||||||||||||||||||||||||||||||||||||||||||||||||||||||||||||||||||||||||||||||||||||||||||||||||||||||||||||||||||||||||||||||||||||||||||||||||||||||||||||||||
| Session Event Log | ||||||||||||||||||||||||||||||||||||||||||||||||||||||||||||||||||||||||||||||||||||||||||||||||||||||||||||||||||||||||||||||||||||||||||||||||||||||||||||||||||||||||||||||||||||||||||||||||||||||||||||
|
||||||||||||||||||||||||||||||||||||||||||||||||||||||||||||||||||||||||||||||||||||||||||||||||||||||||||||||||||||||||||||||||||||||||||||||||||||||||||||||||||||||||||||||||||||||||||||||||||||||||||||
| Session Alerts | ||||||||||||||||||||||||||||||||||||||||||||||||||||||||||||||||||||||||||||||||||||||||||||||||||||||||||||||||||||||||||||||||||||||||||||||||||||||||||||||||||||||||||||||||||||||||||||||||||||||||||||
|
Back to Top
Back to Top
USB Control Hub
A Pegasus USB Control Hub (UCH) which
had been recently ordered from The Widescreen Centre arrived today
(2021-10-15)
(
https://www.widescreen-centre.co.uk/
Description
The UCH Control Hub is a SuperSpeed
(SS), low power, switchable USB3.1 Gen1 hub. The Hub supports Hi-Speed (HS),
Full Speed (FS) and Low Speed (LS). The new SuperSpeed hubs operate in
parallel with the USB 2.0 controller, so 5 Gbps SuperSpeed data transfers
are not affected by slower USB 2.0 traffic. The Hub is certified to
work flawlessly from -40°C to +85°C. Size is 100mm x 72mm x 24mm /
3.9” x 2.8” x 0.94”. Weight is 200g / 7 oz.
The Hub has 6 x USB 3.1
Ports. All ports are backwards compatible with USB 1.0 and USB 2.0 devices.
Moreover, each port can deliver up to 2.5Amps of current. There
is a smart current limit sensor in every port which automatically limits or
cuts power in case of a short-wire or power consumption that is above
2.5Amps. Maximum Total Amperage is 8 Amps.
Each USB port can be
controlled and switched ON/OFF by Pegasus Astro's standalone software or via
ASCOM Switch Connection. The benefit is that there no more need to
pull out and re-plug USB cables to 'reset' equipment.
The Hub is powered using a 12V supply from a power adapter with 2.1mm plug
or using supplied cigarette lighter plug to 2.1mm socket.
In my case I've purchased the UCH along with a Pegasus's 12V/10A
Power Adapter. Whilst has the potential to provide far more power than
required by the USB devices being run on the AllSky/Weather Computer, this
particular adapter was acquired as it could potentially act as a spare
should the 12V/10A adapter that powers a Pegasus PowerBox (mounted on
telescop) fail at some future date.
Details from UCH product page at
https://pegasusastro.com/products/usb-control-hub/
Planned Role
Software & Documentation
USB Drivers, ASCOM Switch
Driver and UCH Software were downloaded from Pegasus Astro's Software &
Documentation Page
https://pegasusastro.com/downloads/
- Firmware Version 1.3
- Software Version 1.4.2.0
- ASCOM Switch Driver version 1.1
USB Control Hub Forum at https://pegasusastro.com/forum/viewforum.php?f=9&sid=7cc5d27f09b019935fd34fde4bb89cd8
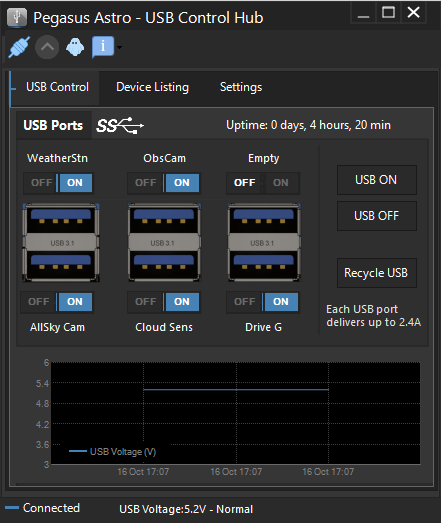
USB Ports
Ports are arranged in the following
arrangement (both physically and in the Pegasus UCH Software).
Port 2 Port 4
Port 6
Port 1 Port 3
Port 5
Initial Tests
After connecting to 12V Power Supply
and allowing the Hub to boot-up a series of initial tests were carried out
- Tested the USB Control Hub and its functions via the Pegasus Astro UCH
Software:
- Demonstrated that each of the 6 USB ports operates ok and
can be individually turned off/turned on
- Demonstrated that USB
Settings as start-up are saved to the Hub's eeprom.
(confirmed
this by turning the hub off and on again and checking the individual ports
were on or were off as expected.
- Noted that port names are limited
to 10 characters. It is proposed to use the following port name
after the Control is installed on the AllSky/Weather Computer.
Port Name Device
WeatherStn Weather Station Hub
AllSky Cam Occulus AllSky Camera
ObsCam ObsCam HD
Camera
G Drive
USB Hard Drive
Empty
None
ASCOM Tests
Testing then proceeded with testing of
ASCOM Switch Connection and UCH Operation
- Switch Driver :
ASCOM.UCH.Switch
- Switch Name : Pegasus Astro - USB Control
Hub
- Discovered that the Hub can be operated from either Pegasus Astro
UCH Software or from an ASCOM switch client but
not both at the same time. (They each require sole access !)
- Tested a client connection to the USB Control Hub using
ASCOM.UCH.Switch, and demonstrated that a particular port could be turned on
/ off from the client
(existing client switch test routines &
buttons/fields in AstroMain were adpated for the testing)
- It should
be noted that USB Port 1 is accessed via Switch 0 (with USB Port 2,3,4,5,6
being accessed via Switch 1,2,3,4,5)
- Client reports that the UCH
has 7 switches though obviously there are only 6 accessible USB Ports.
It's not clear if the 7th port is because the UCH is based on a controller
that can take up to USB port but only 6 are used, or it represents a
capability to collectively turn off/on all ports .
- Names and
descriptions of switches returned by the Switch.GetSwitchName(id) and
Switch.GetSwitchDescription(id) methods reflect 'hard-coded' names like 'USB
Port 1' rather than the nicknames given to switches in Pegasus UCH Software
(eg. 'AllSky Cam') . Nicknames are not written to the UCH's eeprom.
- Following Log was collected.
USB Control Hub 2021-10-16 00:22 (Local)
Connected True
Name USB Control Hub
Description Pegasus Astro - USB Control Hub
Driver Info Version: 6.4
Driver Version 6.4
Interface Version 2
No. Switches 7
Supported Actions
Switch 1 Switch 1 (id=0)
Name USB3 Port 1
Description USB3 Port 1
Min-Max 0 - 1 (step 1)
Can Write True
Switch State False
Switch 2 Switch 2 (id=1)
Name USB3 Port 2
Description USB3 Port 2
Min-Max 0 - 1 (step 1)
Can Write True
Switch State True
Switch 3 Switch 3 (id=2)
Name USB3 Port 3
Description USB3 Port 3
Min-Max 0 - 1 (step 1)
Can Write True
Switch State False
Switch 4 Switch 4 (id=3)
Name USB3 Port 4
Description USB3 Port 4
Min-Max 0 - 1 (step 1)
Can Write True
Switch State False
Switch 5 Switch 5 (id=4)
Name USB3 Port 5
Description USB3 Port 5
Min-Max 0 - 1 (step 1)
Can Write True
Switch State False
Exception Method GetSwitchValue is not implemented in this driver.
Switch 6 Switch 6 (id=5)
Name USB3 Port 6
Description USB3 Port 6
Min-Max 0 - 1 (step 1)
Can Write True
Switch State False
Exception Method GetSwitchValue is not implemented in this driver.
Switch 7 Switch 7 (id=6)
Name USB Bus Voltage
Description USB Bus Voltage
Min-Max 0 - 1 (step 1)
Can Write False
Switch State True
It's unclear without checking the client code whether the two 'GetSwitchValue is not implemented in this driver' exceptions relate to Ports 5 & 6 (a possible carry over from code fixes in early versions of UCH) or they relate to Ports 6 & 7. GetSwitch value is not critical for two value (0 / 1) switches anyways since the switch position is normally accessed using Switch.GetState(id) and set using Switch.SetState(id, bool)
Back to Top
USB Control Hub
A Pegasus Astro USB Control Hub (UCH)
was installed in the observatory today (2021-10-16) where it replaces an
existing standard 4 port USB Hub attached to AllSky/Weather computer
Details about the Control Hub, it's initial testing and its planned role is
described in the section above (see Pegasus
Astro USB Control Hub, 2021-10-15).
Software & Drivers
USB Drivers, and the Pegasus UCH
Software were downloaded and installed from Pegasus Astro's Software &
Documentation Page
https://pegasusastro.com/downloads/
Opportunity was taken to
upgrade the computer's ASCOM Platform from 6.5 to 6.5SP1, after which the
Pegasus UCH Ascom driver was installed.
Setup
The
Pegasus UCH Software was used to setup Port Names and the Default Power
States at Startup.
Port No
(Switch ID)
Port Name Device
1
(0)
AllSky Cam Occulus AllSky Camera
2
(1)
WeatherStn Weather Station Hub
3
(2)
Cloud Sens Aurora/Eurotech Cloud Sensor III
4
(3)
ObsCam ObsCam HD
Camera
5
(4)
G Drive
USB Hard Drive
6
(5)
Empty
None
Next Steps
Update 2021-12-06
An USB powered 'Laptop' Light was added to the USB Control Hub using the
previously vacant 6th USB Port
A 'Aux.Light' button added
to AstroObsCam program (v1.8) to allow the USB light to be toggled on/off.
This is designed to allow a colour image of the Observatory Interior to be
seen, which may be useful for identifying/confirming positions of objects
and equipment in the Observatory. This follows an incident during
session S939 when the rubber strip around the interior flnage of the
observatory roof peeled off during the session and caused an incident.
An object was seen on 4 frames from the ObsCam images at the time but it
wasn't possible to identify the object on the camera's black/white night
time images.
Whilst the control of USB Light from AstroObsCam works, the light itself is found to be too dim to activate the ObsCam Camera into 'daylight mode' and it continues imaging in night time (b/w mode)
Back to Top
| This Web Page: | Notes - Session 926A (2021-10-15) |
| Last Updated : | 2024-03-23 |
| Site Owner : | David Richards |
| Home Page : | David's Astronomy Web Site |