David's Astronomy Pages
Notes - Session 637 (2018-11-15)
Notes
(S636)
Notes
Main
Home
Page
Notes
(S638)
David's Astronomy Pages
|
Notes (S636) |
Notes Main |
Home Page |
Notes (S638) |
Main aims
Equipment & Software
Highlights
Lowlights
Summary Plots & Logs
|
Observing Result (2018-11-15, S637) Observatory opened at 18:10. Observatory Manager set to Auto at 18:18 Run bborted at 18:20 with communication issue with telescope and Com Port Issue with Dome Computer reboot at 18:40. Attempted automated run at 18:48 to 19:16 (unsuccesful due to Scope Comms Issue) Slew Tests 19:17 to 19:25. Focusing Tests 19:32 to 20:53 Observatory Manager closed shutter at 20:54 (critical cloud conditions) Focusing Tests 22:24 to 23:20 Observatory Manager closed shutter at 23:25 (critical cloud conditions) Session ended at 00:30 (scope/dome parked by manual command) . |
|
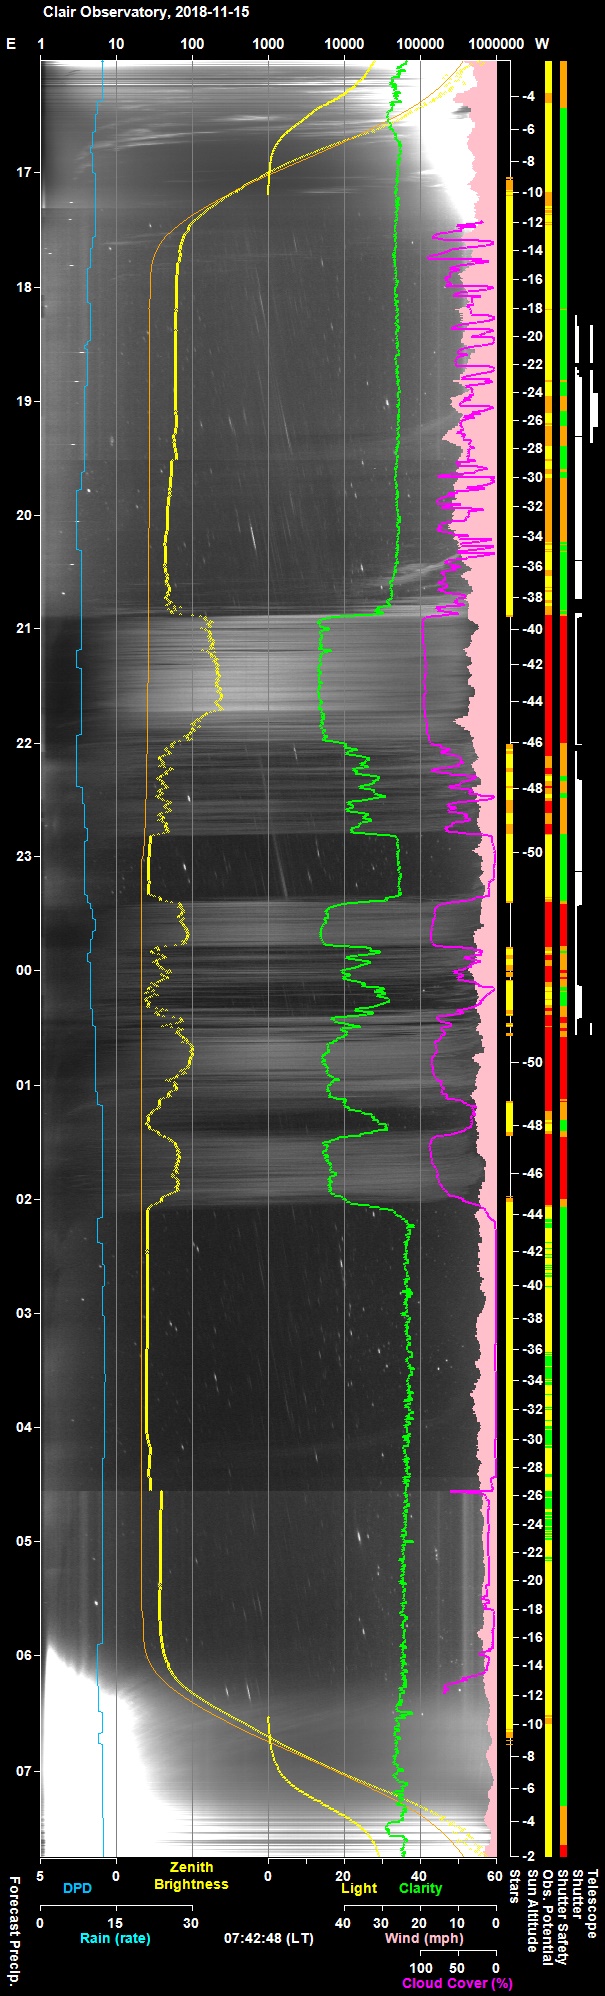
Night Sky Summary Plot -
2018-11-15 Top axis: Sky Brightness at Zenith (in ADU/s) Lefthand axis: Local Time (hh LT). Righthand axis: Sun Altitude (degs) Shutter/Telescope columns missing unfortunatelly (the 'TP Service' was accidently not engaged). |
 |
Back to Top
Illustrations - Screen captures illustrating particular issues from session :
|
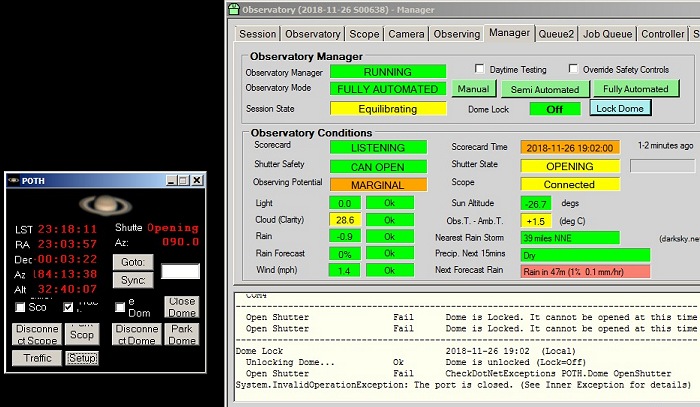
Fig 1: POTH. Dome Exception whilst attempting an 'open shutter'
operation at 18:20 'System.InvalidOperationsException. The port is closed' |
 |
|
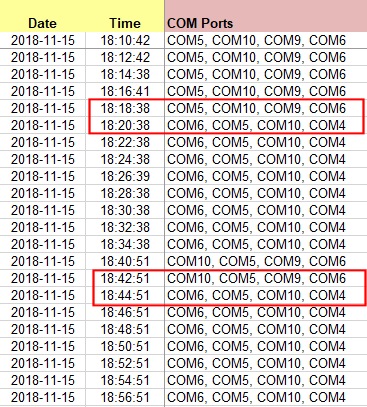
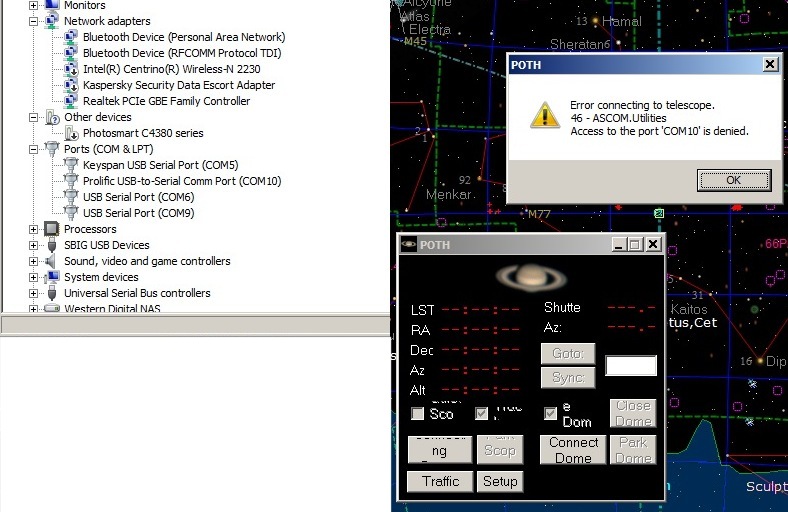
Fig 2: COM Port Monitoring shows unexplained switching of Dome
Port at 18:20 Switch occurs from normal port (COM9) port to another Port (COM4) (the switch in ports was repeated later on at ~18:43, around 8-10 minutes after a reboot that had reset the Dome Port to COM9) |
 |
|
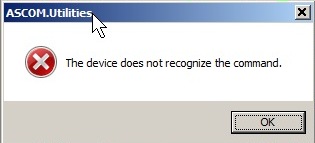
Fig 3: TheSky6. Ascom Utilities Message at 18:34 'The device does not recognise the command' |
 |
|
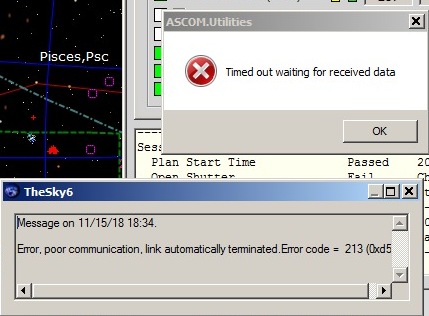
Fig 4: TheSky6 Error Messages showing at 18:35 'Timed out waiting for received data' & 'Error. Poor Communication.. Error Code 213' |
 |
|
Fig 5: Further TheSky6. Ascom Utilities Messages at
21:59 Multiple windows : 'The device does not recognise the command' |
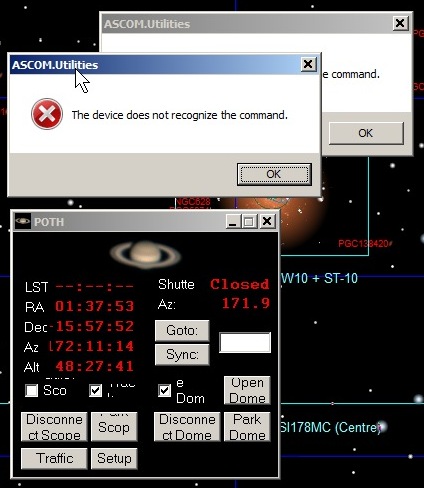 |
| Fig 6: POTH Error - Access to COM port is denied at 22:03 Error conecting to telescope. 46 ASCOM Utilities. Access to the port 'COM 10' is denied |
 |
|
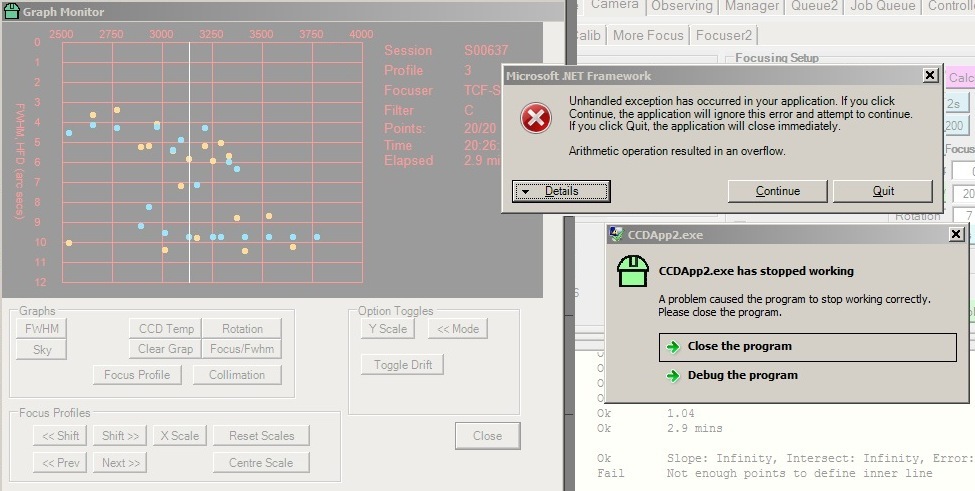
Fig 7: CCDApp2 crash due to unhandled exception whilst created
a Focus Profile / HFD Lines at 20:30 (quick code fix made and session resumed at ....) several HFD points with same value of 9.72" correspond to 'bad placed' stars (see following issue 'Focus Images not being centered on star') |
 |
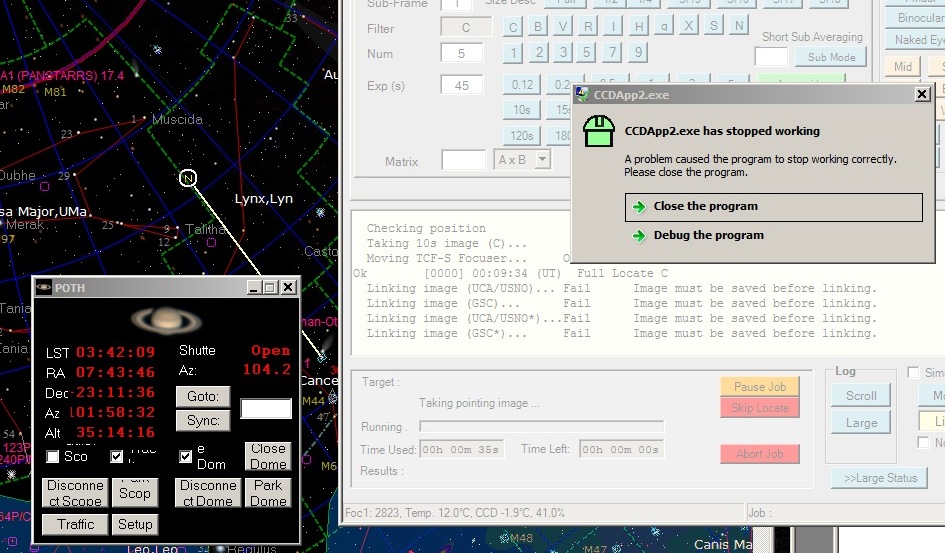
| Fig 8: CCDApp2 program crashed whilst attempting to link a 10s Image at 00:10 |
 |
|
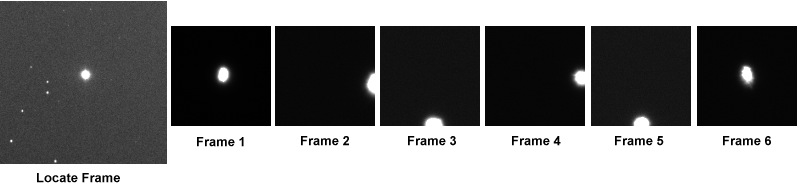
Fig 9: Sequence of frames showing Focus Box Positioning Problem
Example at 22:28 (example below was whilst performing a focus profile with SBIG Camera via CCDSoft) |
 |
|
Fig 10: Obs. Viewer showing Red Cross briefly when the window
was uncovered at 22:07 |
 |
Back to Top
A bug was introduced in CCDApp2's autofocusing code between sessions S635 and S637 as a consequence of adding new code to accomodate the focusing of a second focuser and associated imaging using a second connected camera. The problem is clearly demonstrated in the following sequence of images taken during the attempted focusing of a star using original focuser/camera system (TCF-S focuser & SBIG ST-10XME camera). The code is intended to keep the star centered in the focusing frame, by adjusting the image box position (XORGSUBF & YORGSUBF) using the star position in the previous frame, but the star in frames below is being maintained in the centre but is junmping to the right of the image.
|
|
|
Locate Frame: 3x3, 1s
(Snap.2228.08.autopick_star, cropped in above composite) Frame 1: 1x1, 100x100 box, 1s (initial frame for exposure adjustment) Frames 2 to 6: 1x1, 100x100 box, 0.3s (frames aqcuired whilst changing focus position & adjusting box position) 12" LX200R (at f/10.4) + ST-10XME |
The problem didn't a seem to look like either an atmospheric, telescope vibration, or telescope tracking issue. Indeed calculating the 'absolute' pixel position (XORGSUBF + StarX, YORGSUBF + StarY) for each image showing the star was lying at the same position within 2 or 3 pixels, showing that problem was the associated with modifying the box position between frames. Identification of star, transfer of star x,y position and initial box position work fine showing that the fundamental parts of the routine were still robust.
Examining the operation in more detail then, we note that the modified box position should be calculated as follows
New_XORGSUBF = XORGSUBF + StarX - BoxSize/2
New_YORGSUBF =
YORGSUBF + StarY - BoxSize/2
where ImageBox size is 100 in our case
above
Between Frame 1 and 2 where star has jumped to the right but remained centred in the up/down direction, XORGSUBF (which should be basically unchanged as the star is reasonably centered in Frame1) has been decreased by 50 pixels. This could have happen if the code had executed
New_XORGSUBF = XORGSUBF + StarX - 100
New_YORGSUBF = YORGSUBF + StarY -
100/2
or
New_XORGSUBF = XORGSUBF + StarX - 200/2
New_YORGSUBF =
YORGSUBF + StarY - 100/2
Between Frame 2 and 3 where star has jumped to the bottom but became recentred in the left/righ direction, YORGSUBF (which should be basically unchanged as the star is reasonably centered vertically in Frame2) has been decreased by 50 pixels. This could have happen if the code had executed
New_XORGSUBF = XORGSUBF + StarX - 100/2
New_YORGSUBF = YORGSUBF + StarY -
100
or
New_XORGSUBF = XORGSUBF + StarX - 100/2
New_YORGSUBF =
YORGSUBF + StarY - 200/2
Between Frame 3 and 4 where star has jumped to the right but became recentred in the up/down direction, XORGSUBF (which should be basically unchanged as the star is reasonably centered laterally in Frame3) has been decreased by 50 pixels. This could have happen if the code had executed
New_XORGSUBF = XORGSUBF + StarX - 100
New_YORGSUBF = YORGSUBF + StarY -
100/2
or
New_XORGSUBF = XORGSUBF + StarX - 200/2
New_YORGSUBF =
YORGSUBF + StarY - 100/2
This is the same as between frames 1 and 2. Likewise "4 to 5" is same as "2 to 3". There is no evidence that StarX and StarY are incorrectly used in the code or that their values are getting swapped over in a consistent way.
What about "5 to 6", that looks different ?
Between Frame 5 and 6 where star has recentred in the up/down direction and remaining centered in left/right direction, this could only happen if the code had executed the 'correct' code :
New_XORGSUBF = XORGSUBF + StarX - 100/2
New_YORGSUBF = YORGSUBF + StarY -
100/2
The next 13 frames (ie Frames 7 to 20) are normal with the star reasonably well centered in each frame.
On a different focusing run the star didn't settle down after first 6 frames, but kept jumping between centre, right and bottom until the star was eventually lost.
Since the divisor (2) to the image box size is hardcoded the implication seems to be that ImageBox Size is varying during code execution, but not in a consistent way. When it changes it happens between calculating New_XORGSUBF and New_YORGSUBF which are adjacent line of code (I think). Is a thread changing BoxSize ?
Box Size is potentially obtained in one of 2 ways :
a) by reading the
Input Form field txtFocBoxSize
BoxSize =
CInt(objConsole.txtFocBoxSize.Text)
where
txtFocBoxSize is set by the user typing in a new number or more usually by
clicking a '100', 150', or '200' button to set the field via SetFocBoxSize
routine
b) by taking a setting that is hard-coded
BoxSize = 100
The situation is further complicated because the "RunAutoPickFocusStar"
routine, which formerly got BoxSize from txtFocBoxSize field, now sets
box size to 100 and then updates txtFocBoxSize field with
this hard-coded number
' BoxSize =
CInt(objConsole.txtFocBoxSize.Text)
BoxSize = 100
objConsole.txtFocBoxSize.Text = CStr(BoxSize)
In theory this code should have ensure that a consistent BoxSize of 100 was being used regardless of where BoxSize value was being read from.
Image Box Position is being modified in the routine 'ModifyImageBoxPosition()' (or 'ModifyImageBoxPositionCam2()' for the handling the second camera via ASCOM)
XORGSUBF & YORGSUBF are Subframe origin according to Image Binning
Subframe Box (position and size) is applied by setting Camera.SubFrameLeft, Camera.SubFrameRight, Camera.SubFrameTop & Camera.SubFrameBottom according to Camera pixels (ie 1x1) and therefore it is also feasible for a bug to creep in whilst changing XORGSUBF, YORGSUBF, StarX, StarY, BoxSize from Image pixels values (at 1x1, 2x2 or 3x3 binning) to Native Camera pixels (at 1x1).
Another possible source of the bug is if inappropriate values are being used for StarX, StarY in the event that inappropriate values are being used for Bin in the code lines that set StarX and StarY . However this seems unlikely since B is taken directly from the Image.
Bin = Image.FitsKeyword("CCDXBIN")
StarX = gBrightestX * Bin
StarY = gBrightestY * Bin
Looking again at the flow of code (see below), there is no obvious line or point which seems to be responsible for the problem seen, since the code is hardcoded to use 100x100 Box Size
RunTakeQuickFocusShot    [ running with
gFocusSystem = 1 ]
Camera.BinX = CInt(Me.txtFocBin.Text)
Camera.BinY =
CInt(Me.txtFocBin.Text)

TakeFocusImage
    SaveBin = Camera.BinX
    Camera.TakeImage()
     Camera.BinX = SaveBin

Camera.BinY = SaveBin
AnalyseFocusImage
    Image.Path = SessionFolder + "\_FOCUS\" + FileName

Image.Save()

    GetInventoryDetails

sets gBrightestX, gBrightestY,  BrightestFWHM


ModifyImageBoxPosition()
        BoxSize = 100

        XOrigin =
Image.FitsKeyword("XORGSUBF")

YOrigin = Image.FitsKeyword("YORGSUBF")

Bin = Image.FitsKeyword("CCDXBIN")


StarX = gBrightestX * Bin
        StarY =
gBrightestY * Bin

        x1 =
Math.Round(XOrigin + StarX - BoxSize / 2)

y1 = Math.Round(YOrigin + StarY - BoxSize / 2)


x2 = x1 + BoxSize
        y2 = y1 +
BoxSize

        Camera.SubFrame = 1 '
True
        Camera.SubFrameLeft = x1

Camera.SubFrameRight = x2


Camera.SubFrameTop = y1

Camera.SubFrameBottom = y2

(<< Loop Back)
Options are
1) Log key changes and data to logfile.
2) improve the
code to make it more correct (and more able to work correctly at binning of 2 or
3) and with user defined Box Size
Both options were implemented
Back to Top
The standard GroupBox component has a clear well defined border in applications run on Windows 7, but on Windows 10 the border is almost invisible. Border colour is not accesible as a property that be changed during design or run time. Annoyed by this situation, a bit of internet searching and trial coding showed a solution, allowing a MyGroupBox component to be built and used with a black default border colour
1) From VIsual Studio (2017) create a new project (MyComponents), and add a class (MyGroupBox) that inherits from GroupBox, but with special handling for border colour, including Paint. See code below. Compile the project.
2) Go to ToolBox and right click Choose Items, select MyGroupBox from the long list. This appears in the Toolbox/General Tab allowing it to be added to any form. (The General Tab can be renamed if needed)
3) For new projects and additions to existing projects we simply drop
the MyGroupBox component onto For existing projects were we need to
retrospectively change existing GroupBox instances with MyGroupBox instances, firstly create a backup copy of the project .
Then edit each 'Designer.vb' file from the project in a text editor.
Carefully replace each "System.Windows.Forms.GroupBox" by
"MyComponents.MyGroupBox" (can be done as a global replace)
4) Compile project. This will add several files prefixed MyComponents (e.g. MyComponents.exe, MyComponents.exe.config, MyComponents.pdb) to the bin / debug folder
4) If copying executables from one computer to another (eg. Development Computer to the Observatory Computer) it is important that the files prefixed MyComponent are copied as well.
MyGroupBox Class
(based on Zhi-Xin Ye' code at
https://social.msdn.microsoft.com/Forums/windows/en-US/cfd34dd1-b6e5-4b56-9901-0dc3d2ca5788/changing-border-color-of-groupbox
)
Public Class MyGroupBox
' ====================
Inherits GroupBox

Private borderColor2 As
Color

Public Sub New()
'==============
  MyBase.New
  Me.borderColor = Color.Black

End Sub

Public Property BorderColor As Color

'==========================
  Get
    Return
Me.borderColor2
  End Get
  Set
    Me.borderColor2 = Value
  End Set
End
Property

Protected Overrides Sub OnPaint(ByVal e As PaintEventArgs)

'==============================


Dim tSize As Size = TextRenderer.MeasureText(Me.Text, Me.Font)
  Dim borderRect
As Rectangle = e.ClipRectangle
  borderRect.Y = (borderRect.Y +
(tSize.Height / 2))
  borderRect.Height = (borderRect.Height -
(tSize.Height / 2))
  ControlPaint.DrawBorder(e.Graphics, borderRect,
Me.borderColor, ButtonBorderStyle.Solid)

  Dim textRect As Rectangle =
e.ClipRectangle
  textRect.X = (textRect.X + 6)
  textRect.Width = tSize.Width


textRect.Height = tSize.Height
  e.Graphics.FillRectangle(New
SolidBrush(Me.BackColor), textRect)
  e.Graphics.DrawString(Me.Text, Me.Font,
New SolidBrush(Me.ForeColor), textRect)
End Sub

End Class
Back to Top
To improve the presentation and manageability of the various VB.Net programs
that I use for astronomical use they will be gradually brought together under
"AstroSuite' umbrella term, for my sole private used. [ goto
AstroSuite Web Page for up to date information ]
(This
term and its reference in my website pages should not to be confused with any
other ASTRO Suite , Astro Suite or AstroSuite products or brands. Some companies
or research projects called 'astro' have nothing to do with Astronomy, ( e.g.
one lies field of web services and service-oriented applications, with a
focus on the integration of business processes that are distributed among
disparate entities) or are related to Astrology )
I'm aware that some of the intended names are the names of existing software developed by other Astronomers or Astronomical Software Companies (My use is not a case of copying the name but a result of convergent evolution. I'm looking for a AstroName for my own tool for astronomical observation planning/scheduling but note there is noth an existing AstroPlanner shareware application (by AstroPlanner.net) and AstroScheduler software (by SkyMonsters.net).
Currently programs have imprecise, non related or legacy names, such as CCDApp2, CCDApp3_AllSky, WeatherStationRepeater, SqlForm2 & ObservatoryOverSeer, but these will change to AstroMain?, AstroAllSky, AstroWeather, AstroSchedular, and AstroOverseer.
So for example my "CCDApp3_AllSky" program will change as AstroAllSky. It's VB.Net project name will stay as "CCDApp3_AllSky" at least in the medium term since project names are rather tricky to change in VS2017. In the short term the program executable will stay as "CCDApp3_AllSky.exe", but will change to "AstroAllSky.exe" and be 'published' in an AstroAllSky program folder through a change process
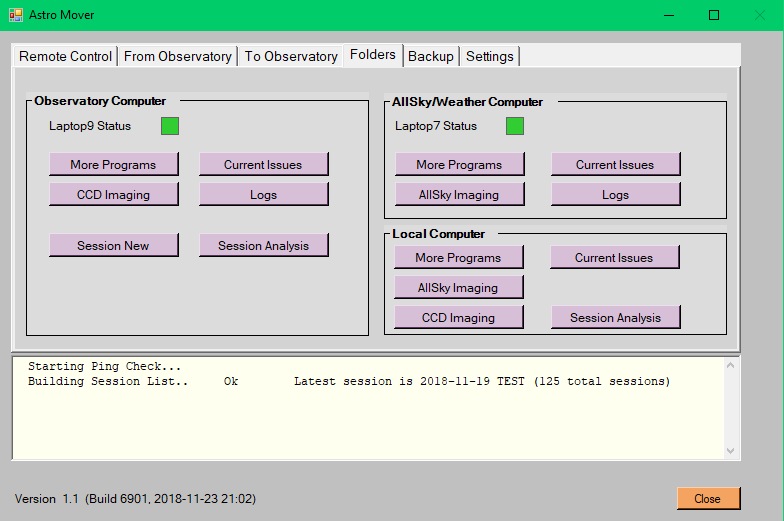
Two new programs are currently being introduced AstroLoader and AstroMover. These are utility programs that simplify the launching of observatory software, including automated start-up of programs on reboot (AstroLoader), and enable the efficient transfer of files and software across various computers on the LAN (AstroMover)
AstroSuite umbrella also includes AstroRichweb (astro-richweb website) and AstroDatabase (Sqlite database of targets, plans projects etc)
The names of the AstroSuite programs may still change, its a case of deciding which word best encapsulates the function(s) of each program (AstroScheduler or AstroPlanner, AstroLoader or AstroLauncher, AstroCCDApp2 or AstroMain / AstroController / AstroObserver ) . There is an exist AstroPlanner product so I might
| Program (Working Name) |
Program (Final Name) |
Primes Function(s) | VS2017 Project | Executable Previous | Executable Future |
| AstroCCDApp2 | AstroMain | Observatory Control / Data Analysis | CCDApp2 | CCDApp2.exe | AstroMain.exe |
| AstroAllSky | AstroAllSky | AllSky Imaging & Safety Monitor | CCDApp3_AllSky | CCDApp3_AllSky.exe | AstroAllSky.exe |
| AstroWeather | AstroWeather | Weather Server & Data Graphing | WeatherStationRepeater | WeatherServer.exe | AstroWeather.exe |
| AstroSchedular | AstroPlan | Observing Targets & Schedule Building | SqlForm2 | ObservingTool.exe | AstroPlan |
| AstroLoader | AstroLaunch | Observatory Startup & Software Launching | AstroLoader | AstroLoader.exe | AstroLaunch.exe |
| AstroMover | AstroMove | File and Software Transfer across LAN | AstroMover | AstroMover.exe | AstroMove.exe |
| AstroOverseer | AstroGuard | Observatory Safety Second Defence | ObservatoryOverSeer | ObservatoryOverSeer.exe | AstroGuard.exe |
|
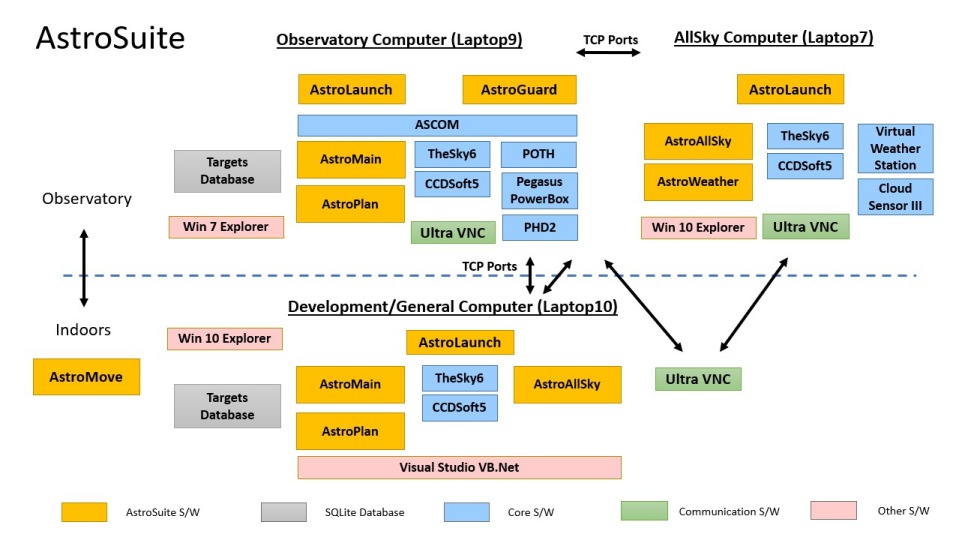
Diagram showing deployment of AstroSuite Programs across
the Home Network |
 |
|
|
|
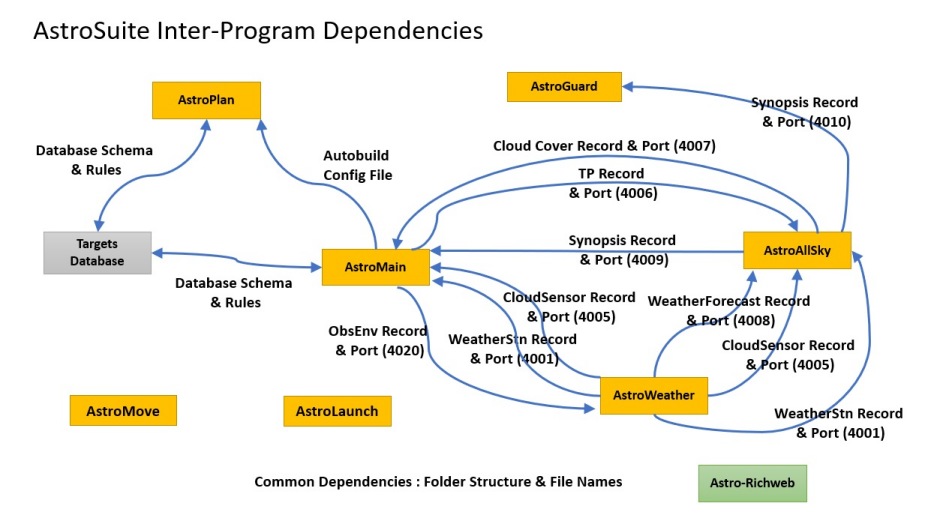
Diagram showing the interdependancies between the
various AstroSuite Programs |
 |
Back to Top
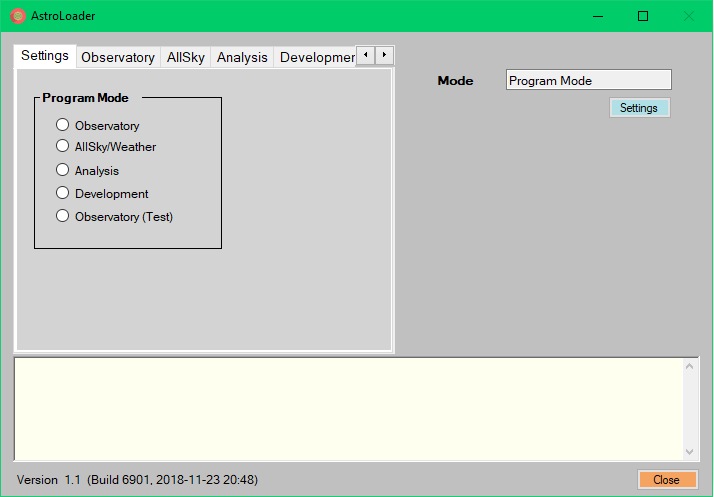
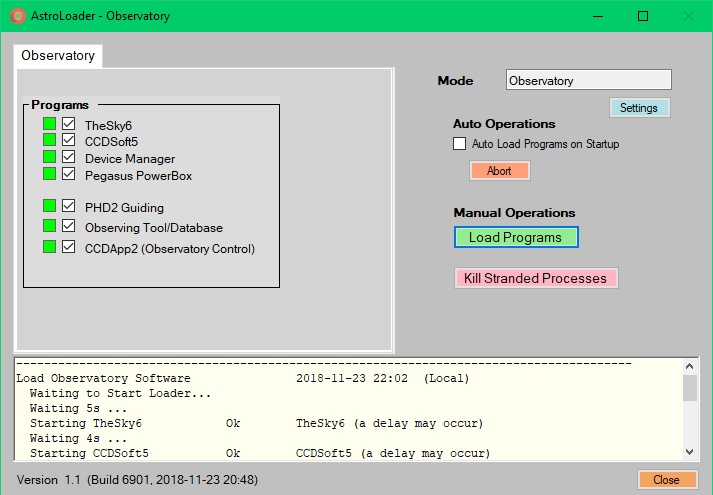
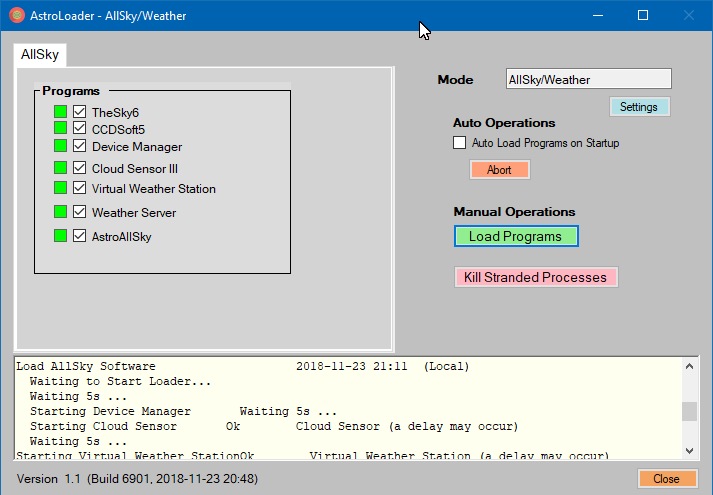
AstroLaunch is a new utility program that is designed to simplify the launching of various observatory software, including the automated start-up of programs on computer reboot. The program will sit on several computers (Observatory, AllSky and Development/General)
The program operates in one of several different modes depending on the
computer it is located on and the services required. For example
- Observatory Mode (for Observatory Computer)
-
AllSky/Weather Mode (for AllSky Computer)
- Analysis Mode
(for Development/General Computer)
- Development Mode
(for Development/General Computer)
- Test Mode
(for Development/General Computer & Observatory Computer)
Progam mode is set on a 'Settings' tab. AutoLoading of Software upon program start-up can be enabled or disabled. If autoloading is enabled the launch process can still be aborted (on not run) within the first 5 seconds after program start-up.
Some screenshots are shown below:
| AstroLaunch (Various Screenshots) |
 |
 |
 |
Back to Top
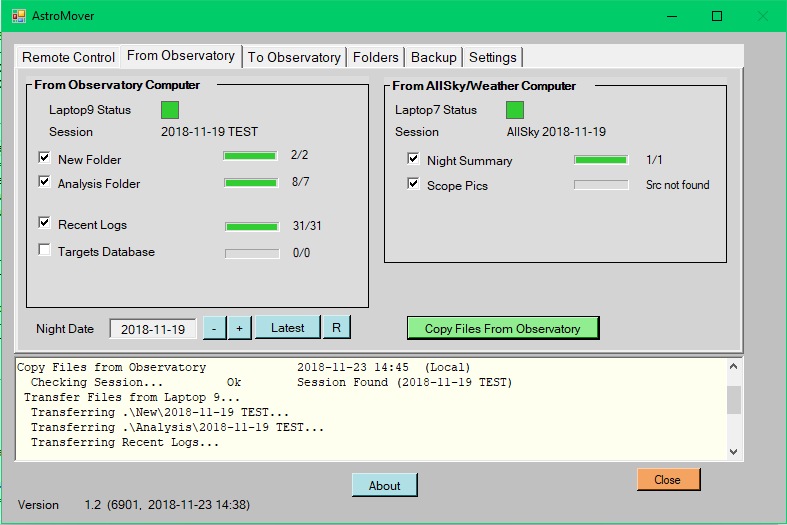
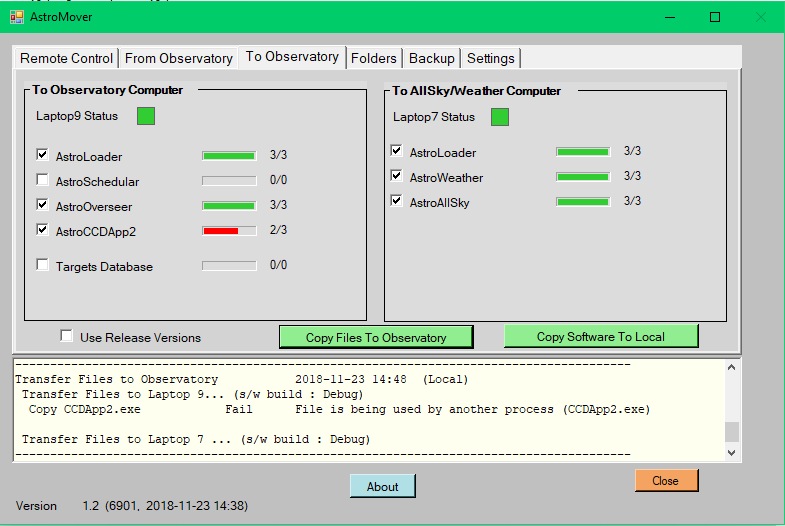
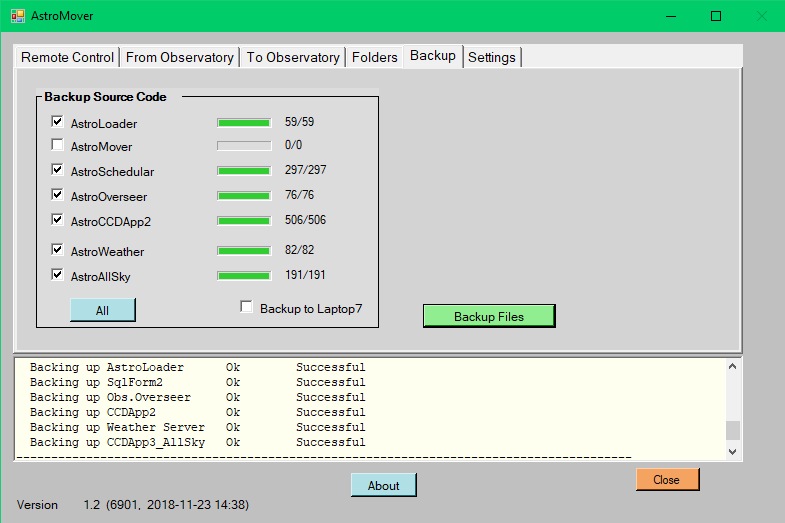
AstroMove is a new utility program that is designed to enable the efficient transfer of files and software across various computers on the LAN. The program also enables the launching of explorer windows to access files on the local and networked computers, and the lauchning of UltraVNC remote connections, and the backup of certain folder (such as various VB.Net projects)
The program will sit on the main Development/General Computer with files
pushed to and pulled from the Observatory and AllSky Computers. The
program has a a number of tabs for performing different operations:
-
From Observatory (for pulling particular key files and data
from the observatory computers)
- To Observatory (for
pushing particular key files and data to the observatory computers)
-
Folders (short cuts to various folders on the local and observatory
computers)
- Backup (for backing up databases and software
projects)
- Remote Control (shortcuts for launching UltraVNC
connections to observatory computers)
Backup of software projects can be made locally, to a relevant (BackUp Copies) folder, or externally to a network computer, dependant on a checkbox setting
Software can be 'published' from either a projects Debug or Release Configuration, dependant on a checkbox setting.
Some screenshots are shown below:
|
AstroMove (Various Screenshots) |
 |
 |
 |
 |
Back to Top
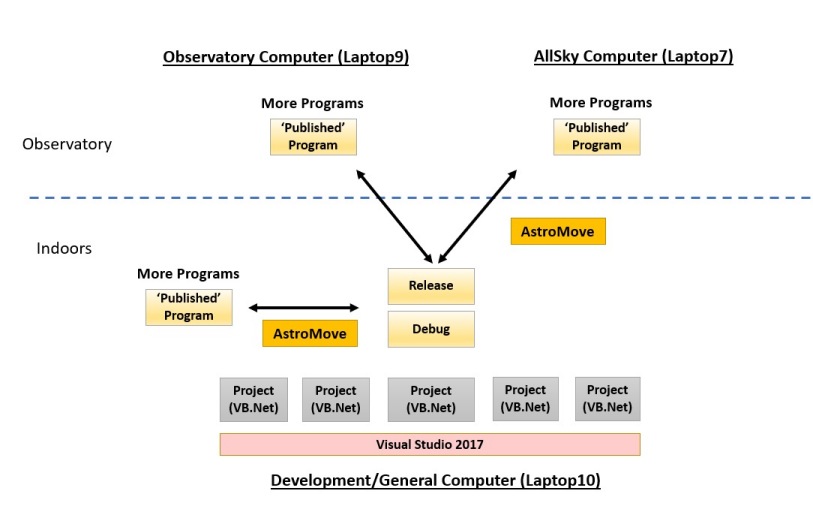
The conceptual flow path from development through to deployment on Local
Computer and Observatory Computers is illustrated below.
All programs
are standalone .EXE programs (with a few associated DLL files), which don't
depend on a windows installation / registration process.
Updating a program
is normally involves no more than copying in a new .EXE file.
 |
Back to Top
Apart from my AllSky program (where I have given copies to a few fellow astronomers and therefore needed to have some form of version control), I haven't worried too much about version control (the latest version is the most recently built executable). However since some of software depend on common data formats and I'm now building/developing software on a separate computer to the ones running the software in the observatory, it is probably important to begin implement ing more systematic software versioning.
In Visual Studio version information for an assembly consists of the
following four values:
- Major Version
- Minor Version
- Build Number
- Revision
Version Number (comprising major and minor parts) are best set by the programmer in the Project Properties under Application/Assembly Information (e.g. 1.3)
Whilst Build (comprising build number and revision) can be set by the user, it is easiest for it to be created automatically. In this case the build element reflects the number of days since January 1, 2000 and the revision element reflects the number of seconds since midnight divided by two (2).
Setting the Build Number to be created automatically was done by changing the third part of the Assembly Version to a wildcard (*) in the project's "AssemblyInfo.vb" file and by removing/commenting out AssemblyFileVersion.
<Assembly: AssemblyVersion("1.3.*")>
' <Assembly:
AssemblyFileVersion("1.0.0.0")>
Initially VS2017 wouldn't accept using wildcard in this manner (a build error
was given saying that I was using an incorrect format). After some on-line
research I discovered that this could be solved by changing the project to not
use 'Deterministic' builds, by having changing the Deterministic setting
in the project's .vbproj file from 'true' to 'false' :
<Deterministic>false</Deterministic>
Program Version can be accessed and displayed within a VB.Net program as follows:
Sub GetVersionInfo(ByRef Version As String, ByRef Build As String,
ByRef BuildDate As String)
'===============
    Dim
RefDate As Date = DateTime.Parse("2000-Jan-01")
    Dim
BuildDateX As Date

    Dim BuildInfo As FileVersionInfo =
FileVersionInfo.GetVersionInfo(Application.ExecutablePath)


' Get Version Number
    ' ------------------

Version = CStr(BuildInfo.ProductMajorPart) + "." +
CStr(BuildInfo.ProductMinorPart)

    ' Get Build Number

' ----------------
    Build = BuildInfo.ProductBuildPart


    'Get Build Date & Time
    '
--------------------
    BuildDateX =
RefDate.AddDays(BuildInfo.ProductBuildPart).AddSeconds(BuildInfo.ProductPrivatePart
* 2)
    BuildDate = BuildDateX.ToString("yyyy-MM-dd
HH:ss")

End Sub


Sub DisplayVersionNumber()
'=====================
Dim Version,
Build, BuildDate As String

    ' Get Version and Build
Information
    ' ---------------------------------

GetVersionInfo(Version, Build, BuildDate)

    ' Display
Version and Build on Form
    '
---------------------------------
     txtVersionNumber.Text = "Version
" + Version + " (Build " + Build + ", " + BuildDate + ")"


End Sub
|
Example of new Version Number Display (from the newly refactored AstroAllSky Application Window) |
|
|
Whilst the revision element is meant to reflect the number of seconds since midnight divided by two (2), it has been noticed that the value may be out by +/- 30 minutes or so. (I can understand why it might give a time slightly in the past , but it's unclear why it would sometimes suggest a time in the future)
Back to Top
AstroAllSky program (CCDApp3_AllSky) underwent some significant refactoring today, and is now running live without any observatory downtime or loss of data.
The program is an offshoot of an earlier version of my CCDApp2 (Observatory Control & Imaging) program and was separated off in order to focus just on AllSky Imaging and more recently on Weather Synopsis/Safety Scorecarding for the observatory. Whilst the AllSky Code had been removed in later version of CCDApp2, the opposite had not happened up until now due to lack of time and the potential risks to the successfull complilation and execution of the AllSky Imaging code due to the removal of many hundreds of lines of old lecacy CCDApp2 Telescope Imaging & Control and a large number of Windows Components & Code.
The final 'driver' for undertaking this refactoring task was the desire to remove the opening Main Menu Form (which just had AllSky option after the earlier hiding of other Observatory options) and to remove the Main TablControl bar (which just had AllSky Tab after the earlier hiding of other Observatory Tabs). This had now been accomplished - the previous Secondary TabControl (which had all the key AllSky Tabs on it ) is now elevated to being the primary TabControl.
The work was accomplished in a few hours involving the following steps:
- Backed up the latest working version of the code (Version 3.2)
-Deleted
all Tabs associated with the legacy functionality
- Deleted Event routines
which have lost there 'handles .... ' link to now deleted button and text box
fields etc.
- Deleted routines that are clearly assoicated with legacy
operations (code was previously grouped into regions which this task
easier
- Deleted secondary forms that are associated with legacy operations
- Deleted or comment out lines that remain as errors
- Eventually reached the
point that code can successfully compile. Tested that it can still run ok.
-
After fixing a few problems, then configure VS2017 Code Analysis (accessed via
Analyze/Config Code Analysis' menu option) to 'Avoid uncalled private code
(CA1811). This is shown under Managed Binary Analysis .
- Ran Code
Analysis and filtered the results on CA1811 to produce a list of Private methods
that are not called from any other code" (ie dead code).
- Went through
lolist and deleting the dead code or commented them out if they were worth
retaining in some form.
- Eventually the code was sufficiently clean athat it
could successfull recompile again.
- Program was then tested and some minor
issues resolved.
- Key initialisation code from the original opening Menu
Form was then taken into the Onload routine of the new Main Form (obsConsole),,
and the new main form set as the opening form in the project properties. The
TabControl2 was extracted from TabControl1, then TabControl1 was then deleted,
before finally fitting TabControl2 at the place that TabControl1 original sat.
Code repaired and tidied up.
- Code was recompiled, tested, and further flaws
resolved (problems traced back to either there being an odd subroutine that had
been accidently removed or ones that were not getting called from the new
modified initialisation / on load routine)
- Final testing of Version
3.3 to see that the program was functioning as it should
- Release
of program to the AllSky Computer, sitting in the Observatory for serious
live testing overnight.
[ The new AstroMove program was used to move the new code to the AllSky Computer. Normally the currently running AstroAllSky program has to be closed before the new code can be copied in (it's not possible to copy an .exe over an .exe which is currently executing, but I learnt a new trick today from an online post and that is to rename the .exe which is currently executing to a some temporary which allows the new .exe to be copied across in to its live location. The old version of the program can then be stopped and the new version immediately started without any downtime in data capture. ]
Update 2018-12-02
A bug was accidently introduced during
the refactoring which stopped the update of the CCDSoft Autosave Folder as the
start of each night and causing FITs images to be saved to an incorrect folder
rather than the intended folder. The bug was due to a subroutine with the
relevant code for setting Autosave folder being accidently dropped during
refactoring. The issue was identified and fixed on 2018-12-02 (released as
3.3.4)
Back to Top
The last attempted session on 2018-11-15 was affected by a POTH Dome Exception (COM Port Switching) issue that is a serious annoynance for attended operation and a showstopping issue of plannedl unattended operations.
During a new test today the same exception was again seen, but circumstances seemed sufficiently different that the may help the diagnosis of the underlying problem.
2018-11-26 Exception
 |
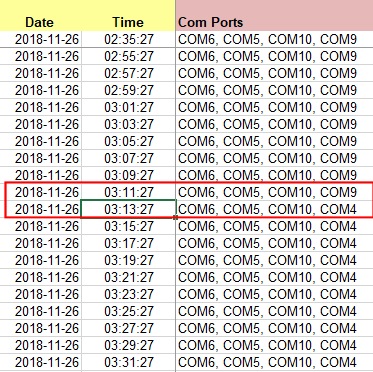
Unlike the "CheckDotNetException" exceptions at 2018-11-15 18:20 and 18:43, this time there was no associated switching in the Pulsar Dome's COM port. However reviewing COM ports records form the Observatory Monitoring service shows that the COM Port switched from COM9 to COM4 at some point between 03:11 and 03:13.
The was active remote connection to the observatory computer at around this time and software lock was placed on the observatory shutter at 03:15. There was a few minutes after the com port has switched.
Interpretating the timeline it seems that an ASCOM Dome object was created and connected to the Dome when the Dome was sitting COM9. Several hours later when AstroMain issued a command to open the Shutter it failed as COM9 port has closed (dome was no sitting on COM4). Creating a new Dome object using COM4 worked normally.
|
COM Port Monitoring shows unexplained switching of Dome
Port at 03:12 Switch occurs from normal port (COM9) port to another Port (COM4) (the switch in ports went unnoticed until it prevented an Open Shutter operation at 19:02 the following evening) |
 |
Way Forward.
- Try to understand the circumstancies that
seem to cause COM Port switching and see if they can be prevented
- Highlight
when COM Port Switching has happened , and use it is some form of smart or
corrective action
(data is already collected that can be evaulated to
show that a COM Port switch has happened)
Back to Top
After restarting AstroMain program and connecting to POTH.Dome, the Observatory Manager routine reported that it would close the Dome Shutter and immediately encountered a CheckDotNetExceptions exception at 16:15 with the message that the Port was closed.
2018-11-27 Incident
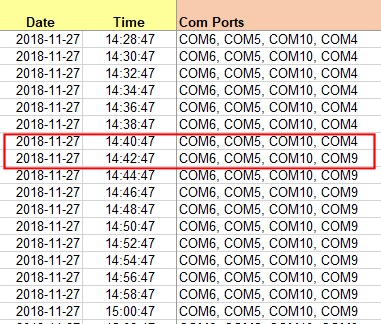
As with the incident on the previous day (2018-11-26) there was no associated switching in the Pulsar Dome's COM port at the time of incident (It was on COM9 before hand and was still on COM9 after the incident). However reviewing port monitoring records show that the COM Port has earlier switched from COM4 to COM9 for no obvious reason at 14:41. This was 50 minutes after observatory services were restarted at 01:51 and 92 minutes before the Dome Exception incident at 16:15
It seems there are two possible interpretations:
1) When POTH.Dome object was created and 'connected' at 16:15 it was done
with COM port properties set to COM4 (which was the COM port for the dome when
it was last set on the previous evening (2018-11-26 19:07). However this port
(COM4) became shut at 14:41 and the assignment of the Dome's USB-Serial Adapter
switched to COM9
When the POTH.Dome object was created all its
property values were set to zero/null etc. Normally properties (some of them)
would change to non-zero/non-null values etc if the Driver was correctly
connected to the real dome. For example ShutterStatus would be change to a value
of 1 corresponding to 'ShutterClosed', the normal state of the shutter before a
session starts)
However being assigned to a closed COM port number property values continued to be set at zero/null . When the Oobservator Manager read Dome.ShutterStatus it found a value of 0, that corresponds to the 'ShutterOpen' state. SInce Rain/Cloud Conditions were critical, the Observatory Manager immediately issue a command to Close the shutter (using Dome.CloseShutter method). But not being connected this produced the "CheckDotNetExceptions ... the Port is Closed" exception
2) The Observatory Manager read the shutter state and acted to close the observatory before the Dome milliseconds before it was fully connected. (Reading invalid data in someway the manager mistakenly percieved the shutter as being open, which is then tried to close)
Later indoor testing appeared to confirm interpretation 1.
|
COM Port Monitoring shows unexplained switching of Dome
Port at 14:41 Switch occurs from the 'secondary' port (COM4) port to normally used Port (COM9) (the switch in ports went unnoticed until it somehow prevented an automated Close Shutter operation at 16:15 |
 |
Way Forward.
- Continue to try to understand the circumstancies that
seem to cause COM Port switching and see if they can be prevented
- Highlight
when COM Port Switching has happened , and use it is some form of smart or
corrective action
(data is already collected that can be evaulated to
show that a COM Port switch has happened)
Back to Top
Way Forward.
Implementation of New Code
|
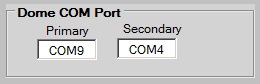
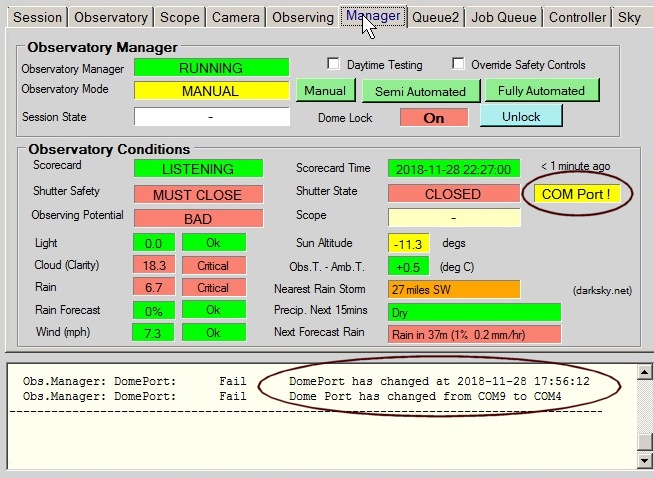
New Dome COM Port Fields in AstroMain Settings The port that the Pulsar Dome sits on when computer is booted up is entered in the primary field. The port that the Dome is observed to jump to is entered in the secondary field |
 |
|
New Dome Connection Code Code looks for the port currently associated with the Dome and uses that to update the 'Com Port' field in 'ASCOM.Pulsar_Observatories_Dome.Dome' profile before making the connecton to POTH.Dome This is done using ASCOM.Utilities.Profile - see code listing below and avoids having to manually go in via Chooser / Properties or via POTH.Hub , Set Up Dialog |
 |
|
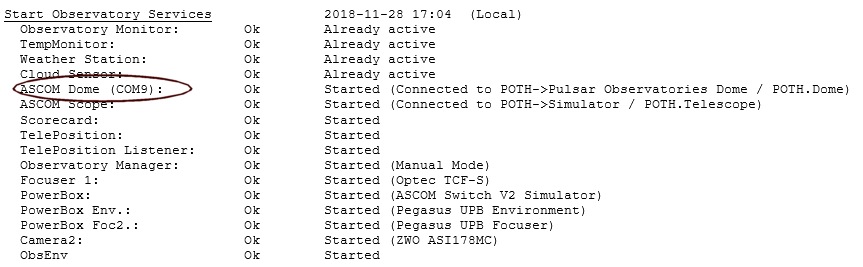
New Code to Check Connection Rather than simply setting 'Dome.Connected = True' and assuming that a connection has really been made the code now check that the properties are consistent with a real connection (ie to a real dome or a simulator) If a connection is not valid properties are likely to be all zero / false / null. We can examine Dome.CanPark which should be True, if it is False then we're probably dealing with an invalid connection' |
 |
|
Auto-Detecting changes in Port associated with Pulsar
Dome New Obs.Manager code has detected that the USB-Serial Port for the Dome has changed from what it was when it when the connection was made. The change in port is flagged in the program console and in flags on the Manager Tab (below) and the Observatory Viewer (further below) |
 |
|
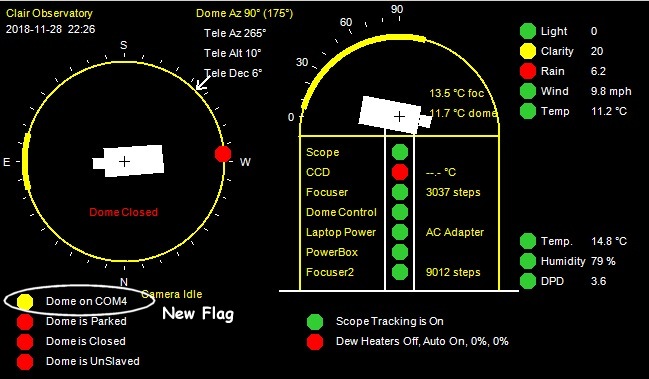
New COM Port Flag on Observatory Viewer Text shows that Dome is currently on COM4. The Yellow Flag indicates that the current port number is different to the one that the dome was connected on and therefore operations using the Dome instance are likely to fail or produce exceptions. |
 |
Code for setting the COM Port for Pulsar Dome prior to connection:
Sub SetPulsarDomePort(ByVal ComPort As String)

'================
  Dim ProfileContents As ASCOM.Utilities.ASCOMProfile
  Dim
Prof As ASCOM.Utilities.Profile

  Prof = New ASCOM.Utilities.Profile


Prof.DeviceType = "Dome"

  ' Exit if we don't have a ComPort to set
  '
-------------------------------------
  If ComPort = "" Then Exit Sub


  Try
    ' Retrieve Pulsar Dome Profile
    ' ----------------------------


Const MY_DOME As String = "ASCOM.Pulsar_Observatories_Dome.Dome"

    ProfileContents =
Prof.GetProfile(MY_DOME)

    ' Set Com Port

' ------------
    ProfileContents.SetValue("COM
Port", ComPort, "")

    ' Write the modified values back to the Profile store
using Profile.SetProfile
    '
---------------------------------------------------------------------------

    Prof.SetProfile(MY_DOME,
ProfileContents)

  Catch ex As Exception
  End Try

End Sub
Back to Top
| This Web Page: | Notes - Session 637 (2018-11-15) |
| Last Updated : | 2023-11-26 |
| Site Owner : | David Richards |
| Home Page : | David's Astronomy Web Site |
